Bob&Patty
Founders of SoCal Chapter
We have made several mods to the Horn over the last 2 months.
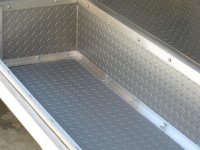
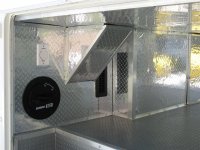
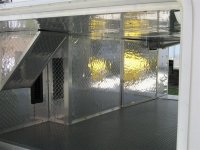
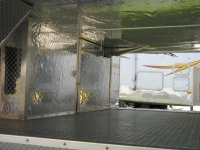
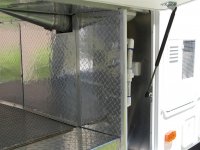
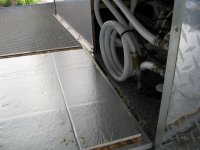
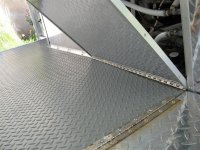
1st. was the basement. I didn't like the grey fuzzy stuff on the walls and I wanted to insulate the floor under the bedroom. I got the idea from Roger (uncle rog). I purchased a sheet of 2" and a sheet of 3/4" solid foam insulation from Lowes and glued them together. I cut them to fit between the beams and installed them (cut them just a little wider than the beams) and they will stay in place. You can use 2 1/2" drywall screws and washers to hold them. Thats where it went out of control. I really wanted to cover the insulation with thin plywood. So now what to do to make it look nice. I found a place on E-Bay that sold plastic chrome diamond plate in 24" wide by 40' long rolls. Great, the walls are only 23" high. I removed all the walls to install the ceiling. I cut the ceiling plywood to fit all the nooks and cranies and glued the plastic sheeting to it. Now one at a time i trimmed all the walls to fit and installed the sheeting to them. Wont do that again. As you can see by the pix, every wall has aluminum angle installed in all the corners. What a PITA. I also sealed every crack and crevis as I assembled it. I could see a lot of light showing through every where. the last thing was putting the access door to the back of the UCD on a piano hinge, another PITA and installed a slide bolt latch in the door.
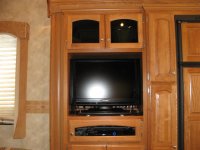
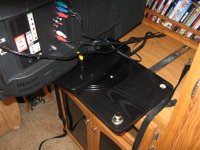
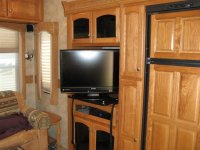
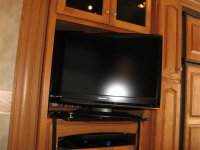
MOD #2 was the new TV mount(DW's idea I just had to make it work). We bought a new 32" HD-LCD, so it was my task to put drawer slides on a piece of wood and a lazy susan on the the TV stand and mount it to the wood. Well after a 3-4 hours of cussing and fussing . It all came together and it works good. It can be pulled out to be seen from the dining table or the couch. See pix. BTW, I (we) made a DVD holder to install behind the TV, now that we have room behind it now.
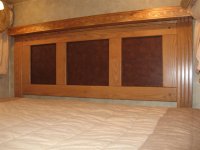
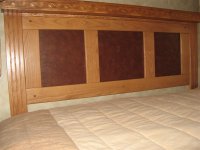
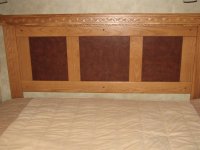
MOD #3. Headboard. We needed a place for our remotes (got tired of sleeping on them all night) and a water glass or two. Removed the headboard and cut off the tops of the 2 vertical pillars. There was also a piece of trim screwed to the top of the headboard between the pillars to remove. Then installed a piece of 1"X4" oak to the HB and screwed it to the tops of the pillars. I then used the 3 screws that held the trim piece on and fasted the 1x4 to the HB with them. I used some hardwood molding to make a box and a little piece of trim to finish it off. Stained it all and put some spray clear satin on the whole thing. AH HA, you thought it was done ,right? Wrong, DW went shopping and came back with a piece of lumber that looked like leather. Heaven knows where she got it, Joanns maybe. So I removed the nice stuff that HL put in the inserts, cut to fit the leather for the holes, glued and screwed it all together. BTW, I hope that the screws holding your HB on are better that ours. There were only 2 holding in place out of 6. It is now held on by 6 molly fasteners. Yes there are pix.
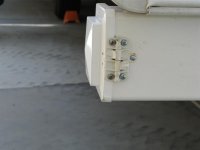
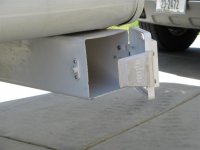
MOD #4 Using old cooler hinges and latches for the ladder tube made out of fence tubing. I have to give credit to Kenny (katkens) for the idea. Mine came off an old IGLOO cooler. The pix should tell the story.
1st. was the basement. I didn't like the grey fuzzy stuff on the walls and I wanted to insulate the floor under the bedroom. I got the idea from Roger (uncle rog). I purchased a sheet of 2" and a sheet of 3/4" solid foam insulation from Lowes and glued them together. I cut them to fit between the beams and installed them (cut them just a little wider than the beams) and they will stay in place. You can use 2 1/2" drywall screws and washers to hold them. Thats where it went out of control. I really wanted to cover the insulation with thin plywood. So now what to do to make it look nice. I found a place on E-Bay that sold plastic chrome diamond plate in 24" wide by 40' long rolls. Great, the walls are only 23" high. I removed all the walls to install the ceiling. I cut the ceiling plywood to fit all the nooks and cranies and glued the plastic sheeting to it. Now one at a time i trimmed all the walls to fit and installed the sheeting to them. Wont do that again. As you can see by the pix, every wall has aluminum angle installed in all the corners. What a PITA. I also sealed every crack and crevis as I assembled it. I could see a lot of light showing through every where. the last thing was putting the access door to the back of the UCD on a piano hinge, another PITA and installed a slide bolt latch in the door.
MOD #2 was the new TV mount(DW's idea I just had to make it work). We bought a new 32" HD-LCD, so it was my task to put drawer slides on a piece of wood and a lazy susan on the the TV stand and mount it to the wood. Well after a 3-4 hours of cussing and fussing . It all came together and it works good. It can be pulled out to be seen from the dining table or the couch. See pix. BTW, I (we) made a DVD holder to install behind the TV, now that we have room behind it now.
MOD #3. Headboard. We needed a place for our remotes (got tired of sleeping on them all night) and a water glass or two. Removed the headboard and cut off the tops of the 2 vertical pillars. There was also a piece of trim screwed to the top of the headboard between the pillars to remove. Then installed a piece of 1"X4" oak to the HB and screwed it to the tops of the pillars. I then used the 3 screws that held the trim piece on and fasted the 1x4 to the HB with them. I used some hardwood molding to make a box and a little piece of trim to finish it off. Stained it all and put some spray clear satin on the whole thing. AH HA, you thought it was done ,right? Wrong, DW went shopping and came back with a piece of lumber that looked like leather. Heaven knows where she got it, Joanns maybe. So I removed the nice stuff that HL put in the inserts, cut to fit the leather for the holes, glued and screwed it all together. BTW, I hope that the screws holding your HB on are better that ours. There were only 2 holding in place out of 6. It is now held on by 6 molly fasteners. Yes there are pix.
MOD #4 Using old cooler hinges and latches for the ladder tube made out of fence tubing. I have to give credit to Kenny (katkens) for the idea. Mine came off an old IGLOO cooler. The pix should tell the story.
Attachments
-
 trailer mods 002 (Large).jpg115.8 KB · Views: 783
 -
 trailer mods 003 (Large).jpg93.6 KB · Views: 731
 -
 trailer mods 005 (Large).jpg117 KB · Views: 725
 -
 trailer mods 007 (Large).jpg115.8 KB · Views: 689
 -
 trailer mods 008 (Large).jpg130.8 KB · Views: 691
 -
 trailer mods 009 (Large).jpg107.3 KB · Views: 678
 -
 trailer mods 010 (Large) (2).jpg84.1 KB · Views: 721
 -
 trailer mods 016 (Large).jpg93.6 KB · Views: 644
 -
 trailer mods 017 (Large).jpg128.6 KB · Views: 616
 -
 trailer mods 018 (Large).jpg104 KB · Views: 623
 -
 trailer mods 027 (Large).jpg91 KB · Views: 714
 -
 trailer mods 031 (Large).jpg119.2 KB · Views: 736
 -
 trailer mods 033 (Large).jpg100.5 KB · Views: 669
 -
 trailer mods 030 (Large).jpg115.3 KB · Views: 746
 -
 trailer mods 035 (Large).jpg84.2 KB · Views: 672
 -
 trailer mods 039 (Large).jpg83.5 KB · Views: 811
 -
 trailer mods 040 (Large).jpg85.8 KB · Views: 736
 -
 trailer mods 041 (Large).jpg82.2 KB · Views: 726
 -
 trailer mods 023 (Large).jpg39.9 KB · Views: 776
 -
 trailer mods 022 (Large).jpg51.6 KB · Views: 750
 -
 trailer mods 021 (Large).jpg42.9 KB · Views: 685
Last edited:
") Nice Work!
Nice Work!