kakampers
Past Heartland Ambassador
Well, our luck finally did run out! Not complaining though...two years of constant use and no problems with leaks...until today! Crap happens!
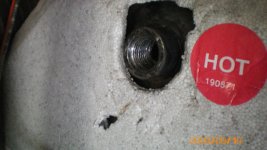
Went to get something from cargo bay on roadside...noticed large amount of water in center of cargo floor. Emptied bay, removed panels and noticed water had been leaking, apparently from bottom of water heater at the inlet. Looked rusty and platform it sits on was wet. Went to investigate, and while moving the water lines attached at back of water heater...it suddenly started spraying water from top connection where the check valve is installed, which is directly above where we first saw water.
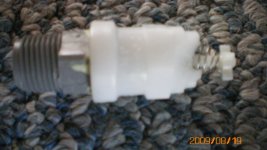
We realized that the plastic check valve was leaking...but here's the BIG problem...DH went to remove the check valve...it snapped off, leaving half of it stuck in the threads of the water heater...UUGGHHH!!
So now he's out trying to find a replacement valve, hopefully metal...and an easy out to try and remove the rest of the valve without damaging the threads...
What's the point of this post...to let everyone know...if you need to replace that check valve...BE VERY CAREFUL!
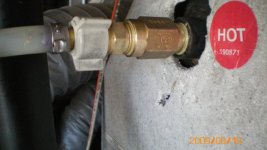
P.S. DH just called, he found a brass check valve! Funny part was, when he walked into the RV repair shop with the plastic one in hand...the guy knew exactly what it was and what happened...he fixes these all the time. Told him easiest way to remove the plastic stuck in threads...either use square screw driver to "bite" the plastic as you turn..OR..small hack saw to cut the pieces in half and just pop them right out...let ya'll know how it works out!
Went to get something from cargo bay on roadside...noticed large amount of water in center of cargo floor. Emptied bay, removed panels and noticed water had been leaking, apparently from bottom of water heater at the inlet. Looked rusty and platform it sits on was wet. Went to investigate, and while moving the water lines attached at back of water heater...it suddenly started spraying water from top connection where the check valve is installed, which is directly above where we first saw water.
We realized that the plastic check valve was leaking...but here's the BIG problem...DH went to remove the check valve...it snapped off, leaving half of it stuck in the threads of the water heater...UUGGHHH!!
So now he's out trying to find a replacement valve, hopefully metal...and an easy out to try and remove the rest of the valve without damaging the threads...
What's the point of this post...to let everyone know...if you need to replace that check valve...BE VERY CAREFUL!
P.S. DH just called, he found a brass check valve! Funny part was, when he walked into the RV repair shop with the plastic one in hand...the guy knew exactly what it was and what happened...he fixes these all the time. Told him easiest way to remove the plastic stuck in threads...either use square screw driver to "bite" the plastic as you turn..OR..small hack saw to cut the pieces in half and just pop them right out...let ya'll know how it works out!