You are using an out of date browser. It may not display this or other websites correctly.
You should upgrade or use an alternative browser.
You should upgrade or use an alternative browser.
Cleaning the "Goop" Self Leveling Caulk and Buytle tape of of the Roof.
- Thread starter 2psnapod2
- Start date
TandT
Founding Utah Chapter Leaders-Retired
I took a plastic putty knife and GENTLY removed the old caulk on a warm day, so it was more plyable. (Taking care not to rip the rubber roof). Then I used my hands to kind of roll off as much of the remaining product as possible. I would not use any chemicals.
I don't think it has to be perfect. I would just get as much of the old residue off as you can. Trace
I don't think it has to be perfect. I would just get as much of the old residue off as you can. Trace
Ray LeTourneau
Senior Member - Past Moderator
Trace and Dan are correct. No solvents up there. I've used a "not too sharp" putty knife and just get under the edge of the existing fans frame. You can remove the putty covering the screws easy enough just be careful not to cut too deep. Remaining caulk material can be cleaned up with simple green and still make a good seal with new caulk. Run a bead around the perimeter of the opening and set the new fan frame into the hole. Screw it down and use the self leveling stuff over the screw heads and frame perimeter and you should be good to go.
PeternLiane
Well-known member
I used a dull putty knife too. Once I removed all of the caulking, I use window cleaner to clean up the residue. Make sure to put the bead of caulk around the perimeter before you screw it down. The caulk the rest including the screws.
2psnapod2
Texas-South Chapter Leaders-Retired
Thanks for the replies, I was really apprehensive about that at first, since I new I did not want any leaks. No I have an Idea about how to do it and I think I will be good to go. I never thought about a bead of caulk around it first since it says to use buytl tape around the flange but I will add a bead of caulk also. Now I need to run to Lowes. 
hillsonwheels
Well-known member
One "whatchamcallit"  you might want to add to your tool kit is a plastic putty knife. They are cheap, come in all sizes, the edge can be redressed with a file and, can be picked up on one of your trips to Lowes or Home "Debit".
  I have used one successfully to remove caulking all around our coach. Neat thing is they it do not scratch the fiberglass.
Dick
Dick
2psnapod2
Texas-South Chapter Leaders-Retired
One "whatchamcallit"you might want to add to your tool kit is a plastic putty knife. They are cheap, come in all sizes, the edge can be redressed with a file and, can be picked up on one of your trips to Lowes or Home "Debit".
I have used one successfully to remove caulking all around our coach. Neat thing is they it do not scratch the fiberglass.
Dick
Thanks Dick, it is on the list.
Ray LeTourneau
Senior Member - Past Moderator
This makes a lot of sense. I wasn't aware they supplied butyl tape. When I moved ours from the bedroom to the WC I used a bead of caulk. I really didn't plan on removing it but I think I could still get it separated. Is this a great forum or what???I would not use a bead of caulk before installing the fan. You will never get it off again if the need should arise.
Use the Butyl tape.
JMO.
Peace
Dave
brianharrison
Well-known member
I did this mod on my bedroom fan last year. Here are some pics.
I "did" use mineral spirits to clean up the old self leveling Dicor- I was aware of the ramifications, however I kept it light and only applied it on a lint free cloth and wiped the old "goop". It works very well and I wanted to leave as much old goop in place to prevent me from cutting the EPDM trying to get it all off. The new Maxxfan OD dimensions were identical to the old fan vent so made it quite easy.
I also used new butyl tape on the underside of the new flange, and left most of the old butyl tape on from the previous vent.
As you pry up the old flange, hold down the EPDM with your other hand to prevent pulling it away from the underlying plywood sheathing.
When installing the new screws into the new Maxxfan flange, only tighten them enough to snug up the flange until the butyl tape starts to compress. Too tight and you will crack the flange, or sqeeze and thin out the butyl tape.
Be generous with the new Dicor self leveling sealant and overlap well. I used one whole tube.
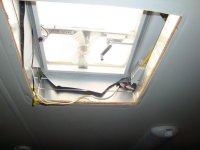
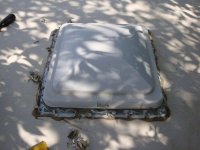
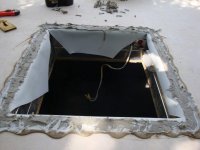
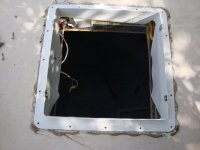
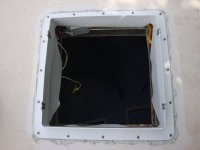
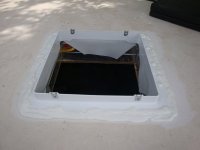
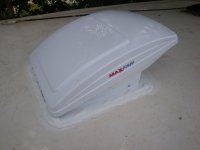
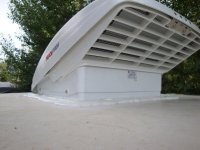
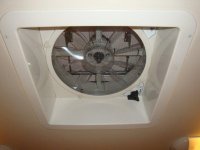
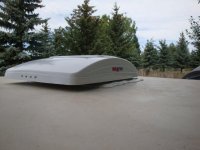
PS - Micheal, here is a video installing the MaxxFan - you may already have seen it.... --> Link to MaxxFan Install Video
Take care,
Brian
I "did" use mineral spirits to clean up the old self leveling Dicor- I was aware of the ramifications, however I kept it light and only applied it on a lint free cloth and wiped the old "goop". It works very well and I wanted to leave as much old goop in place to prevent me from cutting the EPDM trying to get it all off. The new Maxxfan OD dimensions were identical to the old fan vent so made it quite easy.
I also used new butyl tape on the underside of the new flange, and left most of the old butyl tape on from the previous vent.
As you pry up the old flange, hold down the EPDM with your other hand to prevent pulling it away from the underlying plywood sheathing.
When installing the new screws into the new Maxxfan flange, only tighten them enough to snug up the flange until the butyl tape starts to compress. Too tight and you will crack the flange, or sqeeze and thin out the butyl tape.
Be generous with the new Dicor self leveling sealant and overlap well. I used one whole tube.


PS - Micheal, here is a video installing the MaxxFan - you may already have seen it.... --> Link to MaxxFan Install Video
Take care,
Brian
Last edited:
hillsonwheels
Well-known member
Inquiring minds need to know.........How do the Max Air and Fantastic fans compare? Are there clear advantages on one compared to the other or is it just a matter of personal choice? Has anyone done a comparison?
Dick
Dick
brianharrison
Well-known member
No "engineered" comparison for moving air - but I have a Fantastic in the kitchen and the MaxxFan in the bedroom; both "seem" to move the same air.
MaxxFan has integral cover, lower profile when closed comparing to Fantastic and cover, no wall controls with the retrofit MaxxFan but there is a remote if you buy the top of line model. MaxxFan no rain sensor but shouldn't be bothered by rain due to vent down angle.
Just looked online and there are wall remotes but probaby best suited for original installs (OEM) as you have to fish a 6 wire conductor to the remote wall switch.
I'll give it some more thought and add later if I think of more.
Brian
PS - Picture of Fantastic Fan with MaxAir cover in foreground, Maxxfan towards front of trailer.
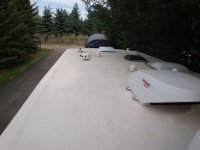

Last edited:
2psnapod2
Texas-South Chapter Leaders-Retired
Ray, they did not include the butyl tape in the set up. I ordered some that was 3/4 inch and looks like I will have plenty if needed for a while.
Brian, thanks for the GREAT Pictures. Those will help me a lot.
I still have been able to get on to this project. I HAD to go to a RV show in the area. You know I just HAD to go. But hopefully will have it completed before the Elko Rally or I might be doing it during that time.
Brian, thanks for the GREAT Pictures. Those will help me a lot.
I still have been able to get on to this project. I HAD to go to a RV show in the area. You know I just HAD to go.
57chevyconvt
Well-known member
The method of removing roof caulking that I have used for a number of years to remove and replace refrigerator roof vents, sky lights, and plumbing vents is by using a metal putty knife with a very thin blade 0.010" thk. at the business end that has the corners radius to prevent gouging the EPDM rubber. I bent the putty knife blade with my fingers to about a 15 deg. angle. by pressing down on the putty knife blade to keep it flat against the rubber roof material and moving from side to side, you will be able to very neatly remove the old caulking. BTW - I purchased the thin blade putty knife from Lowe's. After the majority of the old caulking is removed, I use a spray can of Brake Clean, non-chlorinated, solvent to clean the EPDM rubber prior to laying down the butyl tape and new self-leveling caulking. I don't spray the Brake Clean on the EPDM rubber but on a lint free cloth rag for this cleaning operation. Composition of the Brake Clean is basicly methanol and acetone. This is the solvent that the RV repair shops use around here. I am very aware of the ill effect of any petroleum based solvents on EPDM rubber. As Brian noted above, lint free rag and mineral spirits works well also, just use it sparingly.
hillsonwheels
Well-known member
Brian....thanks for the input. Have a Fantastic fan in the kitchen. Been thinking about something different in the bathroom. Trying to gather info to make a good choice.
Dick
Dick
2psnapod2
Texas-South Chapter Leaders-Retired
Well, I got the goop off and the fan simi-installed. It got too dark, since I started it at about 5pm after I got off work. Will finish up tomorrow. That stuff was not easy to get off. The buytl tape was not to bad but where it and the caulking joined was really a mess. But I am glad it is done. Now to just finish up. I will post a couple of finished pics, since I did not take any since Brian had posted his and it was pretty much the same. Kelly did take a couple with me working, maybe she will post those.
Ray LeTourneau
Senior Member - Past Moderator
Well, I got the goop off and the fan simi-installed. It got too dark, since I started it at about 5pm after I got off work. Will finish up tomorrow. That stuff was not easy to get off. The buytl tape was not to bad but where it and the caulking joined was really a mess. But I am glad it is done. Now to just finish up. I will post a couple of finished pics, since I did not take any since Brian had posted his and it was pretty much the same. Kelly did take a couple with me working, maybe she will post those.
2psnapod2
Texas-South Chapter Leaders-Retired
That's a good one Ray, she had to get the pics to have proof that I actually worked at some point.  But really she has been posting on a blog for about a month and a half now and of course that had to go into it. Oh well it was nice to be doing some work like that again. Before I went back into the Army, I was a heating and Air Conditioner Installer and did a lot of thinks just like that. Even put in a few mobile home units back in the days. Got tired of all the Attics and Crawlspaces! And do I fill it in my back now.
Similar threads
- Replies
- 5
- Views
- 1K
- Replies
- 11
- Views
- 3K
- Replies
- 8
- Views
- 1K
