rear marker lamp

Bob&Patty

Founders of SoCal Chapter
About a month ago I posted a thread about a marker lamp I installed on the back of our BH. It is the marker lamp of a 1 ton Chevy/GMC truck. Thanks to Jim B, I can now post a picture. Wonderful things, PC's if you know to work them. Bob :D:D:eek:
 

Attachments

  • 1st campout 042 (Medium).jpg
    1st campout 042 (Medium).jpg
    34.5 KB · Views: 165
Last edited:

caddojay

Tired and Retired member
NICE! Did you consider wiring to the stop lamp circuit? I've read the other threads about the change-over of the stop lights to LED. Can you grab a stop light wire through the license plate light? I haven't looked behind the light and haven't unscrewed the bottom of the trailer...yet. Has anybody ventured to look under the plastic underbelly to see the wires? I'm going to have to add a 4-wire plug for the hitch reciever and carrying tray, and this would be something to do at the same time. While I'm at it, I might change the license plate holder and light. Ours is so close to the back of the cap that I had to bend the license plate frame out a bit to facilitate the tags.
 

Bob&Patty

Founders of SoCal Chapter
Caddojay, you could use it as 3rd stop lamp But, its a big but, You have to get a kit that will isolate the stop lamps from the turn signals, and from side to side. The way the coachs are wired the lamp would blink every time you used the turn signals. Dont know what year your truck is, but if its a newer one the turn and stop lamps are wired seperately. You either have to run a wire from the truck to the lamp or install the isolation kit. You can probably get your arm down through the tail lamp hole to access some of the wiring. I am going to replace my lamps with LED's and probably the side markers with LED's. Some one did post awhile back where to get the isolation kit. From Canada it think, the one wearing the leather flying helmet and goggles LOL. He is not a GM person. :( I also need the find out where the main wire harness runs in my coach. I want to add more side turn signal lamps. Looked up the person, "nhunter" look up threads under my last post about the lamp. His picture is there, hard to miss. Still want to know what the "N" stands for?? Bob
 

StevieWonder

Well-known member
FWIW, I'd prefer to change the existing brake/turn lights to LEDs, which I have done on utility trailers several times ...

BUT ...

I plan to add a second set of LED brake/turn lights closer to the top of the rear cap. The lower set are often hidden from following vehicles by an intervening vehicle, particularly of the larger variety like a van or a pickup. It makes a HUGE difference in visibility.

I also put some reflective tape on the perimeter of the slideouts. While not an issue in a campground, if you happen to be in a roadside park, they sure help somebody see the slideouts when entering a neighboring spot.
 

caddojay

Tired and Retired member
Thanks for the info. As I said, I haven't explored the underside too much. Since we're having our winter week this week, it may be early February before I'm under it.
 

jbeletti

Well-known member
StevieWonder,

Love the username (and your music :)). Say, great idea on the reflective tape. Not sure what color you use, but on the slide outs, the white reflective tape would work great and be nearly invisible in the daylight. Thanks.

By the way, that is some kind of rig you used to have. Do you have a link to more pics/details?

Thanks,

Jim
 
I saw the same reflective tape on a RV a few years ago. I put 2" red reflective tape on the slide-out of my old 5th wheel. I plan on doing the same on my Cyclone...especially since it has 3 slide-outs. I may put some on the pin-box as well...I keep hitting my head on it.

This is the company's website from where I got mine. It's about $1 per foot in the 2" size for pretty much any color.

http://shop.reflectivestore.com/main.sc

Rock On...
 
Last edited:

Bob&Patty

Founders of SoCal Chapter
Short Timer

Thanks for the info Hawk, I need to get some. And thanks for just one more project. Being retired now, I really dont have time to do anything. I had more time when I was working.LOL BTW, hows the little one and mom doing. The first week in March is not that far away, a couple of weeks. Lets go camping with the new rig. Bob,Pat, and the:eek:cat
 

nhunter

Well-known member
Hey Bob that's not a flying helmet and goggles, it's a hockey helmet and glasses.:D It's not a picture of me but of a guy called Bubbles from a show we have in Canada called "Trailer Park Boys" , kind of a comedy. The N in nhunter stands for Neil. I posted a link for Grote and they carry all kinds of LEDs and wiring stuff. http://www.grote.com/
 
Hi Bob & Patty, Little ones are great, moma is, you know, doing the moma and baby thing about 7-8 times a day now. Tired, but doing great. We're taking turns at night so we can both get a little rest. It's all good!

And, we're all very excited...pick our Cyclone up March 6.

Wish the rally in Feb worked for us, but alas, we'll be at the next one fer sure!
 

nhunter

Well-known member
I did some more thinking on the third brake light. Most trucks now have a "High mount stop light" wire. This is for the third brake light if you have a topper and is usually near trailer plug on truck. Since we don't have back up lights on the trailers you could unhook your back up light wire from your plug, cap it and hook up this wire in it's place. Then you need to run a wire from RV plug to newly installed light. This wire is only brake and has no signal function.
 

caddojay

Tired and Retired member
I really like the clean look and idea of the rear marker light. After I had the receiver hitch installed, I was discussing the light idea for the tray with the installer. He made a suggestion to run a long 4-wire connector to the rear from the truck's flat wire trailer conection, and install a receiver stop light form JC Whitney. Great idea. That adds the extra brake-light when the tray is not in place. I also added taillights to the back of the tray. When I have the tray in place, I use a jumper 4', 4-wire flat connector to the connection on the receiver to the connection on the tray and I have taillights there.
I'll get some pics and post them. It's another idea to make the back of the unit more visible.
 

StevieWonder

Well-known member
I used the white reflective tape on the slide outs, marking the bottom corners (front and rear) with an "L". You can buy pre-cut tape at WalMart. I think they are 1"x4" and come two red and two white to a package. I also did this on the rear of the trailer but went to the bigger DOT tape you see on the 18 wheelers. Makes a HUGE difference in visibility and ... no drilling!

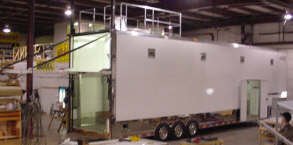
I don't have a website, but here's a couple of photos of the rig. It was a Renegade (also from Elkhart) based on a Freightliner Columbia chassis with a 450hp Mercedes-Benz diesel and 7 spd automatic transmission.

The trailer was 42' long. Double decked with a liftgate to raise/lower the cars carried on the upper deck. Downstairs I carried a Kawasaki Mule, a rack for race tires, a air compressor for air tools and a 125cc 4-wheeler in the back end. In the front end downstairs there were cabinets for tools, a spare engine, transmission, oil, spare parts, pop up tents, diagnostic equipment, welder, cutting torch and all the radios, race gear (helmets, suits, shoes, gloves, HANS devices, etc), and a thousand and one misc things. There was an observation deck on top with a fold-down railing. The trailer was airconditioned and heated (the plastic slide curtains sealed off the non-essential parts of the trailer for this purpose) and had its own 12KW diesel generator. The toterhome also had a 12KW diesel generator and I carried a 10KW gas generator as a backup. LOTS of electricity! The trailer was plumbed for air, so I could hook up the aircompressor and have 2 internal and 3 external quick-connect outlets. We also carried 3 nitrogen bottles for the racetires and to run airtools in the pits. There was also one acetylene and one oxygen bottle for the cutting torch. The welder was a TIG/MIG electric unit.

Pictures, left to right:

Trailer; double doors, four 500 Watt halogen floodlights
Trailer: lift gate for the cars, observation platform/railing on the roof
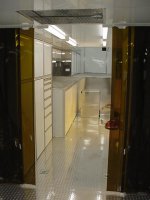
Trailer; bottom floor from back looking forward towards cabinets and work area
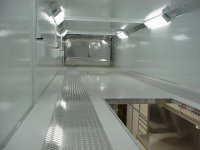
Trailer: upperdeck where cars were carried
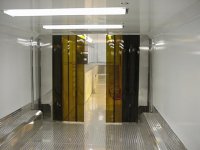
Trailer; bottom deck at very back looking forward; this is where the Mule, 4 wheeler, etc were carried
 

Attachments

  • NewTrailer10.jpg
    NewTrailer10.jpg
    29.7 KB · Views: 21
  • TailGate3.jpg
    TailGate3.jpg
    8.2 KB · Views: 24
  • NewTrailer5.jpg
    NewTrailer5.jpg
    37.6 KB · Views: 18
  • NewTrailer6.jpg
    NewTrailer6.jpg
    30.5 KB · Views: 18
  • NewTrailer4.jpg
    NewTrailer4.jpg
    36.1 KB · Views: 24
Top