2013 Lots of mods made

bjoseph

Member
So I have had my Torque 301 for just over a year now and have made several modifications to make this the perfect RV. The list of mods is as follows:
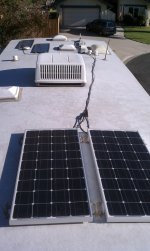
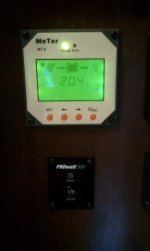
•200 watts of solar panels on roof with 20 amp charge controller
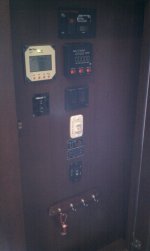
•1000 watt Xanrex inverter that can power most of the AC outlets
•Automatic transfer switch for the inverter
•Battery kill switch (should have came with one)
•Light switch in bathroom (not the switch on the ceiling)
•Light switch in garage that is reachable
•Safety bed rails on top bunk in garage (for my 5 year old)
•Reverse direction switch on my Fantastic Vent in the master bedroom
•I flipped the sliding glass door to garage (you get more heat to garage and you can get thru door with slides in!)
•I added an outdoor scare light above the rear door.
•I added large swingable grab handles to front and rear doors
I replaced all dome lights bulbs with LEDS (went from around 30watts per bulb to about 3watts)
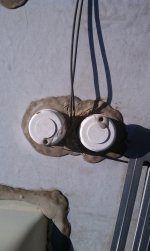
I also moved main area light switch from inside cabinet to just to the right(see picture below). It was too hard to find in the cabinet in the dark!

Next week I will add a remote controlled Fantastic Vent to garage!
Here are some pictures!


IMAG0323.jpg IMAG1626.jpg


IMAG1678.jpg IMAG1679.jpg

IMAG1680.jpg IMAG1681.jpg

IMAG1682.jpg IMAG1683.jpg IMAG1684.jpg
 
Last edited:

porthole

Retired
Looks great. Ya gotta post more often with changes!


Still have wall mounted light switches on my list to do.

How did you run the wires for the garage wall switch?
 

bjoseph

Member
Running the wires wasn't that bad. I though it might be hard when the walls are foam filled. First I took off the cover to the air vent. Then I only had to fish a wire from the shelf, (where the switch is located), to the air vent enclosure and then from the air vent enclosure to the new switch. I used a 18 inch drill bit to make a path thru the foam. There is plently of room in the air vent's enclosure to run the wire through it. This mod was awesome since I have three young kids that could not reach the light switch before!
 

Sans1

Active Member
Thanks - I too am planning to better position a few light switches and add at least one 110 outlet on the street side of my 291. Glad you described how you got the wires through. I had a heck of a time on a fiver with fiberglass insulation when I installed a pair of 'scare lights' as you call them. Figure with foam insulation it could be more difficult, sound like the opposite may be true. I'm not sure followed on flipping the sliding door. So it now opens on the right side? Also I plan to flip my bathroom door because I’vestepped off the stairs too many times coming out of the bathroom and am afraidthe grandkids might too. The only drawback here I can see is you’ll need to open the slide part way if you need tomake an emergency potty stop. I'll post when done.
 

bjoseph

Member
The main advantage of flipping the sliding glass door was to get more heat to the garage. The little 2 inch heat register in the garage gives little if not any heat in the garage due to bad engineering on the proper length and ducting size to carry the heat the long distance back there. Seems like it is a common problem with most garage fifth wheels. I flipped the slider because there is a heat vent 1 foot in front of the non-opening side of the slider. Now this heat vent is on the opening side of the sliding glass door. This gets more heat into the garage. I also can get into the kitchen with my couch slide-out in which is a big advantage if you do not have the width(driveway or camsite) to put out the opposing slide-outs the 301 has.
 

Sans1

Active Member


I also can get into thekitchen with my couch slide-out in which is a big advantage if you do not havethe width(driveway or campsite) to put out the opposing slide-outs the 301has.
Maybe the newer year or the 291 has it already flipped (or maybe they learned from folks like you). Standing in the living room facing the garage, the mine opens on the left side of the door. My (couch/slide) is on the right (road side). And my heat register is just about 6 inches left of center so if the door was all the way open it would help. Although this coach clams to have a high energy rating, it doesn’t seem to be enough. I imagine it will be difficult to keep warm if temp drops too low. I know it doesn’t stay cool when closed up (my old one would stay fairly cool until you opened the windows in the summer and let the heat in). This one has a single AC and won’t cut it if I really need it. We normally don’t need AC because of the normally low humidity in Colorado and because at 9000 feet it is rarely needed. It was unusually hot last weekend and by the time we got to or spot, the inside was so hot I tried the AC. Had a thunderstorm not stopped by to cool things off, I don’t think it would have helped for several hours. Once we opened the ramp and the sliding door, it really helped cool things off. I am going to add a Fan-Tastic Fan soon because I have read plenty of positive feedback. Did not realize they made high volume 12 volt fans until I read some literature that was included in a motorhome we owned for 6 months – it didn’t actually have one installed but being a good RV owner I read all of the included paperwork and that sent me into research mode.


This past weekend was really our shakedown trip – we’ve been too busy since getting the Torque at the end of April and I had an ultimatum that included a major deck overhaul. I was not allowed to go riding or camping until the Deck was done – with rain almost everyday I had time off and grandkids all day every Saturday, this turned into a 6 week project. After I put everything away yesterday I dumped a couple of hundred bucks on the Camping World website and have a full page of planned improvements. Now, to find the time to do them!! Forgot to ask, how are the bunk rails attached to the bunk? Angle bracket maybe? Thanks again for the info.


Last edited:

bjoseph

Member
I installed the bunk rails using 10 inch angle brackets from home depot. On the bunk there only seems to be a stud right at the edge. With 1 decent size lag bolt a piece, they wont move. I installed a Fantastic vent in the garage and it moves some air! I installed the one with the remote.


Forgot to ask, how are the bunk rails attached to the bunk? Angle bracket maybe? Thanks again for the info.


bjoseph

Member
Gotta see more pics about your solar. How did you mount the panels? How did you get the wires up there? Awesome work!

I mounted the panel towards the back of the coach so they would not be shadowed by anything. The wire run was pretty easy but took some planning. I drilled a hole in the roof right above the main wiring run which is behind the control panel. If you remove the control panel, (only like 6 screws), you can see all the wiring for the coach. After running the wiring down the wiring run, I brought the solar power wires through the basement to the grey 20 amp charge controller you can see in one of my pics. From the charge controller, it was only a foot or two of wiring through the basement walls to the batteries. All holes in the roof and the basement were filled with a good all weather silicone. I will post pictures next time I am on the roof.
 

bjoseph

Member
Gotta see more pics about your solar. How did you mount the panels? How did you get the wires up there? Awesome work!

Here are the pictures as promised. There is a picture showing the panels on the roof, a picture showing the roof entry point that goes into the wiring channel behind the control panel, a picture of the control panel, and a close up picture of the solar charge controller panel next to the inverter on/off switch
 

Attachments

  • solar2.jpg
    solar2.jpg
    330.7 KB · Views: 128
  • wire roof.jpg
    wire roof.jpg
    375.1 KB · Views: 124
  • control panel.jpg
    control panel.jpg
    585.3 KB · Views: 127
  • solar readout.jpg
    solar readout.jpg
    333.4 KB · Views: 122
Top