MaxAire II vent cover mounting brackets . . .

JohnD

Moved on to the next thing...
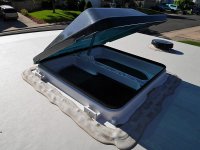
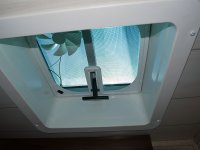
Before I dropped off our 2013 Heartland Trail Runner for trade-in on our new 2015 Heartland Prowler I removed the MaxAire II vent cover to use on our new trailer.

But when I got up on the roof to mount it, it seems that the new trailer has different roof vents made by Ventline that are plastic, where on the Trail Runner the vents were metal and I drilled holes and attached the vent cover that way, according to the instructions and the installation video I watched on YouTube.

However . . . the new trailer vents have their own brackets with holes already in it to mount to the MaxAire brackets, but they don't match up to the holes in the MaxAire brackets, and it seems that I can't drill a new hole in each of those brackets as that is where the bend in the bracket is.

So I'm wondering if maybe there might be a different set of MaxAire brackets that are made to fit up to the new plastic Ventline vents . . .

Anyone here know?
 

JohnD

Moved on to the next thing...
Just make new holes. No big deal.

As I mentinoed in the first post . . .

I can't drill holes where they will match up to the vent as that is where the bend in the current brackets are, and even then wouldn't match up right.

I bought that MaxAir a couple of years ago, and I don't remember if it came with other brackets for different types and manufacturers of the vents.
 

GWRam

Well-known member
As I mentinoed in the first post . . .

I can't drill holes where they will match up to the vent as that is where the bend in the current brackets are, and even then wouldn't match up right.

I bought that MaxAir a couple of years ago, and I don't remember if it came with other brackets for different types and manufacturers of the vents.

Our MaxAirII only came with one type of brackets. Actually one of the 2 required was missing, the MaxAir people sent out additional brackets, had them in two days. Just give them a call. Their customer service was good to us.
 

JohnD

Moved on to the next thing...
Our MaxAirII only came with one type of brackets. Actually one of the 2 required was missing, the MaxAir people sent out additional brackets, had them in two days. Just give them a call. Their customer service was good to us.

Cool . . . I'll try that!

Our new trailer has the Ventline vents (at least that is what it says on the vent) that have the shift-lever style arm instead of the round crank to open and close it, and I just went through the Ventline website looking for a photo of our vents, but there were none.

Perhaps this is a new vent they offer only to manufacturers and they don't offer them for sale, or perhaps they just haven't made it to the RV parts stores yet.

I'll try to get up on the roof tomorrow and take a photo of them and post it here tomorrow.
 

JohnD

Moved on to the next thing...
Here are two shots of the vents:

attachment.php
attachment.php


At first I thought if I cleared some of the caulk away from the tabs with the holes in it that the brackets would match, but I eyeballed it and the holes don't seem to line up.

The tabs do line up perfectly with the brackets on the MaxAir II lid.

Maybe someone here has done this same thing and can advise.
 

Attachments

  • ProwlerVentLid-P1000086.jpg
    ProwlerVentLid-P1000086.jpg
    88.2 KB · Views: 413
  • ProwlerVentLidInside-P1000092.jpg
    ProwlerVentLidInside-P1000092.jpg
    686.1 KB · Views: 410

Gaffer

Well-known member
I put new holes in the brackets and got them to work. Can send a photo next week when it is back from the shop for a few warranty repairs. It was a bit of a challenge.
 

JohnD

Moved on to the next thing...
I got an email response from Ventline/Dexter:

Thank you for your email submitted through the Ventline website. I’m not sure specifically about the MaxxAir II cover but some of the Maxxair covers will fit on our new roof vents with the plastic flange (V3092 and V3094 series). Maxxair covers produced after July 1, 2014 have the hardware kits so they can be installed on either our vents with the metal flange or the plastic flange. Product prior to that time just has the hardware for the metal flange. Customers can call Maxxair’s customer service department for that hardware (316) 832-4357
The maxxair.com website has video of installations on both flange types.
 

Skywrench

Full Timer
My '16 has the same vents. I bought the Camco covers and had to drill new holes in the brackets that came with the covers to get them to fit. It really was much simpler to install covers on the old style vents.
 

Pirana

Active Member
I just got my new Oakmont and just found out about this new Ventline vent problem...I also ordered the MaxxairII since its what I have always used on my previous RVs...now I ran into this problem. I just contacted Maxxair, and problably will get the same response you have gotten. It would be so easy for them to just make new brackets and sell them for $25, make more money and keep their loyal customers happy. We will see what comes out of this. In any case, my solution is to grind away the Ventline tabs and use the MaxxairII brackets. I think that is the quickest solution to the problem.

Vic
 

gasman

Camp Socializer
John, I took my Dremel tool and cut off the plastic tabs and ground them relatively smooth. Then I just drilled through the plastic flanges and bolted up the metal brackets.
 

Pirana

Active Member
Ok, so here is my "How To Install" for the Maxxair ventcover to new style Ventline vent.

Tools you will need:
Dremel tool with a cut-off wheel or a air grinder
Drill with 3/16" drill bit
3/8" and 11/32" wrenches
Phillip head screwdriver
1" #8-32 bolts x4 (per vent cover)
Marker

20160331_154152_zpskfzrkzlp.jpg
This is the tab you will want to grind or cut off...I used an air grinder with a carbide bit, you can use a cut-off wheel or an electric Dremel tool. Cut all 4, been mindful of the edge of the lid and not to grind or cut into the base or sealer.

20160331_162536_zps82afxlfk.jpg
Next, since the tabs where in the exact position needed, all you have to do is put the bracket where the tab was and mark where you will drill.

20160331_162551_zpsrgbyllif.jpg
Drill the 3/16" hole for the bolt.

20160331_163235_zpstp9qphe5.jpg
The supplied screws are too short for the new Ventline frame, so you will need to get 4 (per vent cover) #8-32 bolts in 1" length.

20160331_162832_zpsp4uox2ti.jpg
Tighten the bolt with the 11/32" wrench and the Phillip screw driver.

20160331_163840_zps7tcnysrh.jpg
This is the view of the of the nut and washer....but also, if you notice, I tighten the bolt too much and it collapsed the frame, as you can see the screen came of it snap...so be careful.

20160331_162938_zps5qbyguoe.jpg
Do the same for the clip side, the brackets will match the tabs, so its pretty straight forward. On the hinged side, you will use the long bolt and the 3/8" nut.

20160331_164531_zpsnaqzg9uv.jpg
Done, now while working on the roof, make sure you have something like a cardboard or plastic tub to put the tools, never put the tools on top of the roof itself.
 

JohnD

Moved on to the next thing...
I still can't believe that MaxAire hasn't offered new brackets to accomidate those of us that have, and want to add, the MaxAire II's!

They are loosing out on a huge market of RV'ers that not only have these vent covers, but will buy them to put on our newer RV's!

MaxAire . . . I hope you are reading this . . . !

They have left me hanging . . . and apparently don't care if they keep my business!

Must be they have enough business to not care . . .

I have three vents I want to cover on my Prowler . . . apparently MaxAire wants me to buy another brand to cover my vents!

And I will be doing something about this in the next couple of months . . .

Must be nice to have enough money to not care about future customers!
 

TravelTiger

Founding Texas-West Chapter Leaders-Retired
Ok, so here is my "How To Install" for the Maxxair ventcover to new style Ventline vent.

Tools you will need:
Dremel tool with a cut-off wheel or a air grinder
Drill with 3/16" drill bit
3/8" and 11/32" wrenches
Phillip head screwdriver
1" #8-32 bolts x4 (per vent cover)
Marker

View attachment 43954
This is the tab you will want to grind or cut off...I used an air grinder with a carbide bit, you can use a cut-off wheel or an electric Dremel tool. Cut all 4, been mindful of the edge of the lid and not to grind or cut into the base or sealer.

View attachment 43955
Next, since the tabs where in the exact position needed, all you have to do is put the bracket where the tab was and mark where you will drill.

View attachment 43956
Drill the 3/16" hole for the bolt.

View attachment 43958
The supplied screws are too short for the new Ventline frame, so you will need to get 4 (per vent cover) #8-32 bolts in 1" length.

View attachment 43959
Tighten the bolt with the 11/32" wrench and the Phillip screw driver.

View attachment 43960
This is the view of the of the nut and washer....but also, if you notice, I tighten the bolt too much and it collapsed the frame, as you can see the screen came of it snap...so be careful.

View attachment 43961
Do the same for the clip side, the brackets will match the tabs, so its pretty straight forward. On the hinged side, you will use the long bolt and the 3/8" nut.

View attachment 43962
Done, now while working on the roof, make sure you have something like a cardboard or plastic tub to put the tools, never put the tools on top of the roof itself.

Thanks for sharing, I feel a bit naked with no vent covers and have been wondering what the solution could be.
 
JohnD I got the same camper had to call and MaxAir sent me a different set of brackets that worked for it


Sent from my iPhone using Tapatalk
 
Top