JanAndBill
Well-known member
Since I was changing my grill out because of fading anyhow, I decided to add an auxiliary fan. My A/C has always been a little weak at an idle or low speed, primarily because of the air flow. I found a little 10” electric fan on Ebay for $22, plus assorted parts, brought the total up to just under $30. Because I planned on mounting it in a different spot then what it is, I went with the 10”, if I had to do it over I probably would have gone with the 12”.
The first step I the process was to get power. My 2006 has factory upfitter switches, that are already prewired. The switches only have power when the key is on. To access them you must:
Aux switch 2 – Orange – 30 amp
Aux switch 3 – Orange/Yellow – 10 amp
Aux switch 4 – Orange/light blue – 10 amp
One of the reasons I went with the 10” fan was to keep the amp draw below 10 amps, so I connected to Aux switch 4 wire, with a piece of 14 ga wire with a blunt connector
Also behind here are 4 wires blunt cut with tape, that go through the firewall. There should be one Red, one Blue, one White, and one black. It’s irrelevant which one you use. I connected to the Red, again with a blunt connector. Everything put back in place and I moved outside.
Outside on the firewall find the cable coming from inside and the corresponding wire from inside. I connected to this with 14 ga wire, that I routed around the side to the front of the truck. I had some wire loom on hand that I put the wire in which made the installation, neater but isn’t required.
At the front of the truck I installed an inline fuse holder with a 10 amp fuse. Overkill maybe but if my cheap fan has a problem I’d prefer this fuse go first.
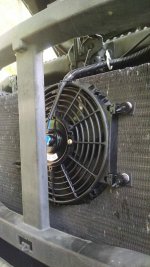
My first thought was to mount the fan behind the A/C condenser, but there just wasn’t enough room without moving the condenser out. Rather than that I decided to mount it in front of the condenser. The fan came with 4 pins, that I pushed through the fins on the condenser, from the back. The fan kit came with foam pads with adhesive on one side. I put one of these over the pin before I slid it in place (adhesive toward the condenser), and one over the pin on the other side (again adhesive toward the condenser). Once the fan was slid in place over the pins, springs and clips supplied with the fan hold it firmly in place. Connection of the power and ground wire completed the installation.
When the ignition switch is on, I can manually turn the fan on and off. I elected to operate the fan manually rather than have it come on automatically, because there are only certain times when I actually need it, and the installation is a lot simpler.

The first step I the process was to get power. My 2006 has factory upfitter switches, that are already prewired. The switches only have power when the key is on. To access them you must:
- Remove the fuse panel trim cover below the steering column
- Remove the four bolts that hold the Central Junction Box in place. (the box with all the fuses). Once you remove the bolts without disconnecting anything simply fold the box out. Behind the box and probably taped to the wiring harness are four blunt cut wires with tape on the end.
Aux switch 2 – Orange – 30 amp
Aux switch 3 – Orange/Yellow – 10 amp
Aux switch 4 – Orange/light blue – 10 amp
One of the reasons I went with the 10” fan was to keep the amp draw below 10 amps, so I connected to Aux switch 4 wire, with a piece of 14 ga wire with a blunt connector
Also behind here are 4 wires blunt cut with tape, that go through the firewall. There should be one Red, one Blue, one White, and one black. It’s irrelevant which one you use. I connected to the Red, again with a blunt connector. Everything put back in place and I moved outside.
Outside on the firewall find the cable coming from inside and the corresponding wire from inside. I connected to this with 14 ga wire, that I routed around the side to the front of the truck. I had some wire loom on hand that I put the wire in which made the installation, neater but isn’t required.
At the front of the truck I installed an inline fuse holder with a 10 amp fuse. Overkill maybe but if my cheap fan has a problem I’d prefer this fuse go first.
My first thought was to mount the fan behind the A/C condenser, but there just wasn’t enough room without moving the condenser out. Rather than that I decided to mount it in front of the condenser. The fan came with 4 pins, that I pushed through the fins on the condenser, from the back. The fan kit came with foam pads with adhesive on one side. I put one of these over the pin before I slid it in place (adhesive toward the condenser), and one over the pin on the other side (again adhesive toward the condenser). Once the fan was slid in place over the pins, springs and clips supplied with the fan hold it firmly in place. Connection of the power and ground wire completed the installation.
When the ignition switch is on, I can manually turn the fan on and off. I elected to operate the fan manually rather than have it come on automatically, because there are only certain times when I actually need it, and the installation is a lot simpler.

