No more shakin for us!!!

mrcomer

Past Ohio Chapter Leaders (Founding)
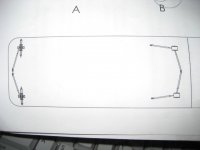
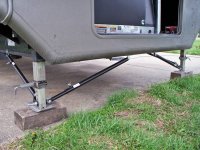
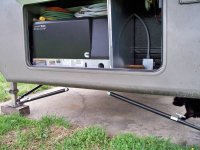
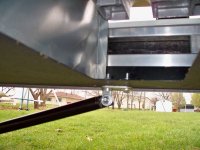
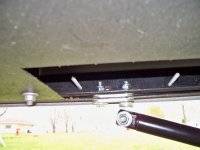
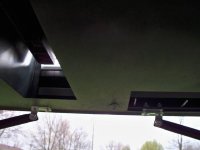
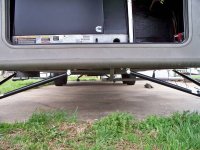
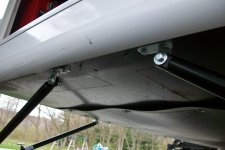
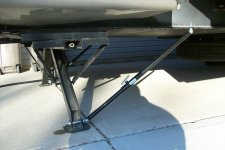
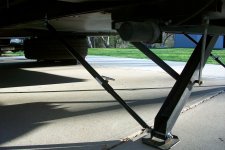
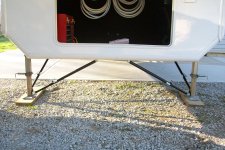
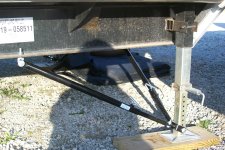
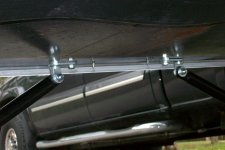
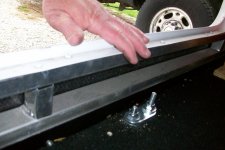
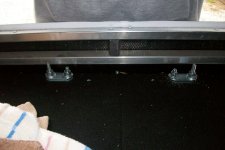
I received my Ultra Fab Eliminators today, so I started the installation. Got the (4) on the front done before the thunderstorm started. I also got the swing bolt installed on the rear jacks but still need to mount the swing bolt to the frame. Not much to do but would rather not do it while it is lightning outside. Hopefully I will get to finish tomorrow. This also means I get to sell off my BAL tripod.

Later,
 

Attachments

  • 100_0103.JPG
    100_0103.JPG
    442 KB · Views: 375
  • 100_0116.JPG
    100_0116.JPG
    405.2 KB · Views: 332
  • 100_0115.JPG
    100_0115.JPG
    407.9 KB · Views: 314
  • 100_0114.JPG
    100_0114.JPG
    431.6 KB · Views: 304
  • 100_0113.JPG
    100_0113.JPG
    440.2 KB · Views: 308
  • 100_0112.JPG
    100_0112.JPG
    465.3 KB · Views: 314
  • 100_0106.JPG
    100_0106.JPG
    356.6 KB · Views: 313
  • 100_0105.JPG
    100_0105.JPG
    373.4 KB · Views: 332
  • 100_0104.JPG
    100_0104.JPG
    402.1 KB · Views: 346
Last edited:

Nabo

Southeast Region Director-Retired
Yes would love to see how they are attached. Pics please.
 

boatdoc

Well-known member
Hey Mark, Did your instructions show the rears going forward instead of side to side. I looked at your pics and said Holy #$% I put them on wrong!!! I went out to the trailer and got my instructions and mine clearly show them going across towards each other. It also shows the two front cross arms tying to the same point, center of trailer, instead of the big gap your pic shows between the two. Have they changed their thinking on these things since last year?
Gary
 

mrcomer

Past Ohio Chapter Leaders (Founding)
Hey Mark, Did your instructions show the rears going forward instead of side to side. I looked at your pics and said Holy #$% I put them on wrong!!! I went out to the trailer and got my instructions and mine clearly show them going across towards each other. It also shows the two front cross arms tying to the same point, center of trailer, instead of the big gap your pic shows between the two. Have they changed their thinking on these things since last year?
Gary

Gary,
I am not one for reading directions as you have so well pointed out. So I went ahead and looked them over again and you are correct but, all of their drawings show the trailers with scissor type jacks on the back so I would agree with their placement of the stabilizers. Maybe it would be ideal for the Lippert style too but I really thought that what I did should work pretty good. If I experianece any shaking I will consider moving them.

Thanks for opening my eyes.

Mark
 

Pulltab

Well-known member
Mark, one thing you need to keep an eye on is the floor plate you attached the front ones to. That is just a thin sheetmetal plate and if you preload or forget to loosed the screws it will bend the heck out of it! I had to install a 1-1/4 sq tube with 1/4" wall to attach mine to. Just a thought for you to keep an eye on them. Great job installing them they look good!
 

Macattack

Member
Mark,mine look exactly like your's except I have the generator and drilled the holes through the generator frame to get more metal to attach them to. Those 2 plates that are in the first picture are taken out of mine for the air intake and exhaust. From everything I can see, it looks like mine will work great as long as I don't try to put to much weight on the thin plate. For now I'm not going to put the rear ones on until I have tried it out and see if I really need them.
 

mrcomer

Past Ohio Chapter Leaders (Founding)
Mark, one thing you need to keep an eye on is the floor plate you attached the front ones to. That is just a thin sheetmetal plate and if you preload or forget to loosed the screws it will bend the heck out of it! I had to install a 1-1/4 sq tube with 1/4" wall to attach mine to. Just a thought for you to keep an eye on them. Great job installing them they look good!

Thanks Tab,
I do have some reinforcement in the front. I have a 3/4" OSB bottom on the inside og the storage compartment. So I had to drill through the sheet metal and the OSB and I also used the (2) holed plates that came with the stabilizers top and bottom. I do like your idea thought for others that need it.
 

cjbearden

Visitor
Macattack, sure would appreciate some pictures of the front installation you did through the generator frame. We are going to have to do the same thing on our Augusta. Do your stabilizers have the gap in front or do they meet in the center?
 

JohnDar

Prolifically Gabby Member
Nice pics, Mark. I mounted my fronts together, instead of separated like yours. Put a stiffener pad on both sides of the floor plate. Yanked and cranked on it and it is solid. The bend at the front of the floor plate adds strength to the plate, so it should be fine. Any shear loading force will be borne by the stiffeners and not the floor plate, anyways.

I was considering mounting the rears to the frame in front of the rear jacks like you did, but kept looking at the instructions. Does it seem to work like that? Running them the way the instructions show, there is only thin sheet metal at the bottom of the rear cap and the jack support arms interfere with the struts when retracting.

I haven't mounted the rears yet, so I can follow your method, no problem. Now that I think about it, with the Lippert rears, they provide the side to side restraint and the struts will give fore/aft. Sometimes a picture is worth a thousand instruction manuals.
 

boatdoc

Well-known member
I'm starting to think along this line also. I went out last evening and sat there for awhile looking at the rear struts. I think Mark's way has a lot of merrit to it. We have 40' 5ers and it seems it would be better that way. Some testing is on it's way today!
 

JohnDar

Prolifically Gabby Member
I went out to the storage yard this afternoon and attached the swing bolts to the frame rail, like Mark did. I thought I'd try that idea of using the longer front bolts for the rear stabilizer pads, substituting a 3" one on the front. Didn't like the lack of threads to fully seat the nut past the end of the bolt, so I left it as is until I get the two longers ones from Ultra-Fab. One thing I did do was replace the jam nuts on the front shackle with the ny-loc nuts. The lift handles were not all that secure, and the jam nuts were removeable with only light finger pressure. Using the ny-loc nuts makes it possible to securely tighten the handles without collapsing the shackle onto the leg.

And then I found two more openings into the underbelly via the sheet metal, but didn't have my "stuff" to fill them. :(

Ya think HL would know about rodents and their affinity to get inside our rigs and secure those gaps. :rolleyes:
 

Macattack

Member
J.D. and C.J---Hope these pics help with your install. I did use the stiffener pads on either side of the floor plate. On the street side one, I put a stiffener pad between the floor plate and generator frame. As you can see mine are seperated on the front. If I remember right, the instructions said to measure 30 inches from the inside of the jack leg to the middle of the stiffener pad. Since you already have the triangle effect on the rear jacks, I am going to see how stable the rig is before I put the ones on the rear. Hope this helps you out.
 

Attachments

  • Stabilizers5.jpg
    Stabilizers5.jpg
    51.2 KB · Views: 131
  • Stabilizers4.jpg
    Stabilizers4.jpg
    41.5 KB · Views: 131
  • Stabilizers3.jpg
    Stabilizers3.jpg
    37.2 KB · Views: 129
  • Stabilizers2.jpg
    Stabilizers2.jpg
    24.3 KB · Views: 127
  • Stabilizers1.jpg
    Stabilizers1.jpg
    18.9 KB · Views: 132
  • Stabilizers6.jpg
    Stabilizers6.jpg
    48.3 KB · Views: 129

JohnDar

Prolifically Gabby Member
J.D. and C.J---Hope these pics help with your install. I did use the stiffener pads on either side of the floor plate. On the street side one, I put a stiffener pad between the floor plate and generator frame. As you can see mine are seperated on the front. If I remember right, the instructions said to measure 30 inches from the inside of the jack leg to the middle of the stiffener pad. Since you already have the triangle effect on the rear jacks, I am going to see how stable the rig is before I put the ones on the rear. Hope this helps you out.

The instructions say to measure 30" from the inside of the front legs if the distance between the legs is over 66" On my 3670, it's only 60", so the struts under the front compartment connect to the same stiffener pads (page 12 of manual). For whatever reason, the instructions say to mount the side struts with the T-handles toward the foot pads, not the frame. Yours are reversed, it appears. That may cause the T-handles to contact the frame when you raise the jacks, maybe.
 

mrcomer

Past Ohio Chapter Leaders (Founding)
Nice pics Mac,
I see now what you generator owners have to deal with. If it were me I think I would add a piece of angle iron to the inside and attach the strut to that thru the sheetmetal floor and add some additional screws thru the sheetmetal floor to the angle iron. If feasible that angle iron would cross over to the other strut location. Not sure that would work because of the sheetmetal cabinet for the generator.

Nice job and thank you for sharing,
Mark
 

Macattack

Member
John, You are right about the instructions saying to install the T handles toward the foot pads. It doesn't look like there would be any problem with the way they are on now but I'm going to turn them around anyway. That is what I get for not reading the last part of the instructions. Thanks for catching my mistake. By the way, The distance between the legs on my Augusta is 74 inches.
 
Last edited:

JohnDar

Prolifically Gabby Member
John, You are right about the instructions saying to install the T handles toward the foot pads. It doesn't look like there would be any problem with the way they are on now but I'm going to turn them around anyway. That is what I get for not reading the last part of the instructions. Thanks for catching my mistake. By the way, The distance between the legs on my Augusta is 74 inches.

I've never seen a Landmark in person. I didn't realize they were wider than the Big Horn.
 
Top