And so it begins

porthole

Retired
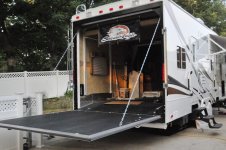
Except for some switches I still need, the garage is now fitted out to the decor of the rest of the trailer.
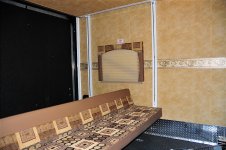
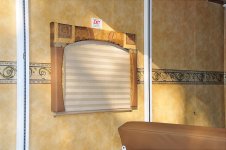
I added the wallpaper border to the perimeter of the garage. Also replaced the blinds with matching shades and added special ordered window valances. If you add the valances to yours something t consider, the factory parts are not long enough to cover the shades!

I ordered 2 valances for the front bedroom but had them change the material to match the living room. Hopefully if someone else does this the factory can make them a bit longer to cover the bottom. I would like to order the parts re-done but there is too much else to do.

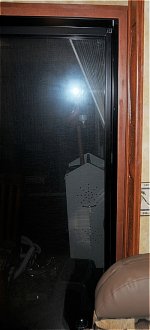
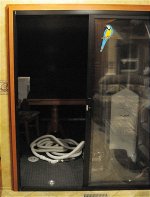
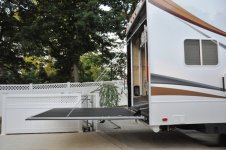
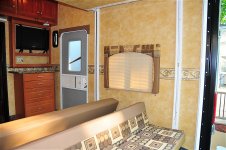
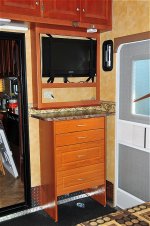
I like the way the garage came out. The follow through of the living quarters into the garage (wall board) was one of the key points I had when shopping for trailer. Everyone else uses plain white board in the garage and a wall and solid door between the garage and the LR. The matching walls and patio door option really open up would be otherwise be a small looking living room.
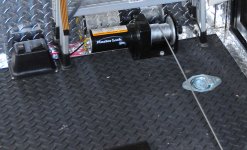
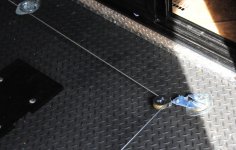
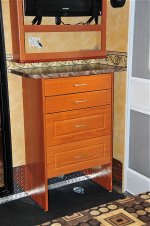
The cabinet in the garage was listed earlier, but to recap, it is a stock HD closet cabinet with an “ordered from HL” bedroom dresser cabinet top, cut to fit. I left the bottom draw out for obvious reasons and the cabinet is mounted off the floor to allow the winch cable to go under it if needed.
 

Attachments

  • Garage_update_01..jpg
    Garage_update_01..jpg
    322.9 KB · Views: 688
  • Garage_update_02..jpg
    Garage_update_02..jpg
    387.5 KB · Views: 625
  • Garage_update_03..jpg
    Garage_update_03..jpg
    407.4 KB · Views: 621
  • Garage_update_04..jpg
    Garage_update_04..jpg
    248.1 KB · Views: 576
  • Garage_update_05..jpg
    Garage_update_05..jpg
    295.5 KB · Views: 614
  • Garage_update_06..jpg
    Garage_update_06..jpg
    190.1 KB · Views: 621
  • Garage_update_07..jpg
    Garage_update_07..jpg
    190.7 KB · Views: 524
Last edited:

porthole

Retired
Added a Maxxair vent. I tried the new style vent (Maxxair II) and on a fantastic fan the cover is not tall enough, all though the package says for “high powered fans”.
I retuned it and bought the “mad for Fantastic Fan expensive cover. Guess what it is also not tall enough to completely allow the vent to open.

I put this one on the LR vent, which seldom seams to run at high speed. But before mounting it I put it over the bathroom FF that I added. On high speed this cover still does not flow all the air the fan is capable off. I could feel air blowing under the cover as well as out the vent. Maybe with the Maxxair screen removed it will flow enough, but I did not try it.
I may try the Maxxair II version again and just remove the cover’s screen and louver.
I want it more for being able to drive with the vents open and to protect the vent itself. It will allow the vent to be open when the cover is on over the winter too.


http://www.airxcel.com/maxxair/products/covers/fanmate

https://www.amazon.com/Maxxair-00-9...id=1525964640&sr=8-1&keywords=maxxair+fanmate
 

Attachments

  • Max_air_vent_00..jpg
    Max_air_vent_00..jpg
    157.2 KB · Views: 305
  • Max_air_vent_01..jpg
    Max_air_vent_01..jpg
    209.6 KB · Views: 308
Last edited:

porthole

Retired
Here a no-cost simple change.
I always felt that the patio door seemed a bit narrow for some reason, and I couldn’t move my dinette table from the LR to the garage. There are two rubber blocks mounted in both the upper and lower tracks of the patio door. I pulled both out and cut about 1.5” off each and re-installed. I still have about 3/8” of room before the door hits the patio door factory stops, but now I have a wider garage access and room to move my table back and forth.
 

Attachments

  • Slider_mod_00..jpg
    Slider_mod_00..jpg
    345.4 KB · Views: 574
  • Slider_mod_01..jpg
    Slider_mod_01..jpg
    102 KB · Views: 528
  • Slider_mod_02..jpg
    Slider_mod_02..jpg
    196.1 KB · Views: 531

Riverman

Well-known member
Duane how do you manage to keep that non-skid material on your ramp looking soooo pristine?
Great work - you are the "Mod Master"!
 

DC10-FE

Member
I must say Duane, I love the mods you’ve made to your 3010 so much that it has inspired me to incorporate many of them into my 3010.

The first one I did was the headboard shelf. The wife loves it, but it doesn’t have quite enough space to accommodate her water bottle. Which is ok, since it has given me additional ideas on how to add a drop down shelf to the unit itself.

The second mod I added was the additional awning switch. I’ve never been comfortable with extending the awning and not being able to see what it’s doing. By far my favorite mod. I am going to see what I can do to modify the slide out controls so I can put an additional switch in the bedroom. It’s not a good feeling hearing something go “crunch” and not knowing what got caught up in the extension or retraction process until after it’s been reduced to kindling. The only reason I mention this is, well, let me just say I have first-hand knowledge of this happening from a previous 5er.

The third update was the area under the sink. This has opened up so much more space for kitchen essentials. I did add my own twist to it though. I cut up some 2X4’s to make them 4 inches tall and then put a piece of 24”X24”X1/4” plywood on top of the 2X4’s to make a shelf flush with the existing shelf/floor. It prevents items from getting trapped underneath the existing shelf/floor.

I think the next mods I do will be the additional electrical outlets on the couch and below the TV.

Keep the great ideas coming and if I can get the creativity in my brain working, I’ll share whatever I come up with. I'll share some pictures of my updates as soon as I figure out how to upload pics from my computer. Since this is my first post, I'm guessing that I have some sort of restrictions on what I can do.
 

jimtoo

Moderator
Hi Scott,

Welcome to the Heartland Owners Forum and Family. Since you have been looking around for a little while on the forum, you have found that there is lots of information here. The folks are all willing to share if you need help.

Enjoy the forum and doing the mods to make your Cyclone,,, your Cyclone.

Jim M
 
"The third update was the area under the sink. This has opened up so much more space for kitchen essentials. I did add my own twist to it though. I cut up some 2X4’s to make them 4 inches tall and then put a piece of 24”X24”X1/4” plywood on top of the 2X4’s to make a shelf flush with the existing shelf/floor. It prevents items from getting trapped underneath the existing shelf/floor.


Having fun are we? Duane has this modification on his "list" just busy enjoying the season now and I am sure he will continue to do more. I wonder where he comes up with many of these and some were just necessary. In time Jennifer wll come up with some of her own as well. I know you will love having the outlets on the oppisite side of the cyclone.
Looking forward to your twist on things as well. Believe me, nothing stays the way it came in the door and he is pretty darn smart and handy.
 

DC10-FE

Member
OK, now that my restrictions are less restrictive, I can post some pics of what I've done.
The shelf I made with some scrap oak I had in the garage (That would be the garage of the house and not the trailer). I shaped some supports and added a felt pad on each support so as to not scratch the existing headboard. Thanks again for the idea Duane.

IMG_5092.JPGIMG_5091.JPGIMG_5093.JPG

The next mod was the awning switch in the forward basement area. I must say, I do like the way Duane did his which makes mine look somewhat makeshift. It works, but I'm still looking for a better switch to use. The switch (Radio Shack switch) is actually wedged in between two straight mending plates attached to the wood framing in the basement. The hard part was running the wiring from the existing switch at the control console.

IMG_5095.jpg

The third mod being the area under the sink, looks funky in the pictures because I wanted very little trouble installing it. Basically what you're looking at is the platform before I installed it and then how I installed it and finally, what it looks like installed. Believe it or not, there is a reason why the 4 inch blocks are mounted the way they are depicted. It was for ease of installation. It will make sense as soon as you try to install it through that door.

IMG_5088.JPGIMG_5085.JPGIMG_5089.JPGIMG_5090.JPG

Almost forgot, threw these together before I left yesterday. When I get home I'll put a finish on them. These "shelves" were made with some scrap poplar wood I had floating around. I rounded the edges to keep DW from hurting herself.

IMG_5103.JPGIMG_5101.jpgIMG_5099.JPGIMG_5100.JPGIMG_5102.JPG

OK, that's it for now, but trust me, there WILL be more to follow.
Cheers!
//heartlandowners.org/images/misc/pencil.png
 
Last edited:

porthole

Retired
Added a small LED (amber) above the main light switch for my wife to be able to find the switch in the dark.

Really works well and I like it too..
West Marine item.
 

Attachments

  • D30_7234.JPG
    D30_7234.JPG
    343.4 KB · Views: 824

porthole

Retired
I have a small 1500 winch on the floor along the ODS wall. You can see behind the motor a small "snatch" block I will use for a cable direction change. The cable runs out across the trailer to one of the tie down loops, snatch block snapped on to the tie down.
I ran a 10 gauge jacketed wire down the frame from the front battery compartment.

Something for the cable to ride over at the beaver tail is also needed. I use a block of HDPE (plastic) for that purpose (white block in the pictures).
Without the block the cable will cut through the floor as it is loaded.
 

Attachments

  • D30_7258.JPG
    D30_7258.JPG
    371.7 KB · Views: 732
  • D30_7314.JPG
    D30_7314.JPG
    549.9 KB · Views: 664
  • D30_7312.JPG
    D30_7312.JPG
    468.3 KB · Views: 686
  • D30_7313.JPG
    D30_7313.JPG
    444.4 KB · Views: 654
Last edited:

porthole

Retired
TDI power cord reel.

This is another luxury item that was well worth the effort.
FYI, TDI makes a Heartland specific reel, slightly smaller in diameter.

I wanted to put this behind the J-wrap just in front of the LR slide, but there just wasn't enough room. The 3010 Cyclone only has 10" frame rails.
The first picture shows a gusset plate that was in the ideal spot for the reel.
The reel is mounted to the frame rail behind the slideout. I will be making a sheet metal enclosure for this but so far it seems to be un-affected by weather, and we rode through some heavy rains on the way to Nashville.

I also removed the sewer hose storage bin and installed the reel switch in this cover plate.

I tapped into the 10 gauge cable I ran to the winch in the back to power this.
If you decide to install one of these don't scrimp on the wire gauge. Go for the bigger cable
 

Attachments

  • D30_7221.JPG
    D30_7221.JPG
    289.5 KB · Views: 1,291
  • D30_7220.JPG
    D30_7220.JPG
    230.8 KB · Views: 1,284
  • D30_7253.JPG
    D30_7253.JPG
    289.6 KB · Views: 1,327
  • D30_7216.JPG
    D30_7216.JPG
    258.3 KB · Views: 1,313
  • D30_7219.JPG
    D30_7219.JPG
    287.1 KB · Views: 1,400
  • D30_7222.JPG
    D30_7222.JPG
    200.4 KB · Views: 1,272
Last edited:

porthole

Retired
A simple "switched" basement storage area light.
This works pretty good and puts the light where I need it.

The small round light is a new item from West Marine, fairly bright LED's. In time I will probably add a few more to the basement area.

Both lights operate from the new switch. The factory light was sometimes difficult to access when the basement is full.

If you do this keep in mind that the light under the overhang in the front of the trailer gets it power downstream from the basement light. Don't ask how I know this.
 

Attachments

  • D30_7240.JPG
    D30_7240.JPG
    264.1 KB · Views: 924
Last edited:

porthole

Retired
I bent a piece of duct work from Home Depot and siliconed it in the space between the tool box and the round port, right up against the tool box.
Once it cured enough to not slide around I reached in with a tube of silicone and caulked all the corners and covered the bottom real good.

I intentionally was sloppy with the water this past week and am happy to report my toolbox remained dry.

//heartlandowners.org/attachment.php?attachmentid=9488&d=1280203202
 

Attachments

  • water_dam.jpg
    water_dam.jpg
    221.3 KB · Views: 996
Last edited:

porthole

Retired
Hardwired Progressive EMS.

Mounted behind the basement wall on the door side. I needed 4' of 6 gauge 3 wire to make the connection after auto transfer switch (for the genset/shore power)

This way protection is for either power source.

I got the version with the remote display and optional 2nd display.
The main display is in the basement next to the UDC. The second display is in the main cabin.

BTW - directions say you can't use telephone cable to extend or shorten the wire run. This is only partially correct.
The difference between the Progressive supplied wire and standard 4 conductor flat tele wire is the connectors are flipped relative to each other.

The monitors display in a scrolling fashion:
  • Line 1 voltage
  • Line 1 amp draw
  • Line 2 voltage
  • Line 2 amp draw
  • Frequency
  • any prior fault codes
  • current system status


Addendum:
Here is the link to an issue I had and the temporary repair needed to get going.
Progressive customer service and support is excellent.

//heartlandowners.org/showthread.php/35022-Progressive-EMS-failure-tech-support-service-and-a-tip?highlight=progressive

Addendum 2: Generator non bonded neutral ground - work around neutral ground bonding plug
Using a portable generator with the open neutral issue. There is a simple cheap work around.

Use a 15amp male repair-replacement plug. Jump the ground and neutral in the plug, put the cover back on and then plug that into an empty duplex outlet on the generator.

Using this plug will allow the EMS to see the bonded neutral and ground and allow the power to pass as well as keeping all the other protection in place.

View attachment 28694
 

Attachments

  • Surge_00.jpg
    Surge_00.jpg
    348.4 KB · Views: 1,111
  • Surge_01.jpg
    Surge_01.jpg
    198.1 KB · Views: 1,027
  • Surge_02.jpg
    Surge_02.jpg
    182.8 KB · Views: 1,010
Last edited:

porthole

Retired
4 eye bolts, two lengths of chain and I have a rear patio
 

Attachments

  • tailgate_01.jpg
    tailgate_01.jpg
    342.8 KB · Views: 936
  • tailgate_00.jpg
    tailgate_00.jpg
    336.5 KB · Views: 1,215

porthole

Retired
A piece of black Starboard with a cleat spaced for the pin box and we have a place to hang our owners plaque and welcome sign.
Small Home Depot solar night light to help from walking into the pin box at night.


******
Switching to a Trailair pinbox means redesigning this ..............
And Deb bought a "Us" sign this weekend to add on.
 

Attachments

  • D30_7293.JPG
    D30_7293.JPG
    387.6 KB · Views: 1,015
Last edited:

porthole

Retired
Hard to see, but in the first picture my sanitation pipes drain "uphill" to the discharge pipe.

I cut the pipes out and put new pieces in. Ended up moving the "Y" towards the front and extending the rear gray tank pipe.

I also found while doing this the pipes coming out of the tanks were either level or slightly elevated at the wrong end. So I moved these around too. The strap on the frame rails I added to support the now lowered pipes.

The forward two holding tanks will hold about 3-4 gallons of fluid when drained. I pushed up on the gray tank and almost filled the 5 gallon bucket with the extra water.

Next time I am in there I may add supports to the center of the tanks. Or maybe just some "bullseye" on the underbelly on where to push for the end of season prep work.
 

Attachments

  • Sewer_pipe_03.jpg
    Sewer_pipe_03.jpg
    199.3 KB · Views: 789
  • sanitation_slope_05.jpg
    sanitation_slope_05.jpg
    358 KB · Views: 613
  • sanitation_slope_06.jpg
    sanitation_slope_06.jpg
    264.8 KB · Views: 657
  • sanitation_slope_04.jpg
    sanitation_slope_04.jpg
    145.1 KB · Views: 643
  • sanitation_slope_03.jpg
    sanitation_slope_03.jpg
    166.7 KB · Views: 702
  • sanitation_slope_02.jpg
    sanitation_slope_02.jpg
    286.8 KB · Views: 733
  • sanitation_slope_01.jpg
    sanitation_slope_01.jpg
    268 KB · Views: 790
  • sanitation_slope_07.jpg
    sanitation_slope_07.jpg
    198.2 KB · Views: 634

porthole

Retired
Fresh water tanks re-plumbed.

First 2 pics show the "drained" water tanks. Last 2 show new blind bulkhead fittings installed in the bottom of the tanks and new crossovers and drain valve. Within 1 minute of starting to fill the tanks I had water coming out of the drain. Seems to work pretty good now but I am still going to change out the tanks to the new style, and raise the door side slightly to make all of the water usable.

I also added pieces of 2x3's all cut to the same length to keep the tanks centered in the frame rails. They are just laying in the angled cross pieces and secured with tie wraps.
 

Attachments

  • fresh_water_tanks_02.jpg
    fresh_water_tanks_02.jpg
    169.6 KB · Views: 658
  • fresh_water_tanks_01.jpg
    fresh_water_tanks_01.jpg
    242.6 KB · Views: 698
  • fresh_water_tanks_03.jpg
    fresh_water_tanks_03.jpg
    179.1 KB · Views: 677
  • fresh_water_tanks_04.jpg
    fresh_water_tanks_04.jpg
    236.2 KB · Views: 661
  • fresh_water_tanks_05.jpg
    fresh_water_tanks_05.jpg
    191.2 KB · Views: 643
Last edited:
Top