And so it begins

trippingt

Member
porthole - I pick up my new 3950 in a couple of weeks. I love the BikePro's for holding my motorcycle up. Do you just drill into the floor? Is there metal plates beneath that area? Are there any tanks I need to be aware of when I install mine?

I love the mods on your rig.

trippingt
 

porthole

Retired
porthole - I pick up my new 3950 in a couple of weeks. I love the BikePro's for holding my motorcycle up. Do you just drill into the floor? Is there metal plates beneath that area? Are there any tanks I need to be aware of when I install mine?

The "D" rings are mounted above steel "C" channel that runs front to rear. 5 sections I think. Those D rings use self tapping screws and do not have nuts/washers on the bottom.

My bike Pro plates are mounted so that one set of holes mount over the steel channel. the opposite side just gets bolted to the floor with large washers.

There is a the fuel tank mounted under the rear that you have to be aware of before you start drilling. I was able to get to all but 1 or 2 of the nuts. For the nut I could not tighten I dropped the tank about 2".
 

porthole

Retired
Somewhere I had seen the new screen door slides. While at Goshen I convinced Sean (or Shawn) to get me one to try. More then once I heard it would not fit from several folks. Well it would fit so I had him get me another. Didn't take long before more and more people wanted them.
As it turned out they became very popular and Brian Brady promised one "Bug Catcher" to everyone at the rally that wanted one. What a nice gesture!

All it It it took was to scribe a line using the old slide as a template and a plexiglass scorer to cut to size.

Works great.
 

Attachments

  • IMG_0573.JPG
    IMG_0573.JPG
    182.5 KB · Views: 493

porthole

Retired
Microwave tweak
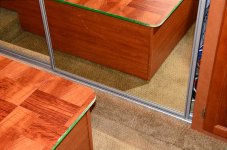
When I picked up the trailer new, the microwave was all lopsided. Turns out there is a plastic mounting pad inside the cabinet that the micro sits on.
Mine was broken and crooked. Whomever installed it decided that a couple of quarters and nickel were all that was needed to "straighten" things up.

This was fixed at the factory before I left for home.

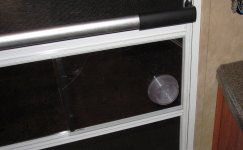
Coming home from the Goshen Rally my micro popped out (deeper into the cabinet). THinking it was probably broken again I popped the cover of and found that it had just jumped out of the track. The front of the MW is held in place by the trim bezel. The rear is held in only by gravity.

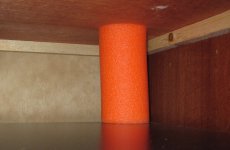
I cut up a foam noodle and stuffed two pieces into the rear. Looks like it work great.

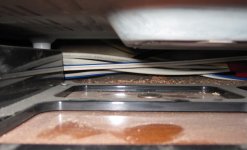
BTW, While poking around I found that there is still a quarter under the MW.

over 10,000 miles later and it is still right in the same spot.
 

Attachments

  • Micro_bumper.jpg
    Micro_bumper.jpg
    167.5 KB · Views: 364
  • Micro_quarter.jpg
    Micro_quarter.jpg
    135.2 KB · Views: 384

jbeletti

Well-known member
Great job on the "bug catcher" install Duane :)

The offer was for Goshen rally attendees. Sorta had to be there.

Jim
 

porthole

Retired
I installed "mid ship" blinkers - turn signals - directionals.
These are LED combo units, running and turn.
I wired it for blink only to get the most attention.
I used a Curt brake light controller (about $25), # C56196

http://www.etrailer.com/p-C56196.html

This controller was wired in, in front of the door on top of the under belly. I already have a "patched" hole there from some other installation.

Jon Holbert noticed them from a good distance away at the PA rally.

 
Last edited:

porthole

Retired
So, I had a piece of 1/4" plywood sitting on the ram for the bedroom slide, along with the insert for the dinette couch/bed.
Somewhere along the way the insert slid down between the bed and the hydraulics.
The hydraulics won and broke the bed apart when I opened the slides.

The first picture shows the slide without the bed assembly. Hard to see but the slide looks like it is ready to fall in. With out the bed frame the slide is only held in the trailer by bolts through the steel frame and the slide floor

2nd and third picture shows gussets and cleats added to rebuild the bed frame and to add supports for the shelf.
 

Attachments

  • Bed_repair_&_storage_2.jpg
    Bed_repair_&_storage_2.jpg
    370.1 KB · Views: 682
  • Bed_repair_&_storage_4.jpg
    Bed_repair_&_storage_4.jpg
    319.1 KB · Views: 646
  • Bed_repair_&_storage_5.jpg
    Bed_repair_&_storage_5.jpg
    371.9 KB · Views: 637

porthole

Retired
The whole side of the bed split. When I was in Elkhart picking up the trailer I also picked up a sheet of slightly damaged 1/4 ply that was almost the same color as the interior of the Cyclone. For $5 I figured I couldn't go wrong.
It is a good match.
 

Attachments

  • Bed_repair_&_storage_6.jpg
    Bed_repair_&_storage_6.jpg
    327.3 KB · Views: 501

porthole

Retired
Finished project. The gas struts, are 90 pound units, they are not strong enough. still looking for a stronger pair.

Also got tired of banging the corner of the bed. Finally rounded it off.
 

Attachments

  • Bed_repair_&_storage_7.jpg
    Bed_repair_&_storage_7.jpg
    394.7 KB · Views: 546
  • Bed_repair_&_storage_8.jpg
    Bed_repair_&_storage_8.jpg
    393.7 KB · Views: 474

Manzan

Well-known member
Very well done. And it is a good match. Good thing you could do it yourself--bet it would cost a bundle to have it done. If you move the bottom of the struts out further, you will get more compression and they will work better. With them so close to the lid, you are getting very little.
 

porthole

Retired
I did have them out further, but it was just too much to start collapsing them.
I did notice while in Goshen and looking at trailers that the frame portion in mounted towards the foot board, opposite angle. I will be giving that a try.
 

porthole

Retired
I see you have the Banks system as well is it the speed brake and econo tuner?

I "used" too. New truck has no performance additions.

On the GMC is was the PDA 6 gun tuner. The speed brake I never got to work correctly. And after changing every part at least twice, I returned it. Although everyone else I have heard form has had no issues.

I saw NO improvement in either economy or engine operating temps with all the works I did.
 

watchthebox

Well-known member
I hadn't read your thread for awhile... looks like you've been busy! Your battery upgrade turned out really nice. I do like those circuit breaker/switches. The block and tackle pulley system you used to install you batteries is excellent. When I was struggling using an external long lever to hoist mine into place, I swore I'd use some sort of pulley like you did whenever I needed to replace mine. The block and tackle is an even better idea. By the way, what is that little tank to the right of your battery box?

I like your under bed storage compartment. That's a perfect place for the dinette sofa piece.

Keep up the great mods!
 

watchthebox

Well-known member
That's for disk brakes, right? Does that work with Ford's integrated brake controller? How to you like your disk brakes? One day I'd like to get some.
 

jnbhobe

Well-known member
That's for disk brakes, right? Does that work with Ford's integrated brake controller? How to you like your disk brakes? One day I'd like to get some.

I can help answer that!!! Yes it is for disc brakes, It works great with the Ford controller, and I would not be without the disc brakes its the best mod I have made. I know Duane feels the same way about them. JON
 
Top