Valance Removal??

kakampers

Past Heartland Ambassador
Hey Guys,

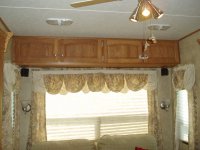
We received the day/night shade for the rear picture window, to replace the original which was bend upon deliver.

The problem is this...can't see how the valance and hard side window covers are attached, so we can't remove them to install new shade. Please advise...:confused:
 

jpmorgan37

Well-known member
Ken;
If yours are like mine, they are attached with screws into small angle brackets. I just remove the screws from the valance and lift it off. You will need two people because it can be a little unruley. Also, my screws required a square bit.
Good Luck,
John
 

HappyKayakers

Well-known member
And once you get them off, leave them off :D DW thinks our rig looks much better without them. I made several trips to the dumpster with all of our valances. She made simple curtains to replace. Makes the rig look much brighter, in our opinion.
 

Attachments

  • P8190005.JPG
    P8190005.JPG
    70.8 KB · Views: 61
  • P8190007.JPG
    P8190007.JPG
    78 KB · Views: 58

kakampers

Past Heartland Ambassador
That's what you would think, however, there are no "L" brackets or any other type of bracket visible...don't see how these things are attached at all...HELP!! They almost appear to attached from the back side of the interior wall, prior to construction, I certainly hope not!!

Can the factory elaborate...this is an 08'?
 

Ray LeTourneau

Senior Member - Past Moderator
On our 3400 there are screws up through the upper valance into the cabinet overhead. In addition there are screws in the side pieces on the very bottom through the fabric into the wall. These should be removed first. Heartland originally installed the shades screwing through the header into the window frame. The instructions supplied with the shade say to use the brackets supplied with it. Your choice but be careful not to screw through the cords and springs inside the header. Have fun, we did.
 

jimtoo

Moderator
kakampers.

I just replaced one on the side of my unit and just checked the rear one. If you look close at the bottom on each side valance that touches the wall, in the fold of the material you will find a screw hidden.
This is at the very bottom where they folded the material around the board. At the top you will find 3 or 4 screws across under the bottom side of the top that are screwed to the bottom of the overhead cabinet. And yes it hard to handle by yourself. Then the factory had just drilled holes in the top part of the shade and screwed it directly to the window frame. When you get the old one off, measure carefully and drill holes in the new one at the same locations so you can reuse the holes in the window frame.

I found that these shades are very sensitive to the tension and also the location of the tension adjusters on the string. If the factory would have mounted the tension adjuster in the correct place, I would not have had to replace the one in mine. The new one did the same until I moved the tension adjuster out about 1 inch from where it was mounted. So if yours is sagging on one side and looks like it has lost it's starch or what ever, check the tension and location of adjuster first.

Jim
 

kakampers

Past Heartland Ambassador
Thanks everybody...we're probably gonna tackle this little project tomorrow. Wish us luck!!
 
Top