Sinking sink

twohappycampers

Well-known member
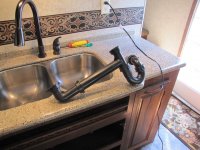
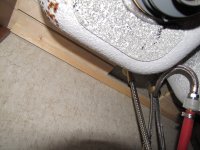
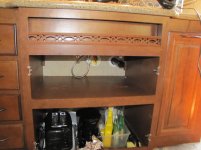
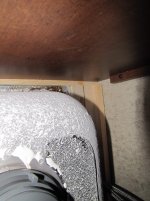
Soooo, that's why it's called a "sink"! We're still dealing with a water heater giving us all kinds of grief (4 service calls so far). Anyway, now we just noticed the kitchen sink is falling through the counter. At the front edge. There's now a gap between the sink and the counter. Don't know how long it's been this way. I remember a few times finding some water in the kitchen drawer below the sink, but didn't make the connection. I recall there being some posts regarding this problem, and now we seem to have joined the ranks. Can someone please direct me to posts where I can look up the solution to this, or maybe give me quick instructions? Thanks. Soon Doug's going to have to quit his full-time job to deal with all these ongoing problems. I know we haven't had as many problems as some, but it does get frustrating and expensive and time-consuming. There, I've vented!!
 

cookie

Administrator
Staff member
There are two things to do here.
One you will need to get some adhesive caulk. you can 'glue' the sink back up into place.
But before you do that you will need to go to a building center and get some sink clips. Seems they do not put enough of these on at times.
So, in a nut shell, you will need to glue the sink, wedge some boards in to hold the sink in place, and install a couple more sink clips.
I have not had to do that, but maybe someone who has will chime in. I remember some one posted the repair with pictures. JohnDar I think.

Peace
Dave
 

jnbhobe

Well-known member
I just had to do mine, I added some screen door clips and caulked the edges real good.
 

nmexseis

Member
This is pretty amazing I was just on the site thinking of posting about the same problem. I was in the middle of nowhere and had the same problem come up on my sink we have and island and it is also the front part of the sink that has come loose all I had was epoxy at the time it did not work so save time don't try it it looks like the clip are to big to fit in the space between the sink and face of the cabinet so we are looking for something else. Does any one know if you can screw right into the counter top material as it looks like there is no wooden piece to screw into.
thanks
 

JohnDar

Prolifically Gabby Member
Yep, I had the beginning of a sinking sink, but I caught it before it got out of hand. If you look under the sink, around the opening in the counter top, you should see the clips that are there. On a double bowl sink, there should be six clips, two in front, two in back, and one on each end. I was missing the two in front, even though the holes for the screws were drilled in the counter.

My quick fix was to run a bead of silicone around the perimeter of the sink flange and the counter top edge (top of sink, not under the counter). This held the water until I got the clips from Heartland. In hindsight, I could have made them or picked up something from a big box store. But there's been no further problems with it.

I'd attach a photo of the underside of the sink, but I'm working a 16 hr. shift and don't have my laptop with all my photos. I'm on my "new" iPad tablet that I took from the wife cuz she decided she wanted a mini-iPad after she got this tablet.
 

nmexseis

Member
I understand just getting off a long shift myself. Thanks for the reply. I will thank to the dealers parts guy tomorrow.
 

cookie

Administrator
Staff member
Does any one know if you can screw right into the counter top material as it looks like there is no wooden piece to screw into.
thanks
I would not screw into the solid counter top. Depending on your situation, you may be able to add some sort of bridging from the existing wood.

Peace
Dave
 

gschaaf

Well-known member
We had the same problem just removed the clip cleaned it up and used 100% silicone all around the sink. They don't usually have enough from the factory. Haven't had a problem since.
 

Westwind

Well-known member
The "Heartland Sinking Sink", I finished fixing mine in our Bighorn yesterday, it had two clips in the front near the cabinet doors and that was it. I was not a happy camper. Our 3070RL sink cabinets are in three parts all built separately and joined together. Therefore room to get to the underneath of the sink area was tight to say the least. I had to remove all the drain pipes. Posted some pictures so you can get an idea of the task, I added 4 screen clips, two to the back and two on the rear side of the sink. It seems pretty snug, I'm sure better then it was and then caulked with some clear sink caulking. Hopefully it won't need additional work. It's not fun working blind because you really can't see what you
are doing. So it was put the screw through the clip and hope it didn't fall off the tip of the screw driver, which it did many many times.
Wish it had been done at the factory when it was being put together, they remembered the front two.
 

Attachments

  • 8.3.2013 RV Sink 001.jpg
    8.3.2013 RV Sink 001.jpg
    813.2 KB · Views: 145
  • 8.3.2013 RV Sink 003.jpg
    8.3.2013 RV Sink 003.jpg
    798.3 KB · Views: 136
  • 8.3.2013 RV Sink 002.jpg
    8.3.2013 RV Sink 002.jpg
    702.3 KB · Views: 133
  • 8.3.2013 RV Sink 004.jpg
    8.3.2013 RV Sink 004.jpg
    803.4 KB · Views: 118
  • 8.3.2013 RV Sink 005.jpg
    8.3.2013 RV Sink 005.jpg
    828.6 KB · Views: 134
Last edited:

JohnDar

Prolifically Gabby Member
You're not screwing into the solid counter top material. There should be 1/2" plywood glued to the underside around the cut-out for the sink.
 

Westwind

Well-known member
Hi John - Into the plywood - sense of touch was still there, my concern was that the screws be the right length. So 5/8" was what I used and it worked out perfectly. Like I said keeping the screw on the screwdriver while laying on my side and trying to reach in and up I felt like a contortionist.
You really can't afford to have something suspended hoping that caulking will hold it, especially traveling on these highways we have, we make it a point not to store anything in the sink while traveling but that didn't matter it still "SUNK"
 

Theresau

Well-known member
Our sink cabinet is similar to yours. Is the wood frame above or below the sink? In other words is the sink sitting on the wood frame? If so, how is the wood frame attached to the sink?

The "Heartland Sinking Sink", I finished fixing mine in our Bighorn yesterday, it had two clips in the front near the cabinet doors and that was it. I was not a happy camper. Our 3070RL sink cabinets are in three parts all built separately and joined together. Therefore room to get to the underneath of the sink area was tight to say the least. I had to remove all the drain pipes. Posted some pictures so you can get an idea of the task, I added 4 screen clips, two to the back and two on the rear side of the sink. It seems pretty snug, I'm sure better then it was and then caulked with some clear sink caulking. Hopefully it won't need additional work. It's not fun working blind because you really can't see what you
are doing. So it was put the screw through the clip and hope it didn't fall off the tip of the screw driver, which it did many many times.
Wish it had been done at the factory when it was being put together, they remembered the front two.
 

Invizatu

Senior Road Warriors
We had the same issue in our North Trail tt. I loosened all the clips and put a nice bead of silicon around the top edge of the sink and then tightened up all six clips. I then put a post from the bottom of the sink to the floor below (closet rod). I cut it just a tiny hair long so that the post, when put in place had enough pressure as not to move. We also started traveling with the sink covers put in a drawer (they are heavy and the constant bouncing down the road did not help). Never had another problem.
 

JohnDar

Prolifically Gabby Member
Here's some photos of the sink underside in a BH3670, showing the clips. You can see the plywood around the opening. The first is the single clip at one end of the sink, the second shows the backside, and the last is the front of the sink, showing an empty screw hole. I had to install two clips in the front. A magnetic bit on a long extension helps hold the screw until you can get it started (great to have tools!). In a 3670, though, access requires one be small of waist and a bit of a contortionist.

View attachment 25795View attachment 25796View attachment 25797
 

Theresau

Well-known member
Joe found the wood frame but not the clips.... Sounds like another project - yes good he's similar - going to be very tight considering the shelf right below.

Here's some photos of the sink underside in a BH3670, showing the clips. You can see the plywood around the opening. The first is the single clip at one end of the sink, the second shows the backside, and the last is the front of the sink, showing an empty screw hole. I had to install two clips in the front. A magnetic bit on a long extension helps hold the screw until you can get it started (great to have tools!). In a 3670, though, access requires one be small of waist and a bit of a contortionist.

View attachment 25795View attachment 25796View attachment 25797
 

Westwind

Well-known member
I don't believe caulk will hold the sink forever if you travel on the road. I would recommend installing the clips if they are missing along with the caulking. To make it easier if you have the shelf dividing the sink cabinet you will have to remove the drain pipes to make it easier, but unless your a small thin person your going to be putting them in blind. A magnetic screw driver will relieve some frustration.
Plywood was glued to my Acrylic counters so you could fasten the counters using clips, unfortunately the clips were forgotten.
 

JohnDar

Prolifically Gabby Member
Fortunately, my cabinet does not have a shelf under the sink. If it did, my responses would have been unprintable. As I mentioned, four of the six clips were there, but with the two front ones missing, it was just enough flex to let a little water seep through and drip to the bottom of the cabinet. Tell tale was finding water in the wash pan down there after we had dried it off. No damage to the fake board bottom of the cabinet.
 

Mizmary

Well-known member
After six months of full time use ours just now started to sink. I use the sink every single day- washing dishes, drying dishes, etc. we just put some new clips/L brackets up to hold the sink up. Then we sealed around the sink ledge with clear silicone waterproof kitchen/bath caulk to ensure that no drips continue to make their way from the sink into the cabinet underneath.
 
Last edited:

JohnDar

Prolifically Gabby Member
Thinking about this problem, for those who might experience it in the future, you don't necessarily have to get the metal clips. You might be able to securely support the sink by attaching a strip of plywood (1/2" or 3/8" should do) that extends from the wood under the counter and over the undersink flange. Might have to shim a bit between the plywood and the flange, but it would essentially do the same as the clip. Then run a bead of clear silicone around the sink between it and the edge of the opening above.
 
Top