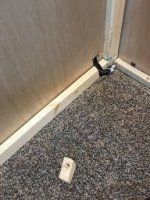
We have an AirSafe hitch that we love, but the last trip the airbags were not holding air making it a rough trip on the rig (and boy can we feel the difference). Thought maybe one of the bags had sprung a leak as spraying soap on the connections was yielding no results...bad news was that the bags are not cheap to replace 🙁. Spent yesterday trying to isolate which bag was leaking and low and behold - the air valve had the leak. It only showed up when you moved it around, but there is was!! $3.75 part and we’re ready to go again!! Happy day!
You are using an out of date browser. It may not display this or other websites correctly.
You should upgrade or use an alternative browser.
You should upgrade or use an alternative browser.
What did you do to your camper today?
- Thread starter MagnoliaTom
- Start date
MountainDon
Active Member
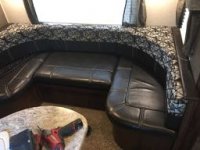
This week I am removing ( and saving ) the u shaped dinette in my North trail 21 FBS and replacing it with a compact couch and coffee table.
Then I am removing the shelves by the shower in the bath room and putting in a rack of towel hooks
Then I am building a magazine rack to hang on the wall by the couch
Then I am removing the shelves by the shower in the bath room and putting in a rack of towel hooks
Then I am building a magazine rack to hang on the wall by the couch
uncledon
Her chauffeur
Not so much what I did "to" it, but more like "for" it. Did some playing around with a new plunge router. Might have to haul the router and my Workmate with me this winter so I have another pastime...
Then grand daughter got into the act too!


Sent from my SM-G900V using Tapatalk
Then grand daughter got into the act too!


Sent from my SM-G900V using Tapatalk
TravelTiger
Founding Texas-West Chapter Leaders-Retired
This week I am removing ( and saving ) the u shaped dinette in my North trail 21 FBS and replacing it with a compact couch and coffee table.
Then I am removing the shelves by the shower in the bath room and putting in a rack of towel hooks
Then I am building a magazine rack to hang on the wall by the couch
Can't wait to see pics!
Sent from my iPhone using Tapatalk
Fox
Well-known member
Believe it or not - we are now in our third RV and today (for the first time ever) used an RV oven; we baked a pre-made frozen pizza.
Now one half the dealers fault (and one half my mistake), it took us awhile to get propane to the stove. At pickup the dealer assured us that both propane tanks were full; so going with the default setup (the tank opposite the empty / change over) I tried once and then twice, and then three times - unsuccessful. Eventually I switched the tank over and observed the change-over dial going green. DUH!
Tomorrow (after they hopefully take care of a few things) I'm going to give them an ear-full. I expect lots of apologies - but not an offer to pay for that tank.
Believe it or not - we are now in our third RV and today (for the first time ever) used an RV oven; we baked a pre-made frozen pizza.
Now one half the dealers fault (and one half my mistake), it took us awhile to get propane to the stove. At pickup the dealer assured us that both propane tanks were full; so going with the default setup (the tank opposite the empty / change over) I tried once and then twice, and then three times - unsuccessful. Eventually I switched the tank over and observed the change-over dial going green. DUH!
Tomorrow (after they hopefully take care of a few things) I'm going to give them an ear-full. I expect lots of apologies - but not an offer to pay for that tank.
you know it’s probably not too late to take in the PDI that was developed by one of our members and have your dealer go thru it with you.
MountainDon
Active Member
This week I am removing ( and saving ) the u shaped dinette in my North trail 21 FBS and replacing it with a compact couch and coffee table.
Then I am removing the shelves by the shower in the bath room and putting in a rack of towel hooks
Then I am building a magazine rack to hang on the wall by the couch
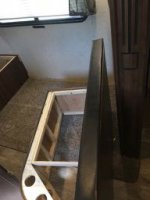
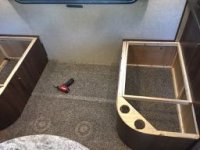
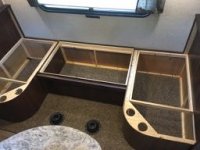
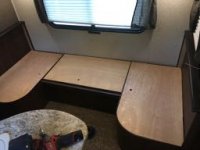
Here are the dinette removal pics. This would have taken about 15 minutes to do but there was a wire for the slide lights that went through the bottom of the left dinette side, so I had to go grab my multitool to cut out a slot for the wire to pass through ( after pulling it away from the wall a bit )
Now I have to figure out what to do with a U shaped dinette...... DOH I guess I will store it till I decide to sell it or take it to the dump.
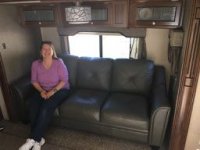
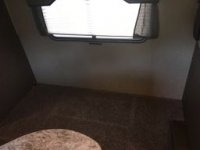
The tough part was getting the sofa in. If you do this you have to measure very carefully and look for the smallest way to turn the couch. The north trail has a door opening just under 26 inches so this couch had to be put on the diagonal and moved in very carefully!
Attachments
carl.swoyer
Well-known member
Very nice.Here are the dinette removal pics. This would have taken about 15 minutes to do but there was a wire for the slide lights that went through the bottom of the left dinette side, so I had to go grab my multitool to cut out a slot for the wire to pass through ( after pulling it away from the wall a bit )
Now I have to figure out what to do with a U shaped dinette...... DOH I guess I will store it till I decide to sell it or take it to the dump.
The tough part was getting the sofa in. If you do this you have to measure very carefully and look for the smallest way to turn the couch. The north trail has a door opening just under 26 inches so this couch had to be put on the diagonal and moved in very carefully!
Sent from my XT1254 using Tapatalk
Alan_B
Well-known member
Today I started the process of preparing for our fall trip:
Next up:
- Brought the Bighorn home from storage
- Re-measured the height of the unit when hooked to the truck for travel - 13'4"
- Greased the suspension
- Added vent tubes and valves to the fresh water vents. I am hoping this will reduce fresh water loss while traveling. I put loops in the vent tubing, I hope that will be enough. I added the valves while I was under there, in case I need to use them.
- Re-torqued the lug nuts on the RV wheels and re-torqued the bolts on the new pin box I installed a couple of weeks ago.
- Replaced the 50 amp breaker on the hydraulic system to reduce the stop-start issue.
- Discovered a missing vent cap on a plumbing vent on the roof. Ordered a new one.
Next up:
- Lubricate the slide seals, slide rollers and slide mechanisms.
- Sanitize the water system and flush and prep our water filter.
- Try to fix the black tank flush system.
- Get back behind the basement wall and quiet the water pump again. I had it pretty quiet with some foam shims. However they must have become dislodged on the many bump roads we traveled on our spring trip.
uncledon
Her chauffeur
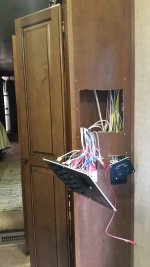
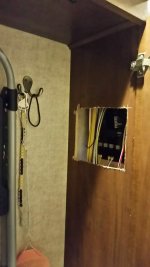
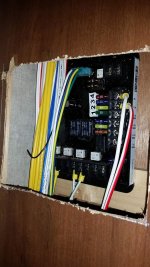
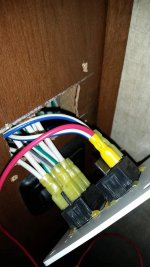
Finally decided to search and locate the LCI remote controller and figure out what needed to be done to enable the "light" button to actually control something. It has never worked. Today I discovered why...no conductor attached to the terminal.
I figured the controller needed to be close to the main control panel, and it was. Why HL ever mounted it the way they did will forever boggle me, but on our 3875FB it was mounted above the main control panel in the space between the hall closet interior wall and the wall holding the main panel (See pictures).
It didn't take long to figure out what needed to be done, and again, why HL didn't install the 15 inch jumper wire from the output terminal on the controller to the switch leg terminal on either the porch light, or the awning light, I'll never guess. I chose to connect it to the awning light so we will have plenty of light when we come home after dark now.
Tomorrow I'll clean up the cutout that I had to make to access the controller and fabricate a clean looking cover for the hole.
Attachments


CoveredWagon
Well-known member

Installed one of Jim Beletti’s magazine racks today. DW likes it already 😁
"Hi-Viz" Bill
Well-known member
Installed a Jim Beletti inspired, Inverter status L.E.D. light on Our Landmark 365 .. Note: Made sure the location could be seen in outside DS mirror, as well as inside rearview mirror, while was RV was in tow !!!

Last edited:
CoveredWagon
Well-known member
Installed a Jim Beletti inspired, Inverter status L.E.D. light on Our Landmark 365 .. Note: Made sure the location could be seen in outside DS mirror, as well as inside rearview mirror, while was RV was in tow !!!
View attachment 59341
Note: I rotated, saved, & uploaded this photo in ALL 4 possible orientations .. and STILL could not get this pic to post right side up ..... Frustrating !!
Bill turn your camera (I pad phone) when taking the picture. Worked for me. Took me 3 tries though.
"Hi-Viz" Bill
Well-known member
Bill turn your camera (I pad phone) when taking the picture. Worked for me. Took me 3 tries though.
Thanks Dave !! Re-took pic AND managed to fix the post !!
uncledon
Her chauffeur
Nice work on the Belletti Light. I added one to our BH last year. It's a comfort thing don't yeah know.
This week during a break in our storms here in MI, the DW and I washed the rig. I then spent two days and a bottle of Rejex sealing her. As easy as it is, on a 42 footer, that's something I don't look forward to very often. Next scheduled application...spring 2019!
Also built a removable shelving unit to maximize some storage space.


Sent from my SM-G900V using Tapatalk

Nice work on the Belletti Light. I added one to our BH last year. It's a comfort thing don't yeah know.
This week during a break in our storms here in MI, the DW and I washed the rig. I then spent two days and a bottle of Rejex sealing her. As easy as it is, on a 42 footer, that's something I don't look forward to very often. Next scheduled application...spring 2019!
Also built a removable shelving unit to maximize some storage space.
Looking nice and shiny!
Installed a Jim Beletti inspired, Inverter status L.E.D. light on Our Landmark 365 .. Note: Made sure the location could be seen in outside DS mirror, as well as inside rearview mirror, while was RV was in tow !!!
View attachment 59343
Nice work Bill and way to be a "good listener". For others, note that in the past, when I would do this mod on my demo coaches, I always had a truck with an RV hauler bed. Those are cut way lower in the back. NowI have a standard pickup bed and when I installed my inverter status light, I didn't stop to think about visibility from the truck, I just put it where I normally did in the other coaches. Oops! Can't see it. When I was at the MI rally and in talking with Bill, I told him about my oops and to consider using tape as a marker and hitch up, get into the truck and move that tape around until he could see it from the cab before committing to drilling a hole.
Good work Bill!
Love it - looks like you added a piece of backer to mount it at that height too. Nice work!
Similar threads
- Replies
- 2
- Views
- 508
- Replies
- 5
- Views
- 692