These are long and detailed notes which hopefully will save you both time and mistakes.
Materials
Coroplast--Home Depot sells stock white 19”x24” signs for $5/ea and I found it to be the best buy on Coroplast and they are large enough. I wanted 3 bins but got 4 signs assuming I would need at least 1 prototype to get it right (which I did).
http://www.homedepot.com/p/The-Hill...n-White-Custom-Create-A-Sign-844496/202982584
Fasteners—The two part aluminum binder post and screw gives a smooth finish in and out and are very secure. Very few adhesives work on Coroplast. Amazon sells 100 ¼” post for $12
https://www.amazon.com/Aluminum-Screw-Posts-Chicago-Screws/dp/B003O5GPHU
Tools
24” straight edge (I used a framing square and highly recommend it vs a straight edge with no angle)
Flatened cardboard for cushion/cutting
Drill with a ¼” bit (preferably a brad point bit)
Razor knife, preferably the thin cheap plastic type with the break off blade sections
Ball point or very fine Sharpie pen
Layout
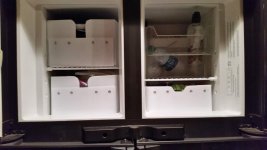
After making my prototype, I leaned that making very accurate lines and cuts as well as learning how to do some offsets in the cuts was key to having very finished boxes. I have the Dometic double door 1350 frig and I’ll give you the dimensions that work for it but you could adjust for others.
Width—my bins inside finished width is 10” which gives less than ½” play. The sides bow slightly and will flex if you cram a lot in the bin so I suggest not making it any wider than this.
Depth—You have a double layer of Coroplast on each end AND the clear plastic door bins protrude inside so make your bins inside depth 10-3/4” (my prototype was ½” too long and I thought I had measured carefully).
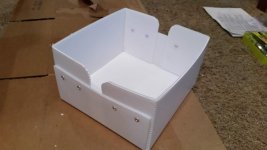
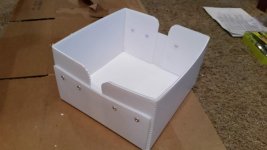
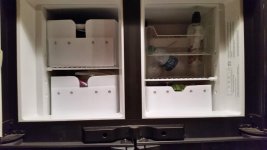
Height—If you use the Home Depot Coroplast and my pattern dimensions, 7” is the maximum side wall height and that worked fine for my top (and largest) bin. For the bottom one below it, I made it 6” high and for the one under the ice bin it was 4-1/4”. However, your shelves are adjustable so you may want to do something different but after looking at the adjustments on the Dometic, I felt these were the most useable heights. For the one with 6" sides, I cut the length of the 24" long Coroplast down to 22" and for the one with 4-1/4" sides I cut it down from 24" to 18-1/2". The sides fold (like on some cardboard boxes) so that the end heights are the same as the sides except in the center (see photo of finished bins) but that ends up being a good “slot” to grab and pull them out. I was going to add rope handles but with the slot and the fact that the Coroplast slides so easily against the plastic lining no handles were needed.
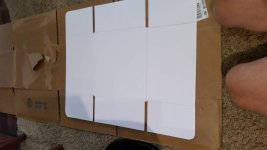
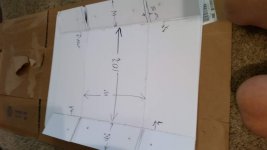
Look at the first 2 photos, the flat unfolded but cut piece and the one unfolded with wide black marks on it (my disassembled prototype) and study them both as you read the directions. Start by making very accurate marks and mark them all before doing any cuts. In looking at the photo of the new box, you see where the cut outs are. The other 6 lines are all scoring cuts—only cutting one surface of the Coreplast where it will fold.
Using the full 24” length, come in 7” from each end which will leave 10” in the center and take those marks all the way across the 19-1/4” width (Home Depot calls it 20” but 2 of mine measured 19-1/4” and one only 19”).
Next come in 4-1/4” from each side (or adjust if yours is not exactly 19-1/4” wide) so that the center section is exactly 10-3/4”. Looking at my photo of the new piece, you can see that the extensions of those lines that are 10-3/4” apart are set in slightly, they should be set in 1/8” so that the distance between lines on each end is only 10-1/2”. These offsets have to do with how the folds end up working.
Lastly mark the sections that get cut out completely (easily seen in the photo). Make a mark ¼” either side of the 4 short lines so the cut out sections will be ½” wide.
Use a small round disk to mark the rounded corners.
TIP—Because the Coroplast is so slick, holding a straight edge in place for marking and particularly for cutting was difficult, until I came up with this technique (if you are not too old and stiff!): Place a couple of layers of cardboard on the carpet below the Coroplast, lay the framing square down as the straight edge with the short angle side back toward your knees. Use the palm of your hand on the far end to press down and your knee on the other end (angle portion of the framing square) as this will hold the framing square securely and use your free hand for marking/cutting. If you use clamps to hold your straight edge tight enough, the clamp will dent it.
Cuts
The 4 cut out sections you see in the photo (1/2” x4-1/4” each) are cut through and all the others are scoring cuts or partial cuts. Have the blade on the razor knife extended enough to cut completely through the Coroplast and cut out the 4 ½” wide sections. You can extend the blade far enough so that the blade is against the edge of the straight edge and put the straight edge right on the lines. However, that will not work on the scoring cuts which you will make next.
None of the razor knives I found will extend the blade only approximately 1/16” and any more than that risks cutting all the way through the Coroplast. I extended my blade a tiny bit and then wrapped a small piece of duct tape around the adjusting mechanism to hold it with that slight extension (between the locking notches).
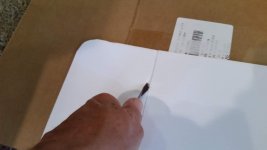
Make a test cut for the scoring portion of the work. I first tested on cardboard primarily to get the spacing correct for setting the razor knife against the straight edge and to be sure my blade would hold in the correct position (taped for only 1/16” protruding). I pushed the blade in, pushed the straight edge next to it to see the spacing, and then drew it along pushing the frame (plastic) of the razor cutter tightly against the straight edge. In other words, you want the plastic frame of the razor knife down against the Coroplast and firmly against the side of the framing square and the blade right on your lines you marked but only cutting the top layer of the Coroplast.
When you cut across the corrugations, you will need to press firmly and hold it tight against the framing square as you are barely cutting but lots of little ridges. When you do the lengthwise cuts, press lightly as you could push down between corrugations and cut through the bottom layer as well (my prototype again!).
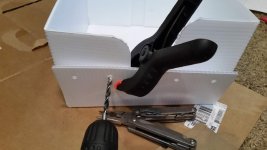
Pilot holes—Looking at the photos, I drilled holes down ¾” and about 1” in from the end of the end section that becomes the “flap” and the second hole over another 2”. I recommend you go ahead and drill the holes in the end piece now as they will serve as a guide for making the final hole through both pieces.
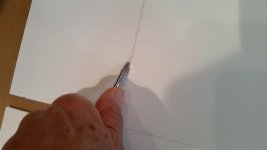
Once you have made the full cuts and the scoring, you are ready to make creases to help with the folds. If you look at the photo with the flat blade screwdriver, I am mashing down the corrugations on one side of the score cut. Do this for all of the side cuts and only on the outside (study photo). Once you have creased them all, fold all of those side flaps in a full 180 degrees (fold them down as tight as possible to help push in the edges along the folds, they will spring back up.
Then fold up the main sides (these are parallel to the corrugations) and at the same time fold in the ends (this should be evident from the pictures of the finished boxes). Fold one up, get it perfectly square (you will have a little play) and put a clamp on it. Drill through the inner flap and install one of the aluminum screw and posts. Repeat so that both fasteners are on the flap and then go to the next one and so on. YOU ARE FINISHED!!!!!
Tonight was my wife’s first time pulling them out to get something and she likes them even better than she though she would.
