WTH: #2 Grey water valve never attached from factory

gslabbert5119

Well-known member
Before I really rip into Heartland, I need to get my facts sorted out.

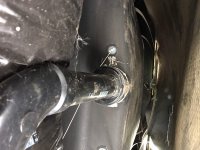
I was installing a wire for backup lights and removed the belly cover, and grey water tank valve dropped out and about whacked me on the head.

After testing the valves from the connector point I found that it was the #2 grey water tank and that it has NEVER been connected to the piping but is controlled at the water valve panel, it simply lay on the under belly panel.

There is no water leaking anywhere so I need to know the following ...

1. Does the 2013 3685RL have 2 grey water tanks
2. If so, do I cut the piping and install it or do I chew out Heartland for failing to fit the valve and file a faulty installation claim against them.
3. If I install the valve, where do I install it ?

Thoughts, Ideas & Suggestions ...

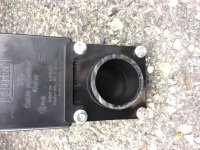
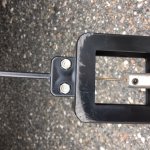
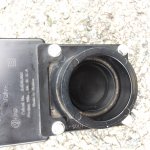
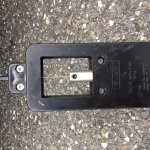
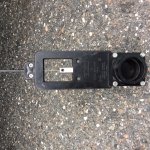
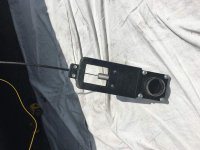
Picture of it laying loose, and what looks like glue is in fact just dust
 

Attachments

  • IMG_1941.jpg
    IMG_1941.jpg
    99.8 KB · Views: 134

danemayer

Well-known member
So...

Gray #2 on your Bighorn would be for the kitchen sink. Gray #1 is usually the bathroom shower, sink and washing machine drain.

If it had never been attached on a 4 or 5 year old trailer, water from the gray #2 tank would have been pouring out into your underbelly since day 1 creating quite a watery, stinky mess down there. Since you didn't mention that, I'm guessing the valve has only very recently fallen off - probably never properly glued in place.

There's a matching outlet on the gray #2 tank - possibly on the front edge. On my Landmark, the gray #2 tank outlet is a few inches to the rear of where the height of the coroplast changes - at the front of the rear section of the coroplast. Not too far from where the 1-1/2" drain pipe joins the 3" sewer outlet pipe.

For the valve to be hanging down loose, it must have also separated from the 1-1/2" pipe that goes to the sewer outlet.

Sometimes when I'm working under the trailer, I'll grab hold of something to scoot out. Any chance you grabbed one of the sewer pipes maybe moving it enough to separate the unglued fixture?

Anyway, I'd think you could just fit it back in place. Do a trial fit, then separate, clean the pieces, and glue.

If more than that is required, before ripping into Heartland, consider that your warranty has long ago expired. They don't have to do anything about manufacturing defects that show up 4 or 5 years after a trailer is purchased. Occasionally they do, as a goodwill accommodation. But goodwill can often evaporate during the ripping into part of the call.
 

JohnDar

Prolifically Gabby Member
In your photo, it looks like the edge of the fitting had glue applied to it. Maybe incorrectly, but it looks "melted." This photo of a tank valve assembly was taken at the plant during a 2011 Rally tour and may help you figure out what wasn't done.
 

Attachments

  • Valve Connection.jpg
    Valve Connection.jpg
    155.9 KB · Views: 107

gslabbert5119

Well-known member
JonDar & Danemayer,

I understand where you are coming from, and I would be as sweet as honey initially, plus nice call to the production manager of someone usually is all that suffices :)


Some have suggested that it came loose and there is signs of glue on it, please take a careful look at the attached images.
If you look at the top of the side that someone suggested that it has been glued you will see the years of scuffmarks on the top, and it is the same scuff marks on the area where the supposed glue should be. Trust me this has never been installed.

I did look at the #2 tank after you guys told me that it exists, and the piping has never been cut anywhere to install the 2nd valve, I guess that they missed it.

Not understanding the drainage system, and without a valve, I surmise that it drained out to the 3" valve that the previous owner had installed at the end of the drainage system where the sewer hose connects.

Please see attached images
 

Attachments

  • IMG_1943.JPG
    IMG_1943.JPG
    158.5 KB · Views: 84
  • IMG_1944.JPG
    IMG_1944.JPG
    149.9 KB · Views: 87
  • IMG_1945.JPG
    IMG_1945.JPG
    142.7 KB · Views: 91
  • IMG_1946.JPG
    IMG_1946.JPG
    208.9 KB · Views: 84
  • IMG_1947.JPG
    IMG_1947.JPG
    253.9 KB · Views: 81

pjones1969

Well-known member
Previous owner installed the end of the run valve because he kept getting wet when the cap was pulled to dump? Hence no valve installed to control the tank.

I’d continue to use as is


Sent from my iPhone using Tapatalk
 

danemayer

Well-known member
Starting to sound like the previous owner changed things up and left the valve hanging. Maybe he had to install a replacement tank for some reason.

As a 2nd owner of a trailer that is 5 years old and long out of warranty, and modified by the prior owner in an unknown way, I doubt Heartland will want to get involved in any way.
 

gslabbert5119

Well-known member
Ahh, the plot thickens.

Peace
Dave

Not really Dave,

The dealer most likely did it due to some issue, but that still does not explain why the valve was never fitted in the first place.

Sure they added an additional valve at the end of the pipe system, but the buyer may have added it as a precautionary measure.

Gavin
 

JohnDar

Prolifically Gabby Member
So, from all of this it sounds like the drain from the tank to the sewer outlet is in place but there is no valve at the tank. Is that what you have?

From your additional photos, I can see the fitting does not appear to have been glued to anything. So, no valve at the tank means the drain line is always open to the sewer outlet and removing the cap guarantees a shower. Hence installing a valve at the sewer outlet.

If the prior owner had discovered this early on and the dealer did the gerry-rig, shame on the dealer for not correcting it properly under warranty.

If that loose valve still functions, it probably could be installed where it belongs by someone that understands RV waste system plumbing.

Assuming it came from the factory like that, the dealer probably could have held HL’s feet to the fire to cover it for the original owner, even out of warranty.


Sent from my iPhone using Tapatalk
 

gslabbert5119

Well-known member
Well guys, there ya go... it was never fitted. (See attachment.)

My question becomes...
What bonding solution do I use to after I cut the pipe and install the valve ?
 

Attachments

  • IMG_1950.jpg
    IMG_1950.jpg
    87.7 KB · Views: 92

Oregon_Camper

Well-known member
Wondering if the prior owner wanted to combine the two grey water tanks and added a Twist-On Waste Valve at the main exit. Then leaving tank #1 open, would allow them to fill at a balanced level.
 

gslabbert5119

Well-known member
Hmm interesting thought.

So tank 2 drains to tank 1 they balance and then they are controlled by the black water valve.

Would yo not achieve the same solution by leaving the valve on tank 2 open, rather than not fit it?

From what I see the valve for tank 2 was never fitted and the original piping remains uncut.

Maybe I just don’t understand the sewer system well enough.
Maybe there is a flow diagram somewhere that I could look at.


Sent from my iPhone using Tapatalk
 

danemayer

Well-known member
Hmm interesting thought.

So tank 2 drains to tank 1 they balance and then they are controlled by the black water valve.

Would yo not achieve the same solution by leaving the valve on tank 2 open, rather than not fit it?

From what I see the valve for tank 2 was never fitted and the original piping remains uncut.

Maybe I just don’t understand the sewer system well enough.
Maybe there is a flow diagram somewhere that I could look at.


Sent from my iPhone using Tapatalk
Yours is probably similar to the diagram in our Water Systems Guide. Page 6.

One possibility is that Heartland put your sewer system together in an extraordinarily different way from the thousands of RVs they build on a daily basis.

Another possibility is that it's been modified for unknown reasons.
 

mlpeloquin

Well-known member
Well guys, there ya go... it was never fitted. (See attachment.)

My question becomes...
What bonding solution do I use to after I cut the pipe and install the valve ?

Well your picture shows just where it belongs and so do mine. When trying to locate the valves, I asked for and got the plumbing drawing from Heartland. I then proceeded to cut the coroplast to gain access to change out the valve seals. Turns out it was not located according to the drawings. The assemblers put both my gray water valves close to the main drain pipe exiting the rig. It makes sense for quicker assembly, but not so much to service it with all the wiring and other stuff in the way. Good or bad, you have been given the chance to install it where it should be.
 

gslabbert5119

Well-known member
Yours is probably similar to the diagram in our Water Systems Guide. Page 6.

One possibility is that Heartland put your sewer system together in an extraordinarily different way from the thousands of RVs they build on a daily basis.
Danemayer, is that an attempt at sarcasm?

Why is it not possible that they just missed the installation, it happens all the time on cars & boats, why not RV's. Heaven knows, the construction of RV's is simply stellar (sarcasm)

Thanks for the link to the water systems guide
 

danemayer

Well-known member
Not sarcasm. Occam's Razor. Looking for the simplest explanation. To me first owner mod or dealer repair is simplest.

Sent from my SM-G950U using Tapatalk
 

KyleC

Well-known member
You could now install the valve where it is supposed to go and then use a PVC repair fitting like the one pictured.( Not sure if they sell it in RV black) allowing you to repair PVC in a straight line. I only have one of each tank so I'm not to savvy with the double tank flow.
3b179dd5b14f06b75b72dd9ba5f14dde.jpg


2017 Pathfinder SL towing Heartland Prowler "lynx" 25lx
4816 lbs dry wieght
 

hoefler

Well-known member
Well guys, there ya go... it was never fitted. (See attachment.)

My question becomes...
What bonding solution do I use to after I cut the pipe and install the valve ?

Just simply cut the pipe as square as possible. The cut out 3/4" of pipe, use a good primer, then glue with either ABS glue or Universal glue.
 

gslabbert5119

Well-known member
Thank KyleC,

I will not need to add in additional piping as the piping is original so all I need to do is to cut out a piece and fit the valve in, which is what I am going to do today... hopefully

Gavin

- - - Updated - - -

Well your picture shows just where it belongs and so do mine. When trying to locate the valves, I asked for and got the plumbing drawing from Heartland. I then proceeded to cut the coroplast to gain access to change out the valve seals. Turns out it was not located according to the drawings. The assemblers put both my gray water valves close to the main drain pipe exiting the rig. It makes sense for quicker assembly, but not so much to service it with all the wiring and other stuff in the way. Good or bad, you have been given the chance to install it where it should be.

Thanks for that insight mlpeloquin,...

Yeah just going to install the valve where it belongs as per the diagram and be done with it.

Gavin
 

CoveredWagon

Well-known member
If I understand correctly, he has no water leaking anywhere, system is working (somehow) so why mess with it. It may not be exactly what he’d like, but why mess with success. If it ain’t broke, don’t fix it.
Thats just my personal opinion.
 
Top