How to replace wiper seals?

David-and-Cheryl

Well-known member
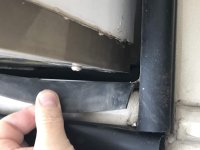
We have a 2013 Landmark San Antonio. One of the side wiper seals on our bedroom slide has torn away at the top of the seal. (The photo posted rotated 90 degrees, so "top" is to the left.)

areyuy2STs6US9W4R4bjIA.jpg

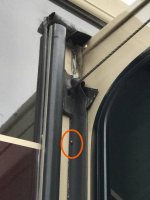
It looks like the bracket holding the seal is riveted to the slide out opening in the body. If so, that would require completely removing the slide-out room to get access to the bracket. That would make it a MAJOR (and expensive) project to replace the seal. (I couldn't get a photo that showed the rivet, but it's to the right of my thumb in this photo.)

I0v3vLvlSiie6DK6OZPf3g.jpg

Am I missing an easier way to replace this wiper seal? Please tell me yes... :)
 

mlpeloquin

Well-known member
This maybe a question to ask Heartland on just how this seal was installed. Call and have your VIN number.
 

danemayer

Well-known member
Maybe I don't have a complete understanding, but it looks like there may be an adhesive layer and a screw (rivet?) holding the wiper in place. Can the screw be removed and the old wiper & adhesive pulled away and replaced? If it's not a screw, perhaps it can be ground off and new wiper secured with the adhesive and screws.

wiper circle.jpg
 

David-and-Cheryl

Well-known member
Maybe I don't have a complete understanding, but it looks like there may be an adhesive layer and a screw (rivet?) holding the wiper in place. Can the screw be removed and the old wiper & adhesive pulled away and replaced? If it's not a screw, perhaps it can be ground off and new wiper secured with the adhesive and screws.

Dan, what you circled in that photo is actually an Asian beetle. :eek:)

But you're not too far off. I do think there's an adhesive layer (maybe) and screws or rivets holding the wiper in place. The problem is that the screw/rivet heads are behind the wiper and face the wall of the slide-out, so there's no way I can see to access them without removing the slide-out room.

- - - Updated - - -

This maybe a question to ask Heartland on just how this seal was installed. Call and have your VIN number.

Not a bad idea. I'll try that. Thanks.

- - - Updated - - -

I replaced mine with aftermarket seal that stick on with 3m tape.Been on there for a cpl years and still look new.

Was yours built the same way? Did you adhere the new seal to the outward-facing surface, or the surface that faces in to the wall of the slide out? Do you by any chance have a link to the product you used?
 

David-and-Cheryl

Well-known member
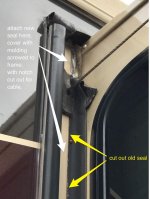
I just talked with a VERY helpful service advisor at Heartland. He said the best way to replace the seal is to cut off the old seal flush with the mounting plate, and then attach a new wiper seal to the face of the frame, covering it with molding with a notch cut out for the slide retraction cable, and finally screwing the molding to the frame.

wiper seal replacement.jpg

That makes sense. Now I just have to figure out where to get the molding. I assume the seal itself will be easy to find.

EDIT: I found this product on Amazon that looks like it will stick on without needing to add molding. I'm guessing this is what Donhutch1800 used (or something similar). It gets good reviews, including from one user whose RV sounds like it had similar construction to mine. I'll probably try that since it's relatively inexpensive.
 

mlpeloquin

Well-known member
Thanks. I book marked the page for future reference. You really need a clean surface to adhere to. Make sure it is clean and degreased. I use 100% isopropyl alcohol followed by an acetone wipe. Lately I put a 3M adhesive primer as well. Really helps sticky tape adhere even better. You can sometimes find 99.9% in a drug store. 100% is used for cleaning flux from circuit boards, but used to clean metal and other surfaces prior to bonding. The acetone removes the slight film the alcohol leaves behind.

https://www.amazon.com/s/?ie=UTF8&k...vtargid=kwd-2778888319&ref=pd_sl_8eskn2zgip_b
 

David-and-Cheryl

Well-known member
Lately I put a 3M adhesive primer as well. Really helps sticky tape adhere even better.

Yep, I had the same thought. That 3M promoter came with the LED light strip from Boogey Lights that I mounted under my awning last year, and it works great. I don't think that adhesive will ever come off. I bought some more at the same time I ordered the wiper seal.

One interesting thing I noticed is that the exposed part of the existing wiper is only 1 1/2" wide--somewhat narrower than on the other slides. The RecPro adhesive wiper seal is 2 7/8" wide including the adhesive strip, so the actual wiper surface is probably about 2" wide. I think there's enough room to mount the new seal far enough over on the frame that the extra width won't be a problem. But if not, I may need to trim a bit off the width to make it work.

I'll try to remember to post a photo of the finished install after I do it.

David
 

richard19

Member
David
We have a 2013 Landmark San Antonio also with the wiper seals tore on the outside and the inside of the bedroom on both sides. I have the same rivet screw you have facing towards the slide. What did you end up doing to replace the seals. All other seals are in good shape Thanks

richard Sonnier
richard19@gt.rr.com
 

David-and-Cheryl

Well-known member
David
We have a 2013 Landmark San Antonio also with the wiper seals tore on the outside and the inside of the bedroom on both sides. I have the same rivet screw you have facing towards the slide. What did you end up doing to replace the seals. All other seals are in good shape Thanks

richard Sonnier
richard19@gt.rr.com
Hi Richard. I just realized that I never followed up on this repair like I said I would. So here it is.

I ordered five feet of the RecPro RV Slide Out Replacement Seal from Amazon, along with some 3M Primer 94. I'd used the primer previously when I mounted some LED strip lights--it helps ensure a good seal for the self-adhesive strip.

First, I used a box-cutter to trim off the old wiper seal flush with the metal plate that held it in place. I then gently peeled the thick rubber gaskets around the retract cables from the RV body, and left them on the cables. Finally, I thoroughly cleaned the outward-facing surface of the RV body, between the bulb seal and the slide-out, first with some 409, and then with rubbing alcohol, and let it dry.
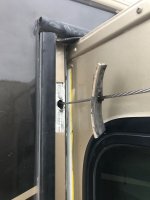
Bedroom wiper seal replacement.jpg

I then cut the new seal to length, leaving a couple inches extra on the bottom, and test fit it, with the top of the new seal butted up against the existing top wiper. The RecPro wiper is almost an inch wider than the OEM wiper, so I was a little worried about whether that would be a problem, but it turned out not to be.

I marked the locations where the two retraction cables would need to pass through the new seal, and then carefully cut a slit in the seal at those spots, starting on the mounting edge (not the wiper edge) and going the distance to where the cables come out of the RV body. I test fit it again. Then I used a drill to slightly enlarge the holes at the end of the slits where the cables would pass through, and test-fit it once more.

I then applied the 3M Primer to the entire area where the adhesive would be. I think I used two tubes. After it dried for a couple minutes, I peeled paper backing off the adhesive strip and began applying it from the top. I did the top section, down to the first cable, initially, and made sure it was positioned properly. (With that 3M primer, you cannot reposition the adhesive strip once it's on, so be careful.) Then I peeled and applied the middle strip, down to the bottom cable. Finally, I trimmed the bottom of the wiper seal to the right length, and applied the bottom strip.
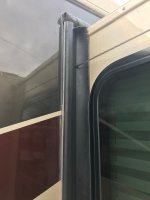
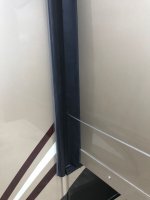
Bedroom wiper seal replacement (2).jpgBedroom wiper seal replacement (1).jpg

I originally thought I would replace those rubber gaskets on top of the new seal. But then I realized that the thickness of the new seal would serve the same purpose, making the gaskets unnecessary, so I just tore them off.

I waited until the next day to test it out, to make sure the adhesive had time to set--not sure if that was necessary or not. I ran the slide in and out a couple of times while I watched from outside to be sure that the new seal didn't buckle or get hung up where it slightly overlaps the window frame. It worked fine, so I decided I didn't need to trim it.

The installation has held up well since then. There's been no obvious wear on the new seal, and the adhesive is still holding strong.

Hope that helps!

David
 
Top