Dometic 300 toilet with the dreaded internal leak to allow waste to pool inside the outer bowl and smell

marknewbill

Well-known member
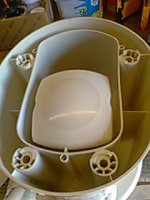
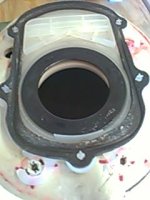
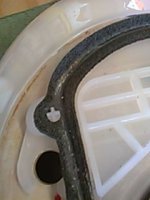
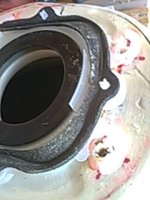
I have the Dometic 300 and it is less than a year old. It has a urine smell all the time, no matter how well we clean it. I ran up on some information on a past recall of 300's where the inner seal lets water come from inside the bowl to the outer bowl and settles there until it evaporates, and makes the odors.

that being said, I reached out to Dometic today on warranty and await a response. the recall is over according to what I understand (my unit has to be newer than the affected units) even though I have the same issue. I can remove my toilet, tip it on the side, and the stale water will come out around the bowl seam.

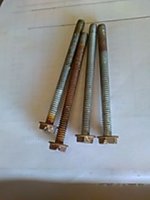
I am considering just opening the toilet up and doing the silicone repair I seen online where the gaskets are re-used and just silicone in to prevent the leak.
any thoughts? I know I can return the camper to Heartland and they should take care of it, but I don't want to be without it right now during prime camping season and I have places booked already.

I hope this isn't already covered somewhere, but I didn't see it.
 

danemayer

Well-known member
Wait a bit for a response from Dometic. They may just send a new toilet to you for self install. I had a different problem on a 5 year old toilet and they sent me a replacement.
 

marknewbill

Well-known member
Hi,
Dometic is sending a new toilet as expected, no issues from them other than a 50 minute hold time on the phone.
In the mean time I opened the toilet I have to investigate by removing the base and the outer bowl. it appears the "fix" on at least that iteration of the toilet was to pack the inner and outer bowls around the gasket area with something like Vaseline. this of course shifts around and allows water to get by. for an experiment I cleaned away all of the grease and reassembled it dry, and removed the flush gasket. then I could take silicone and inject it in the area between the outer and inner bowls (before installing the base) and then put the flush gasket back on and reassembled the base back to the bowl. then for support I mixed some resin and hardener and poured it in between the two bowls (oposite side where gasket is) at the drain area through the hole in the back of the toilet. I know this will make future separations impossible, but since a new one is on the way, why not.

I am waiting now for the resin to cure and I will test the toilet. if the resin supports movement, and the silicone makes a good gasket, it may last a long time. I didn't take any pictures but there is a YouTube video on fixing the 300 toilet that will show all these details except the epoxy, that was my idea to back up the silicone since the inner bowl moves around when you put weight on it.

Thanks for reading - mn
 

marknewbill

Well-known member
Below is a picture shown from the back of the toilet where the water line enters the sprayer. the green is the resin I poured in from the hole and allowed it to drain down the side of the bowl into the gap between the inner and outer bowl for structural support. the silicone bead applied first just behind the rubber ball seal holds the epoxy in place until it hardens.
so far the trick seems to have worked.

Thanks,
 

Attachments

  • 20210617_174621.jpg
    20210617_174621.jpg
    149.3 KB · Views: 44

Routemaster

Well-known member
Is this what you are seeing my 320 is only 1 old and this is the second one I have a rotten floor at the flange, water got past the race track shape gasket pic 60 pedestal moulding. I have bought 1/8" rubber gasket sheeting and was going to make a new one and try again. See how the water got past, to the hold-down screws 62.
 

Attachments

  • KIMG0062.JPG
    KIMG0062.JPG
    29.1 KB · Views: 28
  • KIMG0058.JPG
    KIMG0058.JPG
    42.5 KB · Views: 27
  • KIMG0059.JPG
    KIMG0059.JPG
    41.1 KB · Views: 27
  • KIMG0060.JPG
    KIMG0060.JPG
    34.6 KB · Views: 26
  • KIMG0061.JPG
    KIMG0061.JPG
    45.1 KB · Views: 27

centerline

Well-known member
sometimes you gotta do what you gotta do, but silicone sealer is not meant to be used with a rubber gaskets..... the rubber gasket is soft and resilient and will fill the gaps and seal the connection.... but when silicone sealer is used, it will usually encapsulate the gasket causing it to be nothing more than "filler" to take up space, as the silicone will firm up the gasket and not allow the gasket to work as intended.... either use all silicone, or use the gasket.... the proper gasket is my choice so that it can be disassembled if ever it needs worked on again.....

the other problem with silicone and rubber gaskets is that during assembly, the pressure on the siliconed gasket its like grease until it sets up, and can allow the rubber to squish out as the screws are tightened..... rubber gaskets should never be used with silicone....
 
Top