Lowering top Bunk (Toyhauler)

ILH

Well-known member
I'm looking for advice on modifying my bunk beds so that the top bunk bed descends and stops at a lower height than the factory presets.

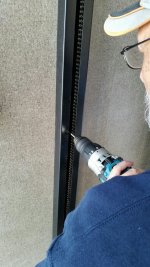
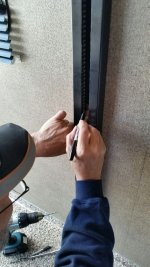
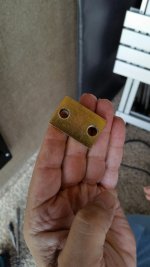
I noticed that there are 'stops' screwed into the tracks. One option might be to lower the stops to the new height. However, I was thinking that a simpler solution might be to remove the stops altogether, then drilling new holes for the pins that are normally used to hold the top bunk in the upper position. The new pin holes would be at the desired bunk height.

Would that work?
 

OEFVET

Well-known member
I have been considering doing the same thing. I see no reason why it wouldn't work. Please let me know if it works because I have it on my list of mods as well.
 

ILH

Well-known member
I see you're attending the Goshen rally - if one or both of us gets it done by then, we'll have to compare notes!
 

tomsws6

Active Member
Kind of the opposite situation here but I think it would work for me.. Im actually looking to have my top bunk stop higher than were the factory has it set. We would like a little more room when the bottom bed is made into the table for eating purposes..
 

ILH

Well-known member
I agree - it is probably the same issue.

I noticed yesterday when I was contemplating it that there are large bolts below the 'stop' plates. I would think these would come in contact with the top bunk when it descends. Removing a few of the bolts might compromise strength.
 

ILH

Well-known member
I have been considering doing the same thing. I see no reason why it wouldn't work. Please let me know if it works because I have it on my list of mods as well.


Got it done yesterday with the help of a fellow Heartlander at the Ontario rally. Come check it out when we're at Goshen.
 

ILH

Well-known member
Here's how it's done.

1. Determine the height you want the top bunk to be when you finish (i.e., the height from the floor)
2. Lower the bunks so that the top bunk rests on the existing stops. Measure the distance from the top of the metal "stop" inside the wall rail to the top of your mattress (keep this number handy).
3. Using a screwdriver, remove the four (4) stops from inside the vertical rails (see the picture of what the stop looks like when removed).
4. Lower your bunks to the point where the top bunk is at the height you want it to be (during this process the top bunk will be resting on the lower bunk).
5. Measure down from the top of the upper bunk along the vertical rail for the offset you obtained in step #2. Using a marker, mark this spot.
6. Using a tape measure, mark the same spot on the remaining three vertical rails (i.e., measure up from the bottom of the rail, not the floor as the floor slopes downward).
7. Place you stop in the rail, mark the first hole, drill a pilot hole through the metal back of the rail, then using a self-tapping bold, screw into the wall.
Note: we found almost identical self-tapping screws to the ones that hold the rails to the wall.
Once you've put the first bolt in, you don't need to remove the stop - use it to help guide the second hole. Repeat the procedure for the remaining three (3) vertical rails. That's about it.

The self-tapping bolts were No. 12 x 1 1/2 inches.

Remember to retain the threaded screws that originally held the stops. When you decide to return the bunk to its original position, you'll need these. I put the screws back into the original holes - that way I won't be looking for them in the future.
 

Attachments

  • 20150606_141259_resized.jpg
    20150606_141259_resized.jpg
    413.8 KB · Views: 106
  • 20150606_141229_resized.jpg
    20150606_141229_resized.jpg
    441 KB · Views: 95
  • 20150606_141220_resized.jpg
    20150606_141220_resized.jpg
    230.7 KB · Views: 96
  • 20150606_141124_resized.jpg
    20150606_141124_resized.jpg
    534.5 KB · Views: 95
Last edited:

TravelTiger

Founding Texas-West Chapter Leaders-Retired
This is great info, I may want to include in the Heartland Highlights Newsletter!


Sent from my iPhone using Tapatalk
 
Top