Most RV brands Heartland makes have sealed underbellies. Meaning, there is a layer of plastic of some sort that covers most of the underbelly area from frame rail to frame rail.
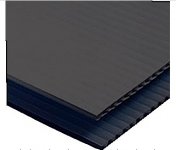
Most often, the material used is referred to as Coroplast. Here's a picture of the black Coroplast Heartland generally uses:
In a previous Landmark, Heartland used a non-corrugated plastic that was basically a thin sheet of black plastic. I didn't care for it as much. It seemed to break easily - especially when cold.
I've said all of that to share my story of repairing my underbelly (Coroplast). Let me start by saying, my underbelly was fine - there was nothing wrong with it.
For another project (link), I needed to expose my freshwater tank and my gray tank 1 in order to install a float switch in each. I knew generally, where these tanks were - but not where they started and stopped. Rather than potholing/probing with a knife or other tool, I decided to slit the underbelly all the way across from frame rail to frame rail. This allowed me to drop the coroplast, flex foil and spun insulation and thereby expose the tanks.
So - that was the plan! And for the most part, it worked. What I had not worked out in my head, was exactly how I was going to splice/join/seam the Coroplast back together when I was done installing my float switches.
Well, I found one side of the rear support brace on both tanks (fresh water and gray 1) had it's fasteners (self-drilling Tek screws) sheared. This allowed both tanks to drop down on the rear, off-door-side corner. Both tanks were still supported in the front and partially (1 sheared fastener and 1 still holding fast) on the door side of the rear support brace.
This meant I need to repair the rear support braces before I could button up the underbelly after installing my float switches. Before discussing how I buttoned up the underbelly, I want to briefly touch on how I repaired the rear support braces. the braces are both rectangular steel tube stock with flat mounting flanges welded to each end. Each of 4 corners of the flanges had holes drilled in them. Heartland used 2 of the 4 holes on each flange to secure the brace to the frame using large self-drilling Tek screws.
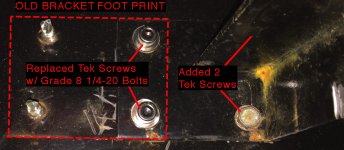
My repair was to drill the holes out to 1/4" in the frame so I could pass a bolt through the support brace flange, through the frame. I used 2 grade 8 bolts, flats, locks and nuts on each flange. On the off-door-side of the freshwater tank support brace flange, I was also able to get 2 self-drilling Tek screws into the other 2 spots on the flange. Same thing for the gray tank 1. It was too tight of a space on the door-side of each tank to get any tools up in there to add 2 extra fasteners. I feel my grade 8 bolts are going to hold more weight in shear than the 4 Tek screws. That's the hope anyway.
Back to the underbelly repair...
I'd decided to not go the route of using any tapes (flashing, Gorilla Glue etc.) All I could think of was to provide a surface/substrate to screw the 2 ends of Coroplast to. I was also naive - thinking I could actually get the 2 ends of Corplast back together tightly and seal it with a bead of black silicone. Hah! Not
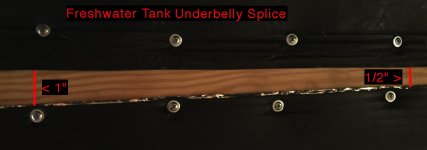
The underbelly below the freshwater tank is what I repaired first. I used a piece of 1"x4" southern pine - nice and sturdy. I have MORryde IS on my coach and there was a piece of metal inboard of the I-beam at the same level as the bottom of the I-beam on both sides of the coach. I pre-drilled the ends of the pine, laid it "on top of" the metal and used Tek screws to fasten the pine to the metal. Now all I had to do was bring the Coroplast to the wood and screw it into place. This was "the most" difficult part of the job. It is nearly impossible to bring the Coroplast back together and touch. For this tank, I had a 1/2" to 1" gap! Oops!
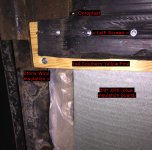
Learning from this tank, I did a better job with the front gray tank 1. I supported the underbelly from the floor with a large storage tote and a triple stack of long 2x4s. This held the underbelly tight up to the tank.
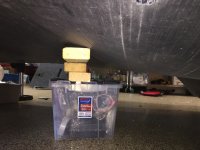
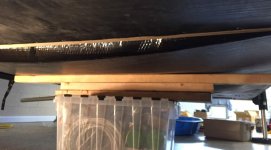
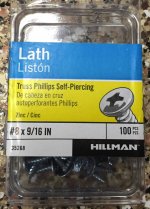
Then I worked on one side of the coach to add a few of the Tek screws and fender washer back into their original holes to hold the Corpoplast back to the frame. I alternated sides a couple of times, working fasteners back in, getting closer to my Coroplast splice area. Up front, I laid the pine on top of the inside bottom of the frame. By working smarter on the front, I was able to pull the Corpoplast to within 3/8" of meeting each end. I used #8 x 9/16" Lath screw to fasten the Coroplast to the wood. I like these screws for their head design.
So - I have the edges of Corpoplast on each side of each splice, exposed, the width of the coach. I want to seal these up as well as seal/treat the exposed wood - preferably covering it up.
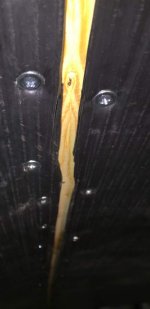
I'm about to take a 3 week trip and I want to see what happens to the spliced areas when the tanks fill up and to the freshwater tank when I travel with some amount of water in it (maybe 30 gallons). If there's any stretching or tearing at the splice points as they tanks swell, I want to be able to deal with that in however I end up treating the spliced area.
Comments? Questions? Suggestions?
A word about insulation...
In Landmark, above the Coroplast is a layer of Flex Foil insulation:
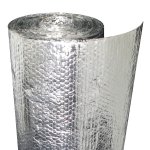
Above the Flex Foil was some sort of spun fiber insulation. It was dusty but I don't think it was fiberglass. In the case of my freshwater tank, because of the support brace falling, the tank tipped forward. This broke off a plastic 90 for one of the 2 tank vents. As such, I believe water sloshed out and onto the insulation. There was a small amount of yellowish water that came out of the underbelly when I cut it open. I decided to remove and discard the spun insulation above the Flex Foil.
I ended up buying Roxul brand Stone Wool batts. I measured and cut each piece to fit where I needed it and I bagged each piece in thin poly. The batts were easy to cut and easy to work with and were not itchy as this isn't fiberglass.
From Roxul's website: ROXUL insulation is a rock-based mineral fiber insulation comprised of Basalt rock and Recycled Slag. Basalt is a volcanic rock(abundant in the earth), and slag is a by-product of the steel and copper industry. The minerals are melted and spun into fibers.

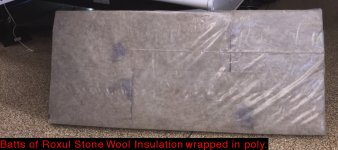
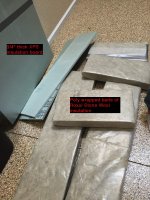
I used the batts along the sides and back of the tanks. I used 3/4" XPS (EXpanded PolyStyrene) insulation board for the bottom of the tank as there is little room between the tank and the underbelly and I didn't want to super-compress the batts.
Most often, the material used is referred to as Coroplast. Here's a picture of the black Coroplast Heartland generally uses:

In a previous Landmark, Heartland used a non-corrugated plastic that was basically a thin sheet of black plastic. I didn't care for it as much. It seemed to break easily - especially when cold.
I've said all of that to share my story of repairing my underbelly (Coroplast). Let me start by saying, my underbelly was fine - there was nothing wrong with it.
For another project (link), I needed to expose my freshwater tank and my gray tank 1 in order to install a float switch in each. I knew generally, where these tanks were - but not where they started and stopped. Rather than potholing/probing with a knife or other tool, I decided to slit the underbelly all the way across from frame rail to frame rail. This allowed me to drop the coroplast, flex foil and spun insulation and thereby expose the tanks.
So - that was the plan! And for the most part, it worked. What I had not worked out in my head, was exactly how I was going to splice/join/seam the Coroplast back together when I was done installing my float switches.
Well, I found one side of the rear support brace on both tanks (fresh water and gray 1) had it's fasteners (self-drilling Tek screws) sheared. This allowed both tanks to drop down on the rear, off-door-side corner. Both tanks were still supported in the front and partially (1 sheared fastener and 1 still holding fast) on the door side of the rear support brace.
This meant I need to repair the rear support braces before I could button up the underbelly after installing my float switches. Before discussing how I buttoned up the underbelly, I want to briefly touch on how I repaired the rear support braces. the braces are both rectangular steel tube stock with flat mounting flanges welded to each end. Each of 4 corners of the flanges had holes drilled in them. Heartland used 2 of the 4 holes on each flange to secure the brace to the frame using large self-drilling Tek screws.
My repair was to drill the holes out to 1/4" in the frame so I could pass a bolt through the support brace flange, through the frame. I used 2 grade 8 bolts, flats, locks and nuts on each flange. On the off-door-side of the freshwater tank support brace flange, I was also able to get 2 self-drilling Tek screws into the other 2 spots on the flange. Same thing for the gray tank 1. It was too tight of a space on the door-side of each tank to get any tools up in there to add 2 extra fasteners. I feel my grade 8 bolts are going to hold more weight in shear than the 4 Tek screws. That's the hope anyway.

Back to the underbelly repair...
I'd decided to not go the route of using any tapes (flashing, Gorilla Glue etc.) All I could think of was to provide a surface/substrate to screw the 2 ends of Coroplast to. I was also naive - thinking I could actually get the 2 ends of Corplast back together tightly and seal it with a bead of black silicone. Hah! Not
The underbelly below the freshwater tank is what I repaired first. I used a piece of 1"x4" southern pine - nice and sturdy. I have MORryde IS on my coach and there was a piece of metal inboard of the I-beam at the same level as the bottom of the I-beam on both sides of the coach. I pre-drilled the ends of the pine, laid it "on top of" the metal and used Tek screws to fasten the pine to the metal. Now all I had to do was bring the Coroplast to the wood and screw it into place. This was "the most" difficult part of the job. It is nearly impossible to bring the Coroplast back together and touch. For this tank, I had a 1/2" to 1" gap! Oops!


Learning from this tank, I did a better job with the front gray tank 1. I supported the underbelly from the floor with a large storage tote and a triple stack of long 2x4s. This held the underbelly tight up to the tank.


Then I worked on one side of the coach to add a few of the Tek screws and fender washer back into their original holes to hold the Corpoplast back to the frame. I alternated sides a couple of times, working fasteners back in, getting closer to my Coroplast splice area. Up front, I laid the pine on top of the inside bottom of the frame. By working smarter on the front, I was able to pull the Corpoplast to within 3/8" of meeting each end. I used #8 x 9/16" Lath screw to fasten the Coroplast to the wood. I like these screws for their head design.

So - I have the edges of Corpoplast on each side of each splice, exposed, the width of the coach. I want to seal these up as well as seal/treat the exposed wood - preferably covering it up.

I'm about to take a 3 week trip and I want to see what happens to the spliced areas when the tanks fill up and to the freshwater tank when I travel with some amount of water in it (maybe 30 gallons). If there's any stretching or tearing at the splice points as they tanks swell, I want to be able to deal with that in however I end up treating the spliced area.
Comments? Questions? Suggestions?
A word about insulation...
In Landmark, above the Coroplast is a layer of Flex Foil insulation:

Above the Flex Foil was some sort of spun fiber insulation. It was dusty but I don't think it was fiberglass. In the case of my freshwater tank, because of the support brace falling, the tank tipped forward. This broke off a plastic 90 for one of the 2 tank vents. As such, I believe water sloshed out and onto the insulation. There was a small amount of yellowish water that came out of the underbelly when I cut it open. I decided to remove and discard the spun insulation above the Flex Foil.
I ended up buying Roxul brand Stone Wool batts. I measured and cut each piece to fit where I needed it and I bagged each piece in thin poly. The batts were easy to cut and easy to work with and were not itchy as this isn't fiberglass.
From Roxul's website: ROXUL insulation is a rock-based mineral fiber insulation comprised of Basalt rock and Recycled Slag. Basalt is a volcanic rock(abundant in the earth), and slag is a by-product of the steel and copper industry. The minerals are melted and spun into fibers.


I used the batts along the sides and back of the tanks. I used 3/4" XPS (EXpanded PolyStyrene) insulation board for the bottom of the tank as there is little room between the tank and the underbelly and I didn't want to super-compress the batts.
Last edited:
