Winterize your Refrigerator Ice Maker Water Line

danemayer

Well-known member
It's that time of year. Don't forget that if you have an ice maker, the water line on most rigs is exposed to outside air. When temps drop to freezing, the poly line will be damaged. Make sure you evacuate all the water and shut off the cutoff valve before that happens. Our Winterization Guide covers how to do this on the Dometic RM1350. The Norcold will have a similar procedure. Consult your Norcold manual for details on the internal mechanisms.

Residential refrigerator owners - even if you're living in the coach full time, make sure you follow the procedure in the Residential Refrigerator Guide to prevent damage. The Residential Refrigerators also have a water chiller and filter inside the frig. Before storing for the winter, you have to thoroughly evacuate the water.
 

Bones

Well-known member
It's that time of year. Don't forget that if you have an ice maker, the water line on most rigs is exposed to outside air. When temps drop to freezing, the poly line will be damaged. Make sure you evacuate all the water and shut off the cutoff valve before that happens. Our Winterization Guide covers how to do this on the Dometic RM1350. The Norcold will have a similar procedure. Consult your Norcold manual for details on the internal mechanisms.

Residential refrigerator owners - even if you're living in the coach full time, make sure you follow the procedure in the Residential Refrigerator Guide to prevent damage. The Residential Refrigerators also have a water chiller and filter inside the frig. Before storing for the winter, you have to thoroughly evacuate the water.
Do you have any recommendations for camp kitchen water lines. How can you keep it from freezing and still use the water in the rest of the coach?
 

jbeletti

Well-known member
Do you have any recommendations for camp kitchen water lines. How can you keep it from freezing and still use the water in the rest of the coach?

You'll need to find where the outdoor faucet taps into the hot and cold water lines. Likely in the underbelly. You can add shut-off valves there.

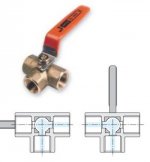
Another idea is to add a 3-way valve instead of a shut-off valve. Plumb it so that one input of the valve is the water supply and the other input of the valve is a length of Pex that terminates just below the underbelly and the output of the valve feeds the line to the faucet. Do this for both the hot and cold.

In this manner, you can shut-off the water to the outdoor faucet and drain the line from the faucet lines.

This all said, I've never plumbed in a 3-way valve. This is just how it works in my head. Perhaps others more wiser can chime in.

prod69.jpg
 

Bones

Well-known member
You'll need to find where the outdoor faucet taps into the hot and cold water lines. Likely in the underbelly. You can add shut-off valves there.

Another idea is to add a 3-way valve instead of a shut-off valve. Plumb it so that one input of the valve is the water supply and the other input of the valve is a length of Pex that terminates just below the underbelly and the output of the valve feeds the line to the faucet. Do this for both the hot and cold.

In this manner, you can shut-off the water to the outdoor faucet and drain the line from the faucet lines.

This all said, I've never plumbed in a 3-way valve. This is just how it works in my head. Perhaps others more wiser can chime in.
Right now there is a shut of valve at the frame for the camp kitchen but it kind of hangs out of the frame so I think it would freeze even if I shut the water off. I like your idea and I wonder if I can put valves inside the camper maybe at the rear bathroom that would allow me to shut and drain the lines before they even come out of the frame.

- - - Updated - - -

You'll need to find where the outdoor faucet taps into the hot and cold water lines. Likely in the underbelly. You can add shut-off valves there.

Another idea is to add a 3-way valve instead of a shut-off valve. Plumb it so that one input of the valve is the water supply and the other input of the valve is a length of Pex that terminates just below the underbelly and the output of the valve feeds the line to the faucet. Do this for both the hot and cold.

In this manner, you can shut-off the water to the outdoor faucet and drain the line from the faucet lines.

This all said, I've never plumbed in a 3-way valve. This is just how it works in my head. Perhaps others more wiser can chime in.

View attachment 39901
If I use the three way I could make it so I can add antifreeze or blow the lines clear for colder weather use

- - - Updated - - -

It is funny I had some one look at me weird eyed when I said I like to camp in November before the big constant freezing happens. We did it last year before we took our camper in for repairs and the big incident happened.
 

danemayer

Well-known member
IMO, the best location for cutoff valves would be near the UDC and pump. Water lines in the underbelly may be protected by keeping the furnace running, if it's not too far below freezing. But keep in mind that there are usually openings in the coroplast around the suspension. Your outdoor kitchen water lines may be closer to those openings, and further away from the furnace. Outdoor kitchen lines could freeze where other lines don't.

PEX lines should survive a freeze, but plastic fittings won't. Crimps might be loosened in a freeze leading to minor leaks.

If you use simple cutoff valves, use compressed air to evacuate the lines to the outdoor kitchen and then close the valves.
 

Bones

Well-known member
IMO, the best location for cutoff valves would be near the UDC and pump. Water lines in the underbelly may be protected by keeping the furnace running, if it's not too far below freezing. But keep in mind that there are usually openings in the coroplast around the suspension. Your outdoor kitchen water lines may be closer to those openings, and further away from the furnace. Outdoor kitchen lines could freeze where other lines don't.

PEX lines should survive a freeze, but plastic fittings won't. Crimps might be loosened in a freeze leading to minor leaks.

If you use simple cutoff valves, use compressed air to evacuate the lines to the outdoor kitchen and then close the valves.
OK. If I understand you then you are suggesting a home run from the main supply area to just the camp kitchen alone so that I can shut that whole system off and clear the line out while I still use the rest of the trailer?
 

jbeletti

Well-known member
I like Dan's idea of putting the valves in a location that may be more convenient to use and keep them safer from freezing. It will be a bit of work for you though but it would be a really nice setup.

As for winterizing the lines from the valve back to the faucet - I'd prefer to blow them out with compressed air rather than using RV antifreeze.
 

Bones

Well-known member
I like Dan's idea of putting the valves in a location that may be more convenient to use and keep them safer from freezing. It will be a bit of work for you though but it would be a really nice setup.

As for winterizing the lines from the valve back to the faucet - I'd prefer to blow them out with compressed air rather than using RV antifreeze.
Yeah, I agree Jim. I will put this on my list. The pex lines are not that expensive. The only thing I will need to teach my self is how to use the crimper. So far I have only used the sharkbite's and they get expensive. I want to pull out the basement wall and do work behind there any way and this would be a perfect excuse.
 

JohnD

Moved on to the next thing...
I like Dan's idea of putting the valves in a location that may be more convenient to use and keep them safer from freezing. It will be a bit of work for you though but it would be a really nice setup.

As for winterizing the lines from the valve back to the faucet - I'd prefer to blow them out with compressed air rather than using RV antifreeze.

I wish that the manufacturers would put a shut-off valve on the outdoor shower that was easy to get at.

I never use the outside shower, so it would be nice to just leave it turned off so that when winterizing we wouldn't have to mess with it.

Right now on our new Prowler I can't get the shower hose to attach to the outdoor shower (I tried the screwdriver and hammer thing and it didn't work - maybe I need to hit it harder), so I haven't been able to flush out the RV anti-freeze from that line, and we get foam and a strange taste in the water after the trailer has sat for a couple of days without running any water (at least that is where I think this foam is coming from).

I'm going to try again this week to attach that shower hose again to see if I can finally get it to work.
 
Last edited:

boatto5er

Founding VA Chap Ldr (Ret)
I wish that the manufacturers would put a shut-off valve on the outdoor shower that was easy to get at.

I never use the outside shower, so it would be nice to just leave it turned off so that when winterizing we wouldn't have to mess with it.

Right now on our new Prowler I can't get the shower hose to attach to the outdoor shower (I tried the screwdriver and hammer thing and it didn't work - maybe I need to hit it harder), so I haven't been able to flush out the RV anti-freeze from that line, and we get foam and a strange tase in the water after the trailer has sat for a couple of days without running any water (at least that is where I think this foam is coming from).

I'm going to try again this week to attach that shower hose again to see if I can finally get it to work.

Is your connection the quick connect type? Does the connection on the end of the hose move freely? Try a little vasoline on the connector on the RV.


Sent from my iPhone using Tapatalk
 

JohnD

Moved on to the next thing...
Is your connection the quick connect type? Does the connection on the end of the hose move freely? Try a little vasoline on the connector on the RV.


Sent from my iPhone using Tapatalk

It is the blue coiled hose with the quick disconnect . . .

I'll have to try the KY . . . uhhhhhh . . . I mean Vasoline on it to see if that helps!
 

travlingman

Well-known member
It is the blue coiled hose with the quick disconnect . . .

I'll have to try the KY . . . uhhhhhh . . . I mean Vasoline on it to see if that helps!

Turn the water off to the coach. Then open up a faucet(kitchen or bath) to relieve the pressure build up in the lines. Go to the outside and take a phillips head screw driver and insert the tip into the opening where you hook up the blue hose. I just take my hand and hit the screw driver and it will cause the valve to release so you can hook up the outside coiled up hose.
 

JohnD

Moved on to the next thing...
Turn the water off to the coach. Then open up a faucet(kitchen or bath) to relieve the pressure build up in the lines. Go to the outside and take a phillips head screw driver and insert the tip into the opening where you hook up the blue hose. I just take my hand and hit the screw driver and it will cause the valve to release so you can hook up the outside coiled up hose.

I've already tried that . . . but will try it again on Thursday (my day off).
 
Top