Garypowell
Well-known member
When I joined the forum a couple of weeks back my first post was if anyone had removed their stove and installed a dish washer. Linda and I are now on our 5th fifth wheel (since 1995) and have always thought of this modification but never tried. I had some interesting responses but no one reported they had tried.
As I looked closer at the stove I could see it would not be possible before our first trip as the stove and cooktop where one unit. And it seemed too big of a project in such a short amount of time.
Linda noticed that the one of the kitchen cabinets backed up to a bathroom cabinet. It also seemed that a shelf in the kitchen was at the same basic level as the floor of this bathroom cabinet. An idea was born.
As you will see below I proceeded very cautiously and made sure all would fit and work before cutting a stud out. Even with the wall removed between the two cabinets I could simply reinstall them if needed.
First we identified the dishwasher (http://www.compactappliance.com/Dishwashers/Appliances-Dishwashers,default,sc.html) and decided that if this custom install idea would not work we could "live" with the dishwasher being on the kitchen counter.
We purchased the unit, tested it and found that it worked excellently.
The attached pictures tell the story but......
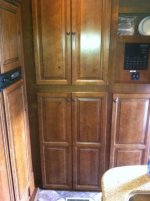
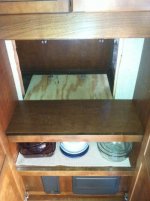
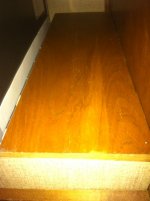
1. Picture of cabinets before.
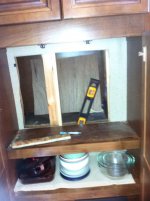
2. Shelf examination and drilling pilot hole to get some idea of spacing. You’ll see the pilot hole on the next picture.
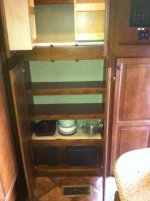
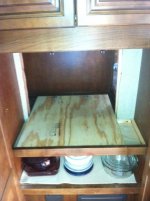
3. Removing one shelf and mapping out where the unit would sit. You can see the pilot hole right next to my favorite beverage.
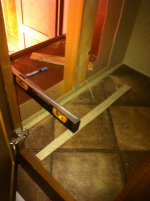
4. Cutting through the wall. I put the level down into the wall as I wanted to see where I was in the basement.
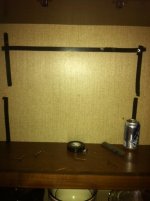
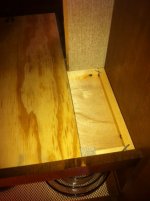
5. Measuring how far back into the bathroom cabinet the unit would sit and if there was room for plumbing.
At this point I called Heartland to make sure the "stud" was not load bearing. I was assured it was not and that it could be removed.
6. The stud removed and a base board installed. You will notice the opening is offset. This is due to another stud to the right and the face of the bathroom cabinet is there too. I had to shim up the bathroom floor as it was about 3" lower than the shelf in the kitchen.
7. Close up of base board fitting into shelf….a small shim needed.
8. Trim board reinstalled.
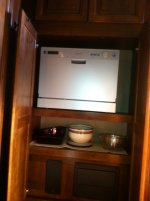
9. Dishwasher installed.
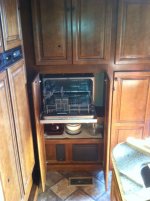
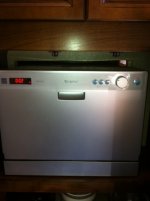
10. Dishwasher with door opened.
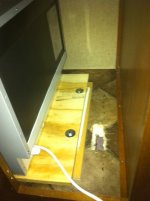
11. You can see the view from the bathroom with the hole in the floor for plumbing and electrical. The two bolts go all the way through to the basement. The idea being that this will bear a majority of the weight of the unit rather than the shelf in the kitchen.
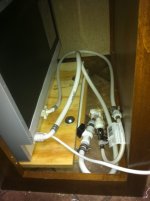
12. Plumbing in place. Obviously not a pretty sight and I am sure I will clean it by shortening some of the lines later.
13. I installed a shelf (using different lengths of legs) to cover plumbing and make this space usable again. The shelf also keeps the unit from sliding back. I also installed two “L” brackets on the front to keep it from sliding forward.
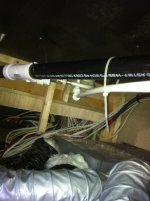
14. Plumbing from below. The drain line is from the shower and the supply is from the kitchen run. I did not take a picture but I insulated all of the hot water lines. Also not being real confident of my plumbing prowess I put a 2' by 4' plastic tub under all the plumbing with two water alarms installed.....just in case!
The power comes from the vacuum receptacle that I put a three way splitter into. Linda was OK with the reality that we cannot do dishes and vacuum at the same time.
15. The first load using the 12 volt pump. Since then I have pressure tested the lines with city water but was not able to run a load of dishes as the generator was back in the garage by this time.
It probably took me 10 hours over 5 days to accomplish this. The project might not be for all but since Linda and I work on the road (Sales Reps) we try and make things as easy as possible for ourselves in the evening. We start our first sales trip in two weeks out to Louisiana and back (covering upper FL, Lower GA, AL, MS and LA) so I am glad I got this done in time……and we still have our oven.
As I looked closer at the stove I could see it would not be possible before our first trip as the stove and cooktop where one unit. And it seemed too big of a project in such a short amount of time.
Linda noticed that the one of the kitchen cabinets backed up to a bathroom cabinet. It also seemed that a shelf in the kitchen was at the same basic level as the floor of this bathroom cabinet. An idea was born.
As you will see below I proceeded very cautiously and made sure all would fit and work before cutting a stud out. Even with the wall removed between the two cabinets I could simply reinstall them if needed.
First we identified the dishwasher (http://www.compactappliance.com/Dishwashers/Appliances-Dishwashers,default,sc.html) and decided that if this custom install idea would not work we could "live" with the dishwasher being on the kitchen counter.
We purchased the unit, tested it and found that it worked excellently.
The attached pictures tell the story but......
1. Picture of cabinets before.
2. Shelf examination and drilling pilot hole to get some idea of spacing. You’ll see the pilot hole on the next picture.
3. Removing one shelf and mapping out where the unit would sit. You can see the pilot hole right next to my favorite beverage.
4. Cutting through the wall. I put the level down into the wall as I wanted to see where I was in the basement.
5. Measuring how far back into the bathroom cabinet the unit would sit and if there was room for plumbing.
At this point I called Heartland to make sure the "stud" was not load bearing. I was assured it was not and that it could be removed.
6. The stud removed and a base board installed. You will notice the opening is offset. This is due to another stud to the right and the face of the bathroom cabinet is there too. I had to shim up the bathroom floor as it was about 3" lower than the shelf in the kitchen.
7. Close up of base board fitting into shelf….a small shim needed.
8. Trim board reinstalled.
9. Dishwasher installed.
10. Dishwasher with door opened.
11. You can see the view from the bathroom with the hole in the floor for plumbing and electrical. The two bolts go all the way through to the basement. The idea being that this will bear a majority of the weight of the unit rather than the shelf in the kitchen.
12. Plumbing in place. Obviously not a pretty sight and I am sure I will clean it by shortening some of the lines later.
13. I installed a shelf (using different lengths of legs) to cover plumbing and make this space usable again. The shelf also keeps the unit from sliding back. I also installed two “L” brackets on the front to keep it from sliding forward.
14. Plumbing from below. The drain line is from the shower and the supply is from the kitchen run. I did not take a picture but I insulated all of the hot water lines. Also not being real confident of my plumbing prowess I put a 2' by 4' plastic tub under all the plumbing with two water alarms installed.....just in case!
The power comes from the vacuum receptacle that I put a three way splitter into. Linda was OK with the reality that we cannot do dishes and vacuum at the same time.
15. The first load using the 12 volt pump. Since then I have pressure tested the lines with city water but was not able to run a load of dishes as the generator was back in the garage by this time.
It probably took me 10 hours over 5 days to accomplish this. The project might not be for all but since Linda and I work on the road (Sales Reps) we try and make things as easy as possible for ourselves in the evening. We start our first sales trip in two weeks out to Louisiana and back (covering upper FL, Lower GA, AL, MS and LA) so I am glad I got this done in time……and we still have our oven.
Attachments
-
 10 Dishwasher with Door open.JPG94 KB · Views: 398
 -
 2 Shelf examination and pilot hole.JPG85.1 KB · Views: 414
 -
 1 Cabinets Before Install.JPG93.8 KB · Views: 449
 -
 3 Shelf Removed.JPG78.5 KB · Views: 403
 -
 4. Hole in the wall.jpg306.7 KB · Views: 425
 -
 5 How deep would unit sit..jpg611 KB · Views: 388
 -
 6 Stud removed and base board in place.JPG88.9 KB · Views: 376
 -
 7 Close up of base board and small shim.JPG79.3 KB · Views: 349
 -
 8 Trim piece reinstalled.JPG93.7 KB · Views: 361
 -
 9 Dishwasher installed.JPG65.6 KB · Views: 405
 -
 15 First load of dishes.JPG62.4 KB · Views: 392
 -
 14 Basement plumbing.JPG79.7 KB · Views: 361
 -
 13 Shelf to cover plumbing.JPG72.1 KB · Views: 353
 -
 12 Plumbing in place.JPG77.4 KB · Views: 362
 -
 11 Back view with plumbing hole in the floor.JPG73.4 KB · Views: 367
") !!!! Way to go. The wheels are turning on how we can modify our coach.
!!!! Way to go. The wheels are turning on how we can modify our coach.


