taskswap
Well-known member
My first foray into 3D modeling, be gentle. 
There are lot of threads about the Atwood/SureCo/Stromberg step caps but none of them worked for me. There seem to be three styles of ladder step caps:
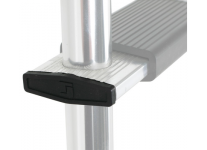
1. A flat cap with a recessed face that installs into the vertical ladder tube with a single screw. This cap has a very thin insert into the step, and is fixed in place with small roll pins or rivets through the sides:

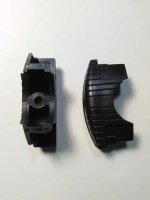
2. A large rounded cap with a pair of fingers that install deeply into the step. This is the "Atwood/Kemberly" style that is also now commonly found on other brands. The old style apparently had one center screw which they redesigned to use three screws:

3. Mine.
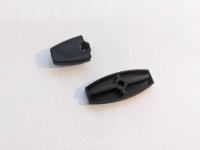
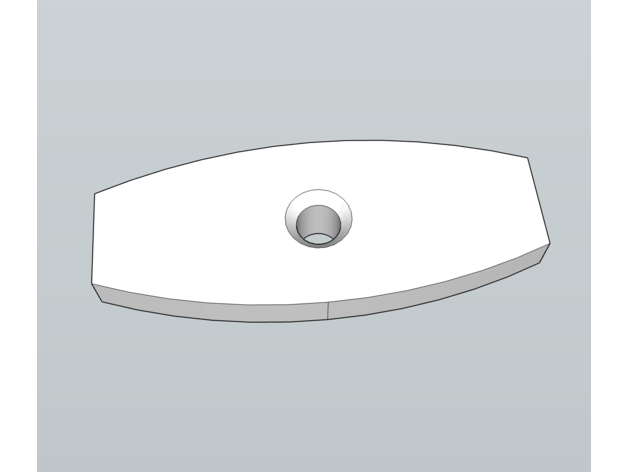
For the life of me I've not been able to track down the manufacturer of this or a source of replacements. Heartland isn't replying to my emails so I gave up on that angle, and neither of the first two options fits this step. (I also didn't want to replace my entire ladder just to fix one step.) As you can see this style has a truncated-oval shape and four "ribs" that support the step, with a central countersunk screw to attach it to the ladder upright tube. My original broken one is shown at top, and the one I 3D printed is below it. I think it's a pretty close replica.

I printed this in polycarbonate, which is one of the strongest (cost-effective) options. Polycarb is NOT UV resistant so I may spray it with a UV protector, but to be honest these things were so cheap I could just as easily replace it every few years. I don't use the ladder except for emergencies (I carry a telescoping one that I use instead) so this is mostly to maintain the look and feel. If you want an alternative, use ASA, which is almost as strong but also UV resistant.
Looking around my storage unit's parking lot I see a ton of other coaches with the same style ladder - I can't imagine I'm the only one with this problem. Hopefully this helps somebody, some day. You don't need to be a 3D printing genius - I don't even own a printer. Just download the STL file, upload it to a service like https://craftcloud3d.com/ and pick the material you want it done in. As I said above I suggest either polycarbonate (and know about the UV issue) or ASA.
Mods: I'm starting to get into the swing of things with 3D modeling and may be making more parts for common items like the range vent flaps that always break, flag pole and antenna mounts and clips, etc. If there are Heartland-specific parts would it make sense to have a section in Resources/Files for those? Now that you can just use services to get things printed, I suspect this could be a good way for RV owners to maintain their coaches without having to be 3D printing wizards...

 www.thingiverse.com
There are lot of threads about the Atwood/SureCo/Stromberg step caps but none of them worked for me. There seem to be three styles of ladder step caps:
1. A flat cap with a recessed face that installs into the vertical ladder tube with a single screw. This cap has a very thin insert into the step, and is fixed in place with small roll pins or rivets through the sides:

2. A large rounded cap with a pair of fingers that install deeply into the step. This is the "Atwood/Kemberly" style that is also now commonly found on other brands. The old style apparently had one center screw which they redesigned to use three screws:

3. Mine.
For the life of me I've not been able to track down the manufacturer of this or a source of replacements. Heartland isn't replying to my emails so I gave up on that angle, and neither of the first two options fits this step. (I also didn't want to replace my entire ladder just to fix one step.) As you can see this style has a truncated-oval shape and four "ribs" that support the step, with a central countersunk screw to attach it to the ladder upright tube. My original broken one is shown at top, and the one I 3D printed is below it. I think it's a pretty close replica.

I printed this in polycarbonate, which is one of the strongest (cost-effective) options. Polycarb is NOT UV resistant so I may spray it with a UV protector, but to be honest these things were so cheap I could just as easily replace it every few years. I don't use the ladder except for emergencies (I carry a telescoping one that I use instead) so this is mostly to maintain the look and feel. If you want an alternative, use ASA, which is almost as strong but also UV resistant.
Looking around my storage unit's parking lot I see a ton of other coaches with the same style ladder - I can't imagine I'm the only one with this problem. Hopefully this helps somebody, some day. You don't need to be a 3D printing genius - I don't even own a printer. Just download the STL file, upload it to a service like https://craftcloud3d.com/ and pick the material you want it done in. As I said above I suggest either polycarbonate (and know about the UV issue) or ASA.
Mods: I'm starting to get into the swing of things with 3D modeling and may be making more parts for common items like the range vent flaps that always break, flag pole and antenna mounts and clips, etc. If there are Heartland-specific parts would it make sense to have a section in Resources/Files for those? Now that you can just use services to get things printed, I suspect this could be a good way for RV owners to maintain their coaches without having to be 3D printing wizards...

RV Ladder Step Cap, Single Screw by taskswap
RV ladder step caps are fragile and easily broken. The most common ladder step cap replacements are from Stromberg or Sureco. However, a mystery third vendor is also common in the industry and use by Heartland and many other manufacturers. This ladder design has a step cap that wraps around the...
