kakampers
Past Heartland Ambassador
Several months back we discovered that the black tank valve was not seating properly, which was allowing all the fluids to drain from the tank...NOT GOOD!! Luckily we have an additional Valtrex blade valve at the very end of the sewer connection...we kept that closed along will all the waste valves and this kept water backed up into the black tank until we could get it repaired. Finally tackled that puppy in the last two days....
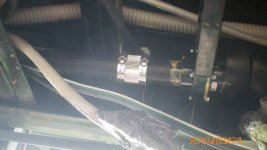
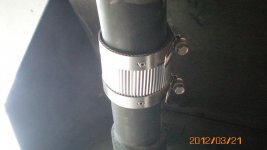
DH did not want to risk "pinching" or tearing the rubber seals on either side of the valve, as it is a very tight fit, and trying to just remove the old valve and pull cable and replace would be very difficult. To solve this problem, he basically cut the valve systems completely out, which are all in close proximity to each other (we actually replaced all three...if we were gonna drop the belly, why not after five years of fulltime use) and used two in-line 1-1/2" to 1-1'2" rubber boots with metal sleeves to put it all back. This made replacing the valves very easy, with lots of room to work, and then he only had a "tight" fit on the last of the two rubber boots. Although it was time consuming, the actual project only took about 2-3 hours...and NOT ONE LEAK!! Nothing pinched, nothing torn...and the pulls work better than new!!

 YEAH!!!
Oh, and the problem was toilet tissue had been lodged in where the edge of the valve "seated" when closed...there was no rinsing it out...it was packed in there tight from repeated opening and closing of the valve. Now if the valve ever has an issue, we just need to undo the rubber boots, pull the valve out, clean it and replace...well, DH gets to do that "lovely" job....LOL!!!


DH did not want to risk "pinching" or tearing the rubber seals on either side of the valve, as it is a very tight fit, and trying to just remove the old valve and pull cable and replace would be very difficult. To solve this problem, he basically cut the valve systems completely out, which are all in close proximity to each other (we actually replaced all three...if we were gonna drop the belly, why not after five years of fulltime use) and used two in-line 1-1/2" to 1-1'2" rubber boots with metal sleeves to put it all back. This made replacing the valves very easy, with lots of room to work, and then he only had a "tight" fit on the last of the two rubber boots. Although it was time consuming, the actual project only took about 2-3 hours...and NOT ONE LEAK!! Nothing pinched, nothing torn...and the pulls work better than new!!
Oh, and the problem was toilet tissue had been lodged in where the edge of the valve "seated" when closed...there was no rinsing it out...it was packed in there tight from repeated opening and closing of the valve. Now if the valve ever has an issue, we just need to undo the rubber boots, pull the valve out, clean it and replace...well, DH gets to do that "lovely" job....LOL!!!


Last edited:

![IMG_0028 [800x600].JPG IMG_0028 [800x600].JPG](https://heartlandowners.org/data/attachments/5/5424-89f80198220bc55c951bf5a9e2e40ff8.jpg)