TXBobcat
Fulltime
Well yesterday I had AAA RV Pro, Steven Mullet, come by and replace the gate valve for the #2 Gray Water (Kitchen).
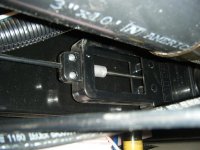
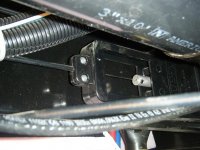
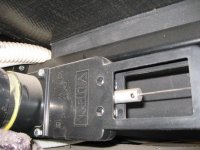
We weren't sure where to open the underbelly to replace it. I remember seeing the Gray Water conduit when I had the Mor/Ryde IS & DB system installed. That will be the first couple of photos. It runs from the back behind the tires along the frame up to the discharge conduit, so Steve cut the underbelly in the area of the discharge conduit and found the GW#2 Gate valve.
There is really not a lot to show. HL did not put the GW#2 gate valve on the tank but they did put it as part of the large discharge conduit that exits from under the trailer. This helped and hindered, but it was doable. The valve was cemented to discharge conduit and we had to cut the smaller conduit to remove the GW#2 gate valve. We did not have to bother the main discharge conduit. One thing I did see was the black water gate valve is in the same place and on the other side of the discharge conduit.
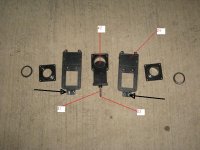
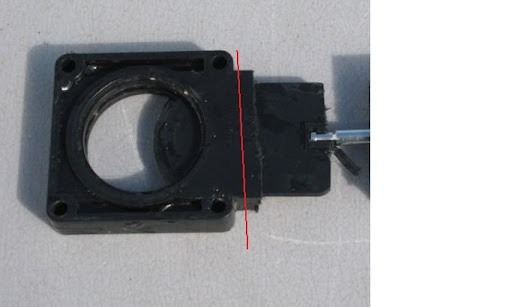
Once the GW conduit was cut Steve removed the bolts holding the gate valve together, but left one side of the gate that was glued to the discharge conduit. Steve took the opposite side of the old valve which had a section of the conduit still glued to it and removed about an inch. Steve took a rubber coupling with worm clamps (from Lowe's) and put it on the small conduit going to the rear, then inserted the conduit with the part from the old gate valve into the other end. Slid the new gate valve between the two parts, put in the bolts back in and tightened the new gate. Then Steve tightened the worm clamps on the coupling. Before Steve put the new gate in he showed me a can of heavy duty silicone lube which he used on the new gate valve.
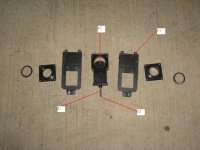
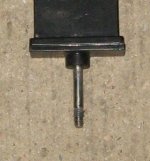
We (Yea.. I was in there helping) put a nylon rope onto the old cable and pulled it back up to the UDC then used the rope to pull the new cable back down into the underbelly. The cable is held on with a hex screw. We had to cut off about an inch to get it to adjust properly. When Steve adjusted the cable, he left the handle in the UDC out just about 3/8 in, which looks like the other handles. The last photo shows the gate valve taken apart.
When we finished, Steve used some black tape to tape up the underbelly cover. It was not Duct Tape. It sticks very well and he said he ordered it from the Pilgrim Mfgr plant. It was about $100 per roll.
The job looks good and worked well. I am posting as many pictures as I can. It is difficult to take pictures because of close quarters and there really is not a lot to photograph, but this is what I have.
I will try to answer any questions as I can. If anyone is in the area of Melissa or McKinney Texas and need help I would definitely recommend Steve. Phone is 972-924-2218 & Cell 214-704-0392.
BC
Attachments
-
![IMG_0148 [800x600].JPG](/data/attachments/5/5408-66a5332401250af278da463f36205502.jpg) IMG_0148 [800x600].JPG122.8 KB · Views: 214
IMG_0148 [800x600].JPG122.8 KB · Views: 214 -
![IMG_0155 [800x600].JPG](/data/attachments/5/5409-ec82aaa58be08ffe9c503beaf414f2a0.jpg) IMG_0155 [800x600].JPG94 KB · Views: 200
IMG_0155 [800x600].JPG94 KB · Views: 200 -
![IMG_0165 [800x600].JPG](/data/attachments/5/5410-1fa73d61d92e48b69b13262cd186beda.jpg) IMG_0165 [800x600].JPG92 KB · Views: 197
IMG_0165 [800x600].JPG92 KB · Views: 197 -
![IMG_0166 [800x600].JPG](/data/attachments/5/5411-45e4c17a36b1727a991b60b88070806c.jpg) IMG_0166 [800x600].JPG133.7 KB · Views: 192
IMG_0166 [800x600].JPG133.7 KB · Views: 192 -
![IMG_0167 [800x600].JPG](/data/attachments/5/5412-0ceaf138cf31a0b4c1a9c3b1881c5b58.jpg) IMG_0167 [800x600].JPG108.5 KB · Views: 189
IMG_0167 [800x600].JPG108.5 KB · Views: 189 -
![IMG_0019 [800x600].JPG](/data/attachments/5/5419-a1069622c5a0fd0594975cf4dec271fe.jpg) IMG_0019 [800x600].JPG130 KB · Views: 169
IMG_0019 [800x600].JPG130 KB · Views: 169 -
![IMG_0018 [800x600].JPG](/data/attachments/5/5418-dd3bf45f29076d0ef13cba8dacfdf594.jpg) IMG_0018 [800x600].JPG121.9 KB · Views: 162
IMG_0018 [800x600].JPG121.9 KB · Views: 162 -
![IMG_0017 [800x600].JPG](/data/attachments/5/5417-37f92df99dc308b02aa49612587f781b.jpg) IMG_0017 [800x600].JPG134.1 KB · Views: 171
IMG_0017 [800x600].JPG134.1 KB · Views: 171 -
![IMG_0016 [800x600].JPG](/data/attachments/5/5416-4fb1a789d796a939910f8d410ca2eaad.jpg) IMG_0016 [800x600].JPG120.3 KB · Views: 165
IMG_0016 [800x600].JPG120.3 KB · Views: 165 -
![IMG_0015 [800x600].JPG](/data/attachments/5/5415-8661417ccc0446e972ba32558a465a46.jpg) IMG_0015 [800x600].JPG144.1 KB · Views: 171
IMG_0015 [800x600].JPG144.1 KB · Views: 171 -
![IMG_0014 [800x600].JPG](/data/attachments/5/5414-6e3eb1cab1d2118b6d7ddc24b3b50a14.jpg) IMG_0014 [800x600].JPG137.3 KB · Views: 184
IMG_0014 [800x600].JPG137.3 KB · Views: 184 -
![IMG_0012 [800x600].JPG](/data/attachments/5/5413-0bbd45d99f1c7f583a9e366858fc9c5b.jpg) IMG_0012 [800x600].JPG153 KB · Views: 186
IMG_0012 [800x600].JPG153 KB · Views: 186 -
![IMG_0023 [800x600].JPG](/data/attachments/5/5420-16d226c7ccc9de3b22e88410a536cf12.jpg) IMG_0023 [800x600].JPG117.2 KB · Views: 177
IMG_0023 [800x600].JPG117.2 KB · Views: 177 -
![IMG_0026M [800x600].JPG](/data/attachments/5/5421-516cf6b618587ced3b6119a61dfe4f13.jpg) IMG_0026M [800x600].JPG101.2 KB · Views: 173
IMG_0026M [800x600].JPG101.2 KB · Views: 173 -
![IMG_0027 [800x600].JPG](/data/attachments/5/5422-d0af91bd1bed55fd819ea0376bea8668.jpg) IMG_0027 [800x600].JPG95 KB · Views: 170
IMG_0027 [800x600].JPG95 KB · Views: 170 -
![IMG_0028 [800x600].JPG](/data/attachments/5/5423-89f80198220bc55c951bf5a9e2e40ff8.jpg) IMG_0028 [800x600].JPG107.9 KB · Views: 165
IMG_0028 [800x600].JPG107.9 KB · Views: 165 -
![IMG_0030 [800x600].JPG](/data/attachments/5/5425-12f6f9883018fb92174ece28f3eaea0a.jpg) IMG_0030 [800x600].JPG108.5 KB · Views: 163
IMG_0030 [800x600].JPG108.5 KB · Views: 163

![IMG_0043 [800x600].JPG](/data/attachments/5/5443-13dd79309649b0f0609614565c496464.jpg)
![IMG_0042 [800x600].JPG](/data/attachments/5/5442-bd9264da38a85d6cefde06faf86ba0c2.jpg)
![IMG_0041 [800x600].JPG](/data/attachments/5/5441-25ea53a7c319bb8d4c4f3bdf3fe4c6c4.jpg)
![IMG_0038 [800x600].JPG](/data/attachments/5/5440-f47a8bf2085b11651f6134d25bd4d18a.jpg)
![IMG_0037 [800x600].JPG](/data/attachments/5/5439-dfc519bfde769896268a1703fe9ad812.jpg)
![IMG_0036 [800x600].JPG](/data/attachments/5/5438-87bcc04cbaa3c538023f835a33864748.jpg)
![IMG_0035 [800x600].JPG](/data/attachments/5/5437-0c0a8d930df0f20b5110e6a316d6a8d3.jpg)
![IMG_0034 [800x600].JPG](/data/attachments/5/5436-e98760f58272fb2a5c098c99832aae23.jpg)
![IMG_0033 [800x600].JPG](/data/attachments/5/5435-ad385ce7a2567bdbb585b3c82a6c3468.jpg)
![IMG_0032 [800x600].JPG](/data/attachments/5/5434-b151df9f240a786af3d59a15f16f98d0.jpg)
![IMG_0037L [800x600].jpg](/data/attachments/5/5444-8d75704532851ba5f1cb861744548555.jpg)