- Home
- Forums
- HEARTLAND RVs GENERAL AREA
- Plumbing - For all Heartland brands
- Faucets, Sinks, Showers, Fresh Water Tanks, Valves
You are using an out of date browser. It may not display this or other websites correctly.
You should upgrade or use an alternative browser.
You should upgrade or use an alternative browser.
Low water pressure kitchen sink
- Thread starter Mdelaney
- Start date
I did. Same screen that works great with spray selection.Check the screen in the tap. Maybe full of debris
CoveredWagon
Well-known member
Same here. Been that day since day one. I call it a water saving device.I have a 2021 bighorn traveler 39MB. Kitchen sink has low pressure except for when you push the spray button. Any suggestions?
Well if I find the issue I’ll let you knowSame here. Been that day since day one. I call it a water saving device.
Tinwindow3
Active Member
Anyone ever figure out how to make the water flow faster? It’s almost unusable
CoveredWagon
Well-known member
NopeAnyone ever figure out how to make the water flow faster? It’s almost unusable
Tinwindow3
Active Member
So I was playing around today, mine is a 22. I was able to unscrew the faucet end from the water line. I removed the backflow valve and the inner ring. I used an air compressor to blow from the outside and a ton on what looked to be building scraps (sawdust etc) blew out. Works like a charm now!
Johnston1107
Active Member
Any pictures or details?
Tinwindow3
Active Member
I don’t have pictures but can try to walk you through any questions
Johnston1107
Active Member
So where is this backflow valve and what shape and color is it and is it under the sink.
Tinwindow3
Active Member
So if it’s the pullout faucet type, I separated the front end of the faucet from the pull out end by twisting it it simply threads in. That left me with just the smaller sprayer end separate from everything else. If you look at the very top of the sprayer inside, you’ll see several indentations that look like a circle with indented squares in it you need to be able to grab these areas to be able to twist the insides out of the casing. This Apollo and internal valve where you will be able to check and see if there’s any sediment hanging in there or not I use the blow gun and a lot came out. It seems like a lot of sawdust, etc. from assembly of the coach. If you look at the very front of the sprayer where the chrome meets the gray, you’ll also notice those few squares in a circle. I use these to push back to get the cartridge out. Part of my mind sinks that I could’ve also unscrewed the innards from that end alone, but it didn’t work for me without getting the faucet fairly scratched up so I did not go with that . Basically, once I had the inside out, clean them and use the blow gun from the front to the back reassembled everything started to work great. I know that the pictures would be so much more helpful and I am going to be going out in the rig in September, but if I can get up into the kitchen and find some time, I will do my best to get you some pictures . And summary your separating the waterline from the sprayer nozzle and pulling out the innards of the sprayer nozzle the hard part is, I said the washers and nuts are all hidden inside and you need to be able to grasp the small indentations in the circle. You will see them as soon as you look and then twist them up just like you were not. I actually use precision screwdrivers to twist them at the same time. Perhaps you have a far better way but I did not have flyers that were small enough. I apologize for any spelling errors. I’m doing this via speech to text. I hope it helped some!
Johnston1107
Active Member
Okay thanks so the restriction is in the spray head and not under the sink
Tinwindow3
Active Member
Correct, at least mine was. At first I thought it was a pressure regulator but I did not see that. For me it was considerable sediment. The sink was getting water pressure
Johnston1107
Active Member
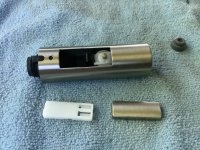
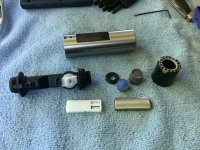
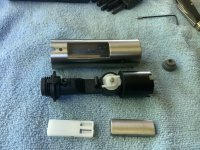
I took the spray head apart and cleaned the aerator completely a slight improvement in flow mine was not so plugged up. The rocker prys up with a small screwdriver then remove set screw and the cartridge slides right out . Thanks for the help
Attachments
Tinwindow3
Active Member
Thanks! Was there a water saving cartridge? How did it work out in the end pressure wise
Johnston1107
Active Member
I think the blue plastic piece is what you’re referring to it did not make a difference with or without it installed
Tinwindow3
Active Member
Did you get at least some more pressure cleaning it out I hope?
Similar threads
- Replies
- 3
- Views
- 327
- Replies
- 2
- Views
- 445
- Replies
- 5
- Views
- 362
- Replies
- 9
- Views
- 597


