Roof caulking no more

JohnDar

Prolifically Gabby Member
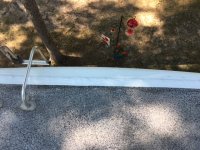
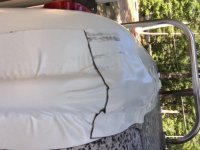
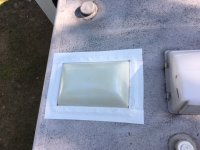
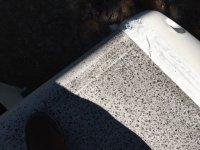
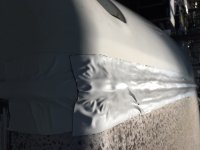
Finally got up on the roof and applied 4" Eternabond tape on the front and rear cap roof seams, as well as the seam around the shower skylight. The roof vents and other areas will get done later. A word of advice: Don't do this on a warm, sunny day. Getting the release liner off the tape can be a real PITA when it gets warmed up sitting in the sun.

There may be some wrinkles in it, but it's still neater than globs of caulking. I cut 5" sections to run from the gutters to the curve of the roof, then an 8' strip across the roof, overlapping the end sections. Used the Eternabond cleaner after a soap/water scrub, then rolled the applied tape to smooth it as much as possible.
 

jnbhobe

Well-known member
I did that a few years ago, it really worked out well.

Sent from my SM-G950U using Tapatalk
 

Niles

Well-known member
I did the front cap, and someday plan to get the back done too. Seems simple enough and no more worry about chalk.
 

NYSUPstater

Well-known member
Finally got up on the roof and applied 4" Eternabond tape on the front and rear cap roof seams, as well as the seam around the shower skylight. The roof vents and other areas will get done later. A word of advice: Don't do this on a warm, sunny day. Getting the release liner off the tape can be a real PITA when it gets warmed up sitting in the sun.

There may be some wrinkles in it, but it's still neater than globs of caulking. I cut 5" sections to run from the gutters to the curve of the roof, then an 8' strip across the roof, overlapping the end sections. Used the Eternabond cleaner after a soap/water scrub, then rolled the applied tape to smooth it as much as possible.

Any chance of some pics? Kinda funny you posted this as I washed my roof for the 1st time this morning. Turned out okay, but darn streaks/stains from A/C units tho---they are still there. Got me to thinking of our last coach as it was on the 12 year mark and was considering the RV Armour coating if we had kept it. Haven't heard or seen much about folks using it tho.
 

'Lil Guy'

Well-known member
Know it's a PITA but I'd like to see a pic of how you've tied in the front and rear caps. Going to do mine soon. I've done all the vents, A/C's, and sky kites n my last trailer.
 

sengli

Well-known member
So did you remove the existing caulk on the roof, or simply go over what was there? And this is better than the caulk in the long run, Just due to its strength?
 

wdk450

Well-known member
Finally got up on the roof and applied 4" Eternabond tape on the front and rear cap roof seams, as well as the seam around the shower skylight. The roof vents and other areas will get done later. A word of advice: Don't do this on a warm, sunny day. Getting the release liner off the tape can be a real PITA when it gets warmed up sitting in the sun.

There may be some wrinkles in it, but it's still neater than globs of caulking. I cut 5" sections to run from the gutters to the curve of the roof, then an 8' strip across the roof, overlapping the end sections. Used the Eternabond cleaner after a soap/water scrub, then rolled the applied tape to smooth it as much as possible.
As we used to say in the Navy; "Works fine, lasts a LONG time". Hint: if you ever need to take the Eternabond tape off (like for an end cap removal) an industrial heat gun works great, but be careful of the rubber roof covering.
 

JohnDar

Prolifically Gabby Member
As we used to say in the Navy; "Works fine, lasts a LONG time". Hint: if you ever need to take the Eternabond tape off (like for an end cap removal) an industrial heat gun works great, but be careful of the rubber roof covering.

Thanks for the removal tip!

- - - Updated - - -

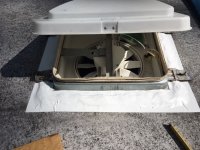
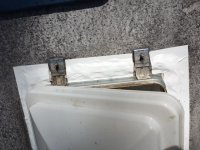
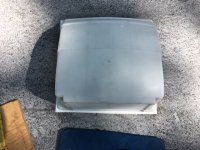
Here's some photos of the work so far. Managed to get two of the roof vents done before my knees had enough kneeling and it started to heat up. More to do later.

Around the roof vents, I cut sections to fit where needed rather than removing the cover hardware. They're embedded in caulk pretty well, anyways. To roll in tight spaces, I found using the curved end of a small adjustable wrench worked fine. With the cover back on, not much tape is exposed.
 

Attachments

  • Front Cap corner.JPG
    Front Cap corner.JPG
    122.7 KB · Views: 148
  • Front Cap end.JPG
    Front Cap end.JPG
    71.5 KB · Views: 149
  • Front Cap top.JPG
    Front Cap top.JPG
    136.8 KB · Views: 175
  • Rear Cap top.JPG
    Rear Cap top.JPG
    173.7 KB · Views: 145
  • Rear Cap end.JPG
    Rear Cap end.JPG
    99.3 KB · Views: 140
  • Skylight.JPG
    Skylight.JPG
    126.7 KB · Views: 142
  • Vent 1.JPG
    Vent 1.JPG
    133.4 KB · Views: 136
  • Vent 2.JPG
    Vent 2.JPG
    123.1 KB · Views: 126
  • Vent 3.JPG
    Vent 3.JPG
    143.5 KB · Views: 126
Top