You are using an out of date browser. It may not display this or other websites correctly.
You should upgrade or use an alternative browser.
You should upgrade or use an alternative browser.
What did you do to your camper today?
- Thread starter MagnoliaTom
- Start date
Doublegranch
Mountain Region Director-Retired
Erika:
The grooves in the steps....would they create any problems for the dogs coming in and out??? I would like to add the steps to my New Sundance when I pick it up at the end of the month....
The grooves in the steps....would they create any problems for the dogs coming in and out??? I would like to add the steps to my New Sundance when I pick it up at the end of the month....
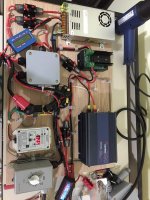
Finally ready to install the charging systen in our prowler. Ordering parts on ebay from china can be patience testing...
Way to lay it out! What is in the upper-left? Looks like a DC to DC PSU. Also, what do you use the timer in the lower-right for?
mlpeloquin
Well-known member
Erika:
The grooves in the steps....would they create any problems for the dogs coming in and out??? I would like to add the steps to my New Sundance when I pick it up at the end of the month....
The Glow Steps have no holes in them and the groves grip your shoes well, but the dogs don't even notice them. In fact the distance in height is less than the OEM so it is easier for them to go up and down.
Doublegranch
Mountain Region Director-Retired
Marc:
Thanks for the info!!!
Thanks for the info!!!
TravelTiger
Founding Texas-West Chapter Leaders-Retired
Erika:
The grooves in the steps....would they create any problems for the dogs coming in and out??? I would like to add the steps to my New Sundance when I pick it up at the end of the month....
Here's some pics of the grooves.


Yes I made shims. I had on hand 1/8"X1.5" stock aluminum. Marked off the hole locations and drilled them oversized using a step drill. Took about 15 minuets to make using a step drill. Used one on each side. The second one went in a bit tight. If I did it again, I wound have used the 1/8" and then a 1/16" thick stock.
The stairs work well.
I took my time installing them. It took 15 minuets to remove the plastic support plates for the J panels. Several of the screws were stripped. I was able to do the instillation by myself by using two of my 6X24X24 inch blocks. I was able to set the blocks on their sides to support the step assembly. The step assembly width is about ¼” less then the stair mounting opening. Since the fifth wheel mounting frame is thin metal and would deform easily, I made the shims. The shims were slid up between the steps and the mounting plate using a piece of 1/16” aluminum stock that I had on hand. The second shim went in a bit tight. Two 3/32” shims or one 1/8” and one 1/16” shim would have made the task a bit easier. Prior to tightening the mounting bolts, I adjusted the front of the steps to be even with the front. I had to make sure that the locking pin can clear the side and trim. The whole process took about a half hour shims and all. It took about fifteen minuets to put the J panel support panels back since I wanted to match the holes and not add any. Adding new holes would have been quicker, but it may have allowed water to intrude. So total working time was about an hour. Add another 15 minuets for tool setup and cleanup.
I order a Glow step for my Big country. It arrives this Wednesday so I will be installing it this weekend. I ordered the 271/2 inch version which should require only 1 or two shims from what I measured. I am a bit concerned since people are talking about 6 or more shims. I will update the install after it is done. I hope it can be as smooth as Marc's install.
Regards,
Steve
Last edited:
TravelTiger
Founding Texas-West Chapter Leaders-Retired
I order a Glow step for my Big country. It arrives this Wednesday so I will be installing it this weekend. I ordered the 271/2 inch version which should require only 1 or two shims from what I measured. I am a bit concerned since people are talking about 6 or more shims. I will update the install after it is done. I hope it can be as smooth as Marc's install.
Regards,
Steve
Steve,no worries. In our case, the opening was 27-1/8 ... I didn't think 27-1/2 would fit, and neither did Torklift. They sent us the 25-1/2 size. We both failed to realize initially how many shims were needed, but once I got the right number (3 each side), the install is fairly straightforward.
Note: no matter which width you buy, the staircase is the same width on both. It's only the frame that attaches to the coach's opening that varies. Shims as needed fill the gap accordingly.
We also removed the plastic end caps on either side of the existing steps first, this makes getting to all the bolts much easier.
Hubby and I held the steps as we removed the loosened bolts, (just because those old steps weigh a ton), and I held the new step frame up as he put the new bolts in place (new is much lighter). It was not hard.
Good luck!!
jhardin
Well-known member
What is the part number? I see an A7804 and an A7504... And where did you purchase them?I installed new Glow Step Revolution from Torque Lift International. Almost effortless to use and very stable. Sorry the pictures are upside down, but the I phone..... Always right side up on Apple devices. The steps adjust in height at the top and the feet also adjust. Just what my wife needed. She has a very high amputation and needs a stable surface. No more bounce! Did the entire install by myself. Total time took about an hour and a half.
View attachment 44700View attachment 44701
TravelTiger
Founding Texas-West Chapter Leaders-Retired
What is the part number? I see an A7804 and an A7504... And where did you purchase them?
Here's their fitment chart


TravelTiger
Founding Texas-West Chapter Leaders-Retired
We got ours direct from Torklift, and ordered A8104 per the specs of our rig. They sent the shims based on my conversation with them.
Sent from my iPhone using Tapatalk
Sent from my iPhone using Tapatalk
Jerry,
I ordered mine from Hitchsource.com.
They had the best price and free shipping. When i talked to the manufacture they recommended to order from the web.
Steve
I ordered mine from Hitchsource.com.
Order Details
|
| ||||||||||||
|
They had the best price and free shipping. When i talked to the manufacture they recommended to order from the web.
Steve
windviewer
Well-known member
Upper left is a megawatt AC/DC power supply (S-400-12, 36 amps 41 amp peak,15.5 VDC (http://www.12voltpowersupplies.us/) to supply battery charging power from generator either direct to to battery (left most switch), or via jumper cable to the solar controller to simulate solar panels. Or I can connect the solar panels instead when the sun shines. Direct to battery for quick high voltage direct charging from generator to minimize run time; finish with solar. The timer switch is to control the AC power from the generator to the AC/DC power supply to ensure that if i get distracted the power to the charging circuit is terminated and the batteries are not cooked. The timer has a range of 1-4 hours which should allow fast charging to the 80% battery level (where the battery starts resisting charge). Then switch to solar. As mentioned before, the inverter is for powering select circuits only in the trailer (computer and/or TV).Way to lay it out! What is in the upper-left? Looks like a DC to DC PSU. Also, what do you use the timer in the lower-right for?
Upper left is a megawatt AC/DC power supply (S-400-12, 36 amps 41 amp peak,15.5 VDC (http://www.12voltpowersupplies.us/) to supply battery charging power from generator either direct to to battery (left most switch), or via jumper cable to the solar controller to simulate solar panels. Or I can connect the solar panels instead when the sun shines. Direct to battery for quick high voltage direct charging from generator to minimize run time; finish with solar. The timer switch is to control the AC power from the generator to the AC/DC power supply to ensure that if i get distracted the power to the charging circuit is terminated and the batteries are not cooked. The timer has a range of 1-4 hours which should allow fast charging to the 80% battery level (where the battery starts resisting charge). Then switch to solar. As mentioned before, the inverter is for powering select circuits only in the trailer (computer and/or TV).
Well thought out. Thanks for sharing.
Jesstruckn/Jesstalkn
Well-known member
Very nice set up. Maybe to advanced for me to understand. But I'm curious what the advantage is from your system over just a good 4 stage convertor that does all of the battery charge thinking for you automatically. And a good Invertor hooked to a transfer switch ?Upper left is a megawatt AC/DC power supply (S-400-12, 36 amps 41 amp peak,15.5 VDC (http://www.12voltpowersupplies.us/) to supply battery charging power from generator either direct to to battery (left most switch), or via jumper cable to the solar controller to simulate solar panels. Or I can connect the solar panels instead when the sun shines. Direct to battery for quick high voltage direct charging from generator to minimize run time; finish with solar. The timer switch is to control the AC power from the generator to the AC/DC power supply to ensure that if i get distracted the power to the charging circuit is terminated and the batteries are not cooked. The timer has a range of 1-4 hours which should allow fast charging to the 80% battery level (where the battery starts resisting charge). Then switch to solar. As mentioned before, the inverter is for powering select circuits only in the trailer (computer and/or TV).

Sent from my XT1254 using Tapatalk
windviewer
Well-known member
We have a small trailer and the built-in WFCO converter would require me to run the generator 'forever' to get the batteries close to but never fully charged. I have followed many discussions on battery charging, and chose my 'camp' (as there are many dissenting opinions on the ways to maintain batteries and to do Solar charging) to minimize generator run-time and incorporate smart solar charging). This system is a hybrid to let me maintain the batteries for long life and careful monitoring.
I can provide reading material for those that wish it to provide the background for the decisions made to build it this way (besides being fun to do") )
)
I can provide reading material for those that wish it to provide the background for the decisions made to build it this way (besides being fun to do
)Jesstruckn/Jesstalkn
Well-known member
We have a small trailer and the built-in WFCO converter would require me to run the generator 'forever' to get the batteries close to but never fully charged. I have followed many discussions on battery charging, and chose my 'camp' (as there are many dissenting opinions on the ways to maintain batteries and to do Solar charging) to minimize generator run-time and incorporate smart solar charging). This system is a hybrid to let me maintain the batteries for long life and careful monitoring.
I can provide reading material for those that wish it to provide the background for the decisions made to build it this way (besides being fun to do
I definitely know what you mean about a fun thing to do!!!!
You did an amazing job on it thanks for sharing. And that answers my question (you can charge the batteries faster with less Generator run time) makes perfect sense. Let use know how it works.
Similar threads
- Replies
- 5
- Views
- 237
- Replies
- 10
- Views
- 538