You are using an out of date browser. It may not display this or other websites correctly.
You should upgrade or use an alternative browser.
You should upgrade or use an alternative browser.
Project LM 365
- Thread starter Jesstruckn/Jesstalkn
- Start date
-
- Tags
- locks
Jesstruckn/Jesstalkn
Well-known member
The line looks good Jerrod.
Steve
Thanks Steve
- - - Updated - - -
That looks good
Thanks Dave
It's moving along slowly but it's getting done right !!!
Jesstruckn/Jesstalkn
Well-known member
This is a little off from my current project but I forget that I put this on a few weeks ago. I just used screws to mount it. I need to drill it and use bolts so it won't flex.
This is a Quick-Release Toggle Clamp I found on Amazon.
I'm modified it a little bit and I'm using it to hold the swinging basement door open in windy conditions.
https://www.amazon.com/gp/product/B004K5WWPW/ref=oh_aui_detailpage_o03_s00?ie=UTF8&psc=1


Sent from my XT1585 using Tapatalk
This is a Quick-Release Toggle Clamp I found on Amazon.
I'm modified it a little bit and I'm using it to hold the swinging basement door open in windy conditions.
https://www.amazon.com/gp/product/B004K5WWPW/ref=oh_aui_detailpage_o03_s00?ie=UTF8&psc=1


Sent from my XT1585 using Tapatalk
porthole
Retired
Just to log in your memory bank and something you probably already know.
I have wanted to build one but haven't had to mess with brake line in along time.
I thought it was clever but found later there are a bunch of these devices on the market.
The Eastwood version seems the easiest and most cost effective one to use.
http://www.offroadfabnet.com/forums/showpost.php?p=126489&postcount=10
View attachment 49049
The homemade versions work well as does the Eastwood tool.
https://www.google.com/search?q=unrolling+a+coil+of+brake+line+tubing&espv=2&biw=1843&bih=970&source=lnms&tbm=isch&sa=X&ved=0ahUKEwiv_ar29Z7RAhVq9IMKHZZRByAQ_AUICCgD#q=unrolling+a+coil+of+brake+line+tubing&tbm=isch&tbs=rimg:CftTnQtiGzQVIjg5sY6J0_1WpUcRHBCfGpuYh97hl6uZyGvAgDDKYEcqLRAg9XoN9nmkRk88V-7aoCvhCTd30rTSV9CoSCTmxjonT9alRETadAX_1M0n5NKhIJxEcEJ8am5iERebzBddPrIF0qEgn3uGXq5nIa8BG64G7XXgWZLCoSCSAMMpgRyotEEbswMlVCCK8NKhIJCD1eg32eaRERoJCKXQ2bObMqEgmTzxX7tqgK-BFUx4D-T8GsWSoSCUJN3fStNJX0EUwRKnDLjXyp
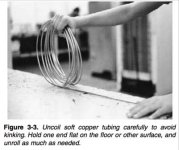
And for unrolling the coil of tubing, try this method to minimize bends and kinks.
Attachments
Jesstruckn/Jesstalkn
Well-known member
That's the process I used
Sent from my XT1585 using Tapatalk
Sent from my XT1585 using Tapatalk
Thanks for posting the picture. I have the same kit for my Bighorn and have been looking at where to put the hydraulic pump and did not think about the propane bay. Makes a lot of sense and makes running the lines real easy.Dave I went low on the I-beam can't really see it unless you look for it.


I also had to use a 1/8" pipe to flare 90° here to keep it off of the propane tank

Sent from my XT1585 using Tapatalk


Jesstruckn/Jesstalkn
Well-known member
Ya I did think about it at first but that's where Ron's installer said he mounts a lot of them in there.
Also propane and electricity throughout the entire RV so I'm not to worried about it.
Sent from my XT1585 using Tapatalk
Also propane and electricity throughout the entire RV so I'm not to worried about it.
Sent from my XT1585 using Tapatalk
Jesstruckn/Jesstalkn
Well-known member
OK I had a good day
We (mostly Calib from Les Schwab) installed the Air/Lift system today.
Make things a lot easier when it's up on the lift.
I basically mounted the pump and wired it in to the #2 upfitter switch. He did most of the rest of it.
We were trying to use self tapping screws in to that military grade steel frame and it was quite the challenge. That steel is tuff. They just kept twisting the heads off. We had to pre drill the holes.
All in All it came out perfect.
I really like how the new kit mounts the bags down inside the spring instead of outside like I've seen other ford kits.


Sent from my XT1585 using Tapatalk
Jesstruckn/Jesstalkn
Well-known member
I also was able to pick up my roll of brake line and fittings,

Also finished installing the left side brackets, rotors, and calipers. So both sides are done now tomorrow I just need to run the rest of the brake lines and bleed the brakes.
And I'll be ready to roll on down to lake Havasu.

I'm very anxious to try them out.
And after seeing all of the drum brakes still looking brand new I think I'm definitely going to feel a big difference.
Sent from my XT1585 using Tapatalk
Jesstruckn/Jesstalkn
Well-known member
Another Mod is done ��
Finally rapped up my Titan disc brake kit install.

Step, one I mounted the pump in the left side front propane compartment. After I connected the wires harness to it with the heat soldier wire connectors.


Next step was to run the wires in to the batteries and then on to the junction box on the back of the pinbox.


Next step was to remove all of the old hubs and drum brake assemblies.


Then install all of the new brackets rotors and calipers


The today I finished running all of the brake lines. I custom made all of the lines at the axles. The lines supplied with the kit were all odd lengths that didn't work for me.


I ran a 2 wire stran from the 7-way box all the way back on the ground to the axles and put a switch on it so that I could trigger the pump to bleed the brakes by my self. It worked pretty good.
JOB IS DONE.
I'll take it for a ride tomorrow.
Sent from my XT1585 using Tapatalk
Last edited:
Jesstruckn/Jesstalkn
Well-known member
I always said the hardest part of the job was running the lines, now that your done what do you think ??
Ya I agree. I custom made most of my lines so I probably have 4 or 5 hours into the brake lines.
I didn't keep track but I bet I have 12 to 14 hours in this project.
Jesstruckn/Jesstalkn
Well-known member
Awesome job Jerrod! Those brake lines look extremely professional. Now you've got to get rid of all the rust and paint the axles and suspension for your " Show Rig" to be complete.
Sent from my SM-G900V using Tapatalk
Thanks for pointing that out Steve !!!
It will all get replaced with nicely painted components when I do the full Air Ride suspension. Hopefully soon.
Jesstruckn/Jesstalkn
Well-known member
Can't wait to hear how the road test goes. Again great job!
Sent from my SM-G900V using Tapatalk
Thanks Steve, see you guy's soon.
For20hunter
Pacific Region Directors-Retired
Nicely done Jerrod!! You are going to love them!!
Rod
Sent from my iPhone using Tapatalk Pro
Rod
Sent from my iPhone using Tapatalk Pro
Similar threads
- Replies
- 4
- Views
- 330
- Replies
- 7
- Views
- 2K
- Replies
- 13
- Views
- 2K