Cyclone 4007 List of Continuous Mods

Matt750

Well-known member
Thats great man!!! Im curious if youre an A&P. If you have no idea what that is just disregard!! Youre work is fantastic. Those tubes are perfect and I may just do that. The Macerators are great, however sometimes they are truly more work than they are worth. Grey water open drainage is an issue with them and you have to do a modification to allow grey water to drain openly. Otherwise I have to run the macerator when the grey tank fills and thats like once a darn day with this group here and long showers!! . That would get rid of the big bins I used to put the three 20’ lines in. That would then make my docking “bin free”!

One other question, where did you get the wallpaper for the stair mount? Ive got two sets and I am goung to desperately need a place to store them other than on the floor. Im thinkimg with your install, I can put them one in front of the other and secure them.


Sent from my iPhone using Tapatalk

Yes I am an A&P, but haven't worked on them in a while and thanks!

I looked into the macerator idea a while back, but never committed.

I purchased the wall paper directly through Heartland. I believe they call it "tape-seam" (seam tape). They have several different widths. I ordered some that was 12" wide not really knowing what direction the pattern ran ( I wanted it to run in the same direction as the wall paper on the wall). If I were to do it over again, I would order the 48" wide seam tape to cover the mounts in one piece (since I know how they cut it with regards to the grain direction). It still looks good they way I did it because of the pattern on the wall paper, but I think it would hold better with one continuous piece. I will post the p/n's and color down below, but I would still call/email to verify that the numbers are still correct.
0276951 Tape - Seam - 6 - Acker Beach
0278681 Tape - Seam - 12 - Acker Beach
0276952 Tape - Seam - 24 - Acker Beach
0277119 Tape - Seam - 48 - Acker Beach
0276950Tape - Seam - 1 - Acker Beach
 

dhauser

Member
Totally agree. I installed one on my previous Super C and loved it. Can't imagine not having one. I never had a leak issue and I plan to plumb with PEX and residential connections. My plan was to try and put it in the lower part of the storage cabinet, so if there was a leak it would go out the roller hatch. But we will see. I have not yet found a good under chassis spot but I have not spent the time looking yet. I would post my planned design schematic here but as a new member I can't post images.

Please post pictures! Thats exactly what I want to do. You can plumb the hose from the reel to the wet panel and it sounds like youre going tk install the roller hatch under the storage? My only concern with this install is ensuring the connections are solid and totally leak free, as I can totally imagine the nightmate of opening the caninet to find an jnch of water in it!

Here’s an idea I was toying with. Could the reel be bolted sideways to the frame with the rollers facing outward in the forward or rear (next to power cord) of the unit with a hatch and roller similar to the power cord? Or perhaps bolted vertically to the frame with a 90 degree bracket so the hose comes out the bottom of the rig?

My goal in life is to be like the Pusher guys. Less work more fun (although sometimes those guys arent much fun and they dissapear in those things for days never to be seen again after they put out the obligatory folding chair that never gets used) Sorry I digressed there!! But seriously Id love to be able to pull up, run the power cable the hose off a reel, quick connect the lines off my macerators (I have two one for each sewer) to the sewer and done. When its time to go, reel in the lines, wrap up the hoses for the sewer and away we go! With the side porch now I can see the job of patio mats and all that going away as well.

Thanks guys this is great stuff!!


Sent from my iPhone using Tapatalk
 

Burnsze15

Member
Totally agree. I installed one on my previous Super C and loved it. Can't imagine not having one. I never had a leak issue and I plan to plumb with PEX and residential connections. My plan was to try and put it in the lower part of the storage cabinet, so if there was a leak it would go out the roller hatch. But we will see. I have not yet found a good under chassis spot but I have not spent the time looking yet. I would post my planned design schematic here but as a new member I can't post images.

Sounds good thanks. Maybe a metal or plastic square pan just wider than the reel itself with like 2” sides under the reel like they do with hot water heaters that way anything will accumulate in the pan.


Sent from my iPhone using Tapatalk
 

Burnsze15

Member
7ed9f20733b1229b6afae995d4d55467.jpg

My blank canvas has arrived!!! Let the fun begin. First on list, ice maker for garage (Or Kegorator we shall see) retractable fresh water line and filter, dual macerator systems to a T connector to an accessory box for the line accoridan line and bayonnet. Fantastic Fans, and daytime MCDs for the bedroom and living room. This one came with the blackouts in the bedroom not the flimsy white ones so I can take that one off the list.

Lets talk about this pinbox. I have to really scratch my head on this one. My 5hr drive through NY state and their 1977 roads (man those bridge expansion joints are brutal and surrounded by unfilled craters- use caution) was rough. My Seismic had the Morryde on it and I can now appreciate how well it worked (I used to question how effectice it really was, now I know!!!) Why would you put a plain steel pinbox on a 20klbs 126k$ rig????? Cmon guys. Add a grand to the cost and put the Liipert Flex in there. Anyway Im calling today and ordering one and having it installed ASAP!!!!

Thanks guys, loving the new rig. Night and day from my 2016 and 2014 Jayco Seismics. Literally a case of they look the same from the outside but whej you lift the hood, worlds apart in quality and build.


Sent from my iPhone using Tapatalk
 

dhauser

Member
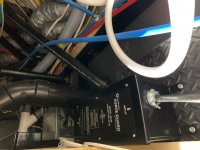
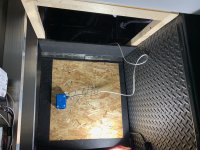
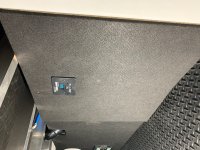
Completed the Surge Guard 40240 install in the basement of my 4007 tonight. Decided to take the shore power as the input and then go into the transfer switch. Found a good mounting place on the floor and secured well. Rather than route the cable into the inside control center and have to make a mess cutting a whole for the remote monitor I decided to cut that into the wall of the basement. Put in a piano hinge but the fit is very tight to the side, it works.

During the process I removed the entire basement wall fixed some cables. Fixed the vacuum unit that was getting pushed out by the transfer switch. Moved the transfer switch.

IMG_9558.jpgIMG_9559.jpgIMG_9560.jpg
 

Burnsze15

Member
Completed the Surge Guard 40240 install in the basement of my 4007 tonight. Decided to take the shore power as the input and then go into the transfer switch. Found a good mounting place on the floor and secured well. Rather than route the cable into the inside control center and have to make a mess cutting a whole for the remote monitor I decided to cut that into the wall of the basement. Put in a piano hinge but the fit is very tight to the side, it works.

During the process I removed the entire basement wall fixed some cables. Fixed the vacuum unit that was getting pushed out by the transfer switch. Moved the transfer switch.

View attachment 64288View attachment 64289View attachment 64290

Great job! Looks super clean. Does the main power line run right through there? I assume so.


Sent from my iPhone using Tapatalk
 

dhauser

Member
Yes from the power reel in the back up the chassis directly into there to the transfer switch. The transfer switch is the silver metal box up the line from the surge protector.

Great job! Looks super clean. Does the main power line run right through there? I assume so.


Sent from my iPhone using Tapatalk
 

Dmetcalf

Well-known member
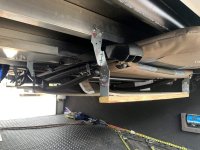
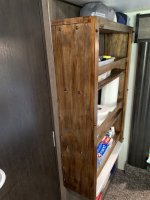
Here is another idea I had to store our outdoor rocking chairs. 942E380F-95CB-4E8F-8D78-18711B9A89EA.jpg
It uses space above where we store everything else and my plastic containers still slide underneath. The hangers only take up 6.5 in. from the top just enough room for the chairs to slide in.
 

Dmetcalf

Well-known member
Re: Cyclone 4007 mid. Insulated waterline under rear toilet

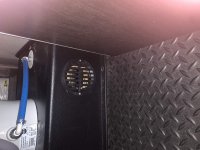
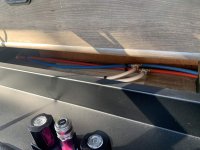
The rear toilet is elevated on a wooden frame with a black plastic cover that the toilet sits on top of. We have been experiencing some colder temps lately so I had been looking for areas that might require more insulation. This was one of them. I also added some insulation to the water lines passing thru and feeding the outside kitchen. I think (hope) this helps to protect them from freezing if the temps fall down that low in the future. I also should add that I had to cut a 3x3 hole in the back of the elevated platform tge toilet sits on to add the insulation around the cold water line then I bought a $3.00 vent cover at Lowe’s to finish it. Prob not a bad idea to allow air in there too. 849A76FA-E301-45AE-BDFF-6B0E916E35EC.jpg458EF78A-CD29-42D0-AA7E-65193CE7D5D1.jpg
 

Matt750

Well-known member
Here is another idea I had to store our outdoor rocking chairs. View attachment 65033
It uses space above where we store everything else and my plastic containers still slide underneath. The hangers only take up 6.5 in. from the top just enough room for the chairs to slide in.

Looks good! Those chairs can be cumbersome! I have one of those collapsible ladders up front and need to do something similar.


Sent from my iPhone using Tapatalk
 

Matt750

Well-known member
Re: Cyclone 4007 mid. Insulated waterline under rear toilet

The rear toilet is elevated on a wooden frame with a black plastic cover that the toilet sits on top of. We have been experiencing some colder temps lately so I had been looking for areas that might require more insulation. This was one of them. I also added some insulation to the water lines passing thru and feeding the outside kitchen. I think (hope) this helps to protect them from freezing if the temps fall down that low in the future. I also should add that I had to cut a 3x3 hole in the back of the elevated platform tge toilet sits on to add the insulation around the cold water line then I bought a $3.00 vent cover at Lowe’s to finish it. Prob not a bad idea to allow air in there too. View attachment 65037View attachment 65038

When it’s cold, we usually prop the aft toilet door open just a bit. It got down into the teens in Alpine, TX a few weeks back (along with a foot of snow if you can believe that!) and we never had a problem with any lines freezing. I didn’t try the outside kitchen though (too cold for me!). I should note that we also used a heated fresh water hose and typically when it’s that cold, I’ll stuff a towel in the hole where the hose enters the UDC. What are you using for insulation? The foam that goes around the hose?


Sent from my iPhone using Tapatalk
 

Dmetcalf

Well-known member
Re: Cyclone 4007 mid. Insulated waterline under rear toilet

When it’s cold, we usually prop the aft toilet door open just a bit. It got down into the teens in Alpine, TX a few weeks back (along with a foot of snow if you can believe that!) and we never had a problem with any lines freezing. I didn’t try the outside kitchen though (too cold for me!). I should note that we also used a heated fresh water hose and typically when it’s that cold, I’ll stuff a towel in the hole where the hose enters the UDC. What are you using for insulation? The foam that goes around the hose?


Sent from my iPhone using Tapatalk

I couldn’t reach them to use the foam hose insulation so I used a roll of non backed (no paper on one side) rolled insulation and just stuffed it back and over the water lines.
 
Top