- Home
- Forums
- HEARTLAND RVs GENERAL AREA
- Exterior Components - For all Heartland brands
- Slide Rooms, Slide Toppers & Awnings
You are using an out of date browser. It may not display this or other websites correctly.
You should upgrade or use an alternative browser.
You should upgrade or use an alternative browser.
Awning supports
- Thread starter Jacknel
- Start date
John T Bettencourt
Well-known member
About the only thing you can do is put tie down straps on it. If it is a power one I would not advise to do it. Just not made strong enough.
mlburst1
Well-known member
We spend six months in Florida in the winter and leave our power awning out unless severe winds are forecast.
I used schedule 40 PVC pieces to create two "patio legs" for our Carefree awning - spent about $120 total but well worth the peace of mind. The straps that anchor the legs down place all of the stress on the legs - no pressure on the awning hardware.
A friend made similar legs using two manual awning arms he got from a RV dealer and welded saddles on top to cradle the roller tube and flat bases on the bottom.
.jpg")
.jpg")
.jpg")
I used schedule 40 PVC pieces to create two "patio legs" for our Carefree awning - spent about $120 total but well worth the peace of mind. The straps that anchor the legs down place all of the stress on the legs - no pressure on the awning hardware.
A friend made similar legs using two manual awning arms he got from a RV dealer and welded saddles on top to cradle the roller tube and flat bases on the bottom.
mlburst1
Well-known member
Alan,
I used 4-in x 4-in x 3-in dia PVC Sanitary Tee Fittings with the top part and ends cut off - makes a perfect saddle for the awing roller. A pair of reducing bushings allows the 3" opening of the T to fit onto the top telescoping pole.
The telescoping poles are 1.5 and 2.0 inch Schedule 40 PVC - I bought a ten-foot length of each and cut each in half - the inner section has a series of through-holes drilled every 1 inch for adjustability - the outer section has a through-hole - a pin goes through the holes to set height depending on awning height and ground level.
The base is a bushing fitted into a 4 inch aluminum foot.
All of the PVC is Schedule 40 PVC.
Ratchet straps are looped around the the outside part of the T-fitting and cranked down firmly to anchors in the ground.
I'm not sure how long the Schedule 40 PVC will hold up to the Florida sun but time will tell...
Mike
Last edited:
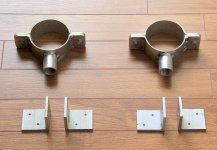
I designed brackets out of aluminum. Clamp brackets (fit loose) over ends of awning roller. Buy 2 - 10' lengths of 3/4" threaded pipe and screw one end into the bracket. Cut the other end 2" above the ground, drill a 5/16" hole 1" from end and bolt to feet. Either lag feed to patio or if on grass use a tie down strap.
Attachments
Last edited:
SNOKING
Well-known member
We bought a couple large C-clamps at the Mesa Flea Market a few years back and clamped them to the outer edge of our patio slab (dig out a little) with a board on top of the slab to received the legs from our older awning(when they are off the side of the trailer and out straight down to the ground you do not walk into them!!!). The last winter we had a new site and both leg landed on the slab, so I bought two additional HF C-clamps) Then I used two ratchet straps on each end from the roller to the C-clamps to hold it down. So you have given me the plan on how to work with the new awning on the 3575el. I just have to build the schedule 40 post and clamp it down like I did before. We also have a few rebars with eyes welded on (from the flea market) to drive in the ground for the bottom of the sun screen to bungie to.
Oh NO! I have two awnings to deal with!!!!!!!!!!!!!!!!!!
Chris


Oh NO! I have two awnings to deal with!!!!!!!!!!!!!!!!!!
Chris


We use The Claw for the ground anchors with cargo tie-down straps to tie down the awning. The Claw works great in sandy soil as well as clay soil.
Here's a picture of our Landmark at the beach.
View attachment 44908
Nice - I like that too
")


SNOKING
Well-known member
Just thought I would share this little jewel for everyone.
I had to put my anchors in good hard clay and neighbor brought this over.
Built one next day. Great tool.
View attachment 45537View attachment 45538
Carefull do not break a wrist with the high HP drill. The fea markets in Arizona sell rebar stacks with rings welded on the side near the top. Work great. Over lap two at right angle to each other under the sat dish stand to strap it down to. Drive others at an angle under the patio slab. Chris
Carefull do not break a wrist with the high HP drill. The fea markets in Arizona sell rebar stacks with rings welded on the side near the top. Work great. Over lap two at right angle to each other under the sat dish stand to strap it down to. Drive others at an angle under the patio slab. Chris
Yes. Forgot to mention use caution!
I use a lower powered drill with mine.
Similar threads
- Replies
- 4
- Views
- 666
- Replies
- 1
- Views
- 373
- Replies
- 2
- Views
- 385