Chaffeekid
Member
Hi everybody, here is another modification I have made to make this Sundance ours  We noticed that the back splash or the wall paper behind the stove had wrinkled a little due probably to someone using the stove as a heater, don't know why as the furnace works great.
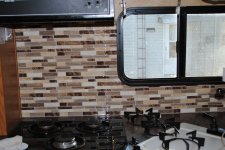
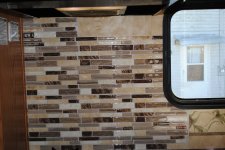
Anyway, we saw these peel and stick tile at Camping world and Bonnie fell in love with them. They match the color scheme of our fiver, so we bought 10 tiles, they measure 10 X 10 inches. (I should have bought one more.)
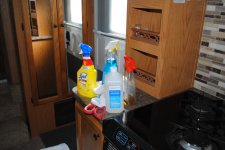
Well it was a bright COLD sunny day here, early morning Temp was 21 degrees. But my remote sensor in the Fiver showed 55 degrees, we keep a couple of heaters going inside, so when it hit 60, I grabbed my tiles and headed out back to install them. Prep is very important. As it is around the stove, the walls have grease residue on them. So a good grease cutter, Lysol liberally applied with many paper towels to the entire area. Then I wiped down the entire surface area with Alcohol to make sure it was clean.
To install the tiles, you need a really good, sharp set of scissors, a marker and a good set of eyes . I started at the bottom left of the pictures and proceeded from there. Cutting the curves around the window is a matter of aligning the tiles holding them against the wall then pressing the tile against the edge of the window frame. Press hard, and it will leave a crease where you can see where to draw your cutting line, then take your scissors and carefully cut along your line. Simple. Oh yes, you will need a measuring tape, and maybe a single edge razor blade for trimming.
Below the window I simply measured the distance, transferred that to the back of the tile drew the line and cut it. Make sure that you take care as the tiles have alignment marks so the next tile will overlap properly. Anyway that's what I did today.
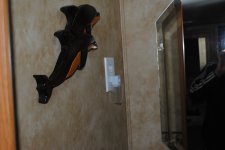
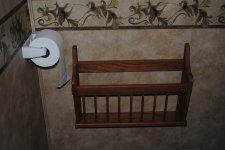
Now to catch you up on a couple of other things, you will see in the pictures in our toilet room, I installed an electrical socket so we could have a night light for Bonnie. Her vision has deteriorated from diabetes, under control now, so she can see when she has to get up at night. I did this by removing the electrical socket where the TV is plugged into in the bedroom, make sure the shore power is disconnected and you do not have a generator hooked up. Remove the socket then I used a really sharp awl to punch a little hole in the lower right hand side of the socket as you are looking at it. Then, having your new socket, without the trim piece, draw an outline of the hole you want to cut, and your bravery test, start cutting the outline. I used my vibrating saw, and it worked great. Reach though the hole locating the wire going to the TV socket. Your TV socket should still be removed from the other side so with a little flash light you can see when you have the correct one.

There was plenty of excess wire in our Fiver to pull it through and use your electrical side cutters to cut the wire in two. You will find 3 wires inside, mine were 12 gage, so your socket can be a 15 amp socket. Get the socket that has holes in the rear, makes it easy to reconnect the wires. You will have to strip about 1/4 inch of insulation from each wire, except the Green wire, ground, for it about 3/4 inch is what you want. You will have a Black wire, and a White wire also. On the side of the socket take the wire coming from the TV socket and push the stripped white wire into the hole at the top of the socket, on the side that has the SILVER screw, make sure that the wire is securely caught by the socket. Also make sure the silver screw is screwed down against the socket side, no it doesn't hold anything just gets it out of harms way. The white wire is the neutral wire. Now the Black wire, insert it into the hole opposite the white wire, on the side that has the BRASS screw. Again make sure it is securely captured by the socket and screw the BRASS screw down against the socket.
Now the green wire, you can twist both of these together and secure them to the ground screw on the socket, if you don't know where the ground screw is located don't perform this mod
Ok now on the bottom of the socket, the wire coming up from the supply point, do the same with the White and Black wires as you did on the wire from the TV socket. GOT IT. Could you put it in lower probably, I don't think there is a fire break in that interior wall, but I wanted it high enough to be a light and out of waters way Yes I though about a GFI but opted not to go that route, thanks.
BTW the Dolphins were created by our good Friends, Marv and Shirley Ojetn, who own Campers Supply in Carterville Illinois. He makes these and many other items, and like these, they are beautiful. Just google Campers Supply, Carterville, (By Marion) Illinois and you can get all the scoop so you could contact them if you want.
Well thats it hope you enjoy BTW took the pics with my Nikon hope they tell the story. UH don't know how the pic of the Spare tire got in there, just so you'll know me when you see me.
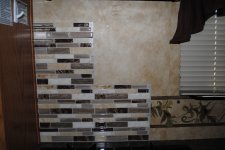
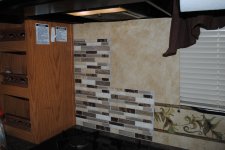
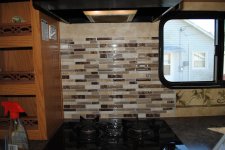
Anyway, we saw these peel and stick tile at Camping world and Bonnie fell in love with them. They match the color scheme of our fiver, so we bought 10 tiles, they measure 10 X 10 inches. (I should have bought one more.)
Well it was a bright COLD sunny day here, early morning Temp was 21 degrees. But my remote sensor in the Fiver showed 55 degrees, we keep a couple of heaters going inside, so when it hit 60, I grabbed my tiles and headed out back to install them. Prep is very important. As it is around the stove, the walls have grease residue on them. So a good grease cutter, Lysol liberally applied with many paper towels to the entire area. Then I wiped down the entire surface area with Alcohol to make sure it was clean.
To install the tiles, you need a really good, sharp set of scissors, a marker and a good set of eyes
Below the window I simply measured the distance, transferred that to the back of the tile drew the line and cut it. Make sure that you take care as the tiles have alignment marks so the next tile will overlap properly. Anyway that's what I did today.
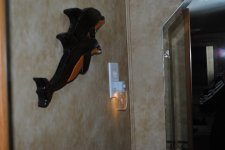
Now to catch you up on a couple of other things, you will see in the pictures in our toilet room, I installed an electrical socket so we could have a night light for Bonnie. Her vision has deteriorated from diabetes, under control now, so she can see when she has to get up at night. I did this by removing the electrical socket where the TV is plugged into in the bedroom, make sure the shore power is disconnected and you do not have a generator hooked up. Remove the socket then I used a really sharp awl to punch a little hole in the lower right hand side of the socket as you are looking at it. Then, having your new socket, without the trim piece, draw an outline of the hole you want to cut, and your bravery test, start cutting the outline. I used my vibrating saw, and it worked great. Reach though the hole locating the wire going to the TV socket. Your TV socket should still be removed from the other side so with a little flash light you can see when you have the correct one.

There was plenty of excess wire in our Fiver to pull it through and use your electrical side cutters to cut the wire in two. You will find 3 wires inside, mine were 12 gage, so your socket can be a 15 amp socket. Get the socket that has holes in the rear, makes it easy to reconnect the wires. You will have to strip about 1/4 inch of insulation from each wire, except the Green wire, ground, for it about 3/4 inch is what you want. You will have a Black wire, and a White wire also. On the side of the socket take the wire coming from the TV socket and push the stripped white wire into the hole at the top of the socket, on the side that has the SILVER screw, make sure that the wire is securely caught by the socket. Also make sure the silver screw is screwed down against the socket side, no it doesn't hold anything just gets it out of harms way. The white wire is the neutral wire. Now the Black wire, insert it into the hole opposite the white wire, on the side that has the BRASS screw. Again make sure it is securely captured by the socket and screw the BRASS screw down against the socket.
Now the green wire, you can twist both of these together and secure them to the ground screw on the socket, if you don't know where the ground screw is located don't perform this mod
Ok now on the bottom of the socket, the wire coming up from the supply point, do the same with the White and Black wires as you did on the wire from the TV socket. GOT IT. Could you put it in lower probably, I don't think there is a fire break in that interior wall, but I wanted it high enough to be a light and out of waters way
BTW the Dolphins were created by our good Friends, Marv and Shirley Ojetn, who own Campers Supply in Carterville Illinois. He makes these and many other items, and like these, they are beautiful. Just google Campers Supply, Carterville, (By Marion) Illinois and you can get all the scoop so you could contact them if you want.
Well thats it hope you enjoy BTW took the pics with my Nikon hope they tell the story.


