Bedroom slide leaks when it rains

Our 2017 Big Country 5th Wheel leaks when it rains. How in the world do you replace the seal around the slide out without taking the whole slide right out of the trailer? We have tried replacing the seal and it still leaks. We caulked the window, so that is not the issue. HELP!
 
Do you have the one with the cables? Ours leaks at the cables, but only one side. I put pool noodles over the cables and that stops water from getting in.
 

Gary521

Well-known member
You did not say where the water is coming in at. Check the top where the roof cover meets the inside fascia as It is not sealed there.
 

Bogie

Well-known member
I had a similar leak in the corner of my bedroom slide (Schwintek). Turned out to be a small plastic drain cup at the bottom corner of the slide that wasn't sealed properly. I re-caulked the cup. No more leak. Not saying this is your problem, but it is something you can check.
 

Prace

Member
Our 2017 Big Country 5th Wheel leaks when it rains. How in the world do you replace the seal around the slide out without taking the whole slide right out of the trailer? We have tried replacing the seal and it still leaks. We caulked the window, so that is not the issue. HELP!
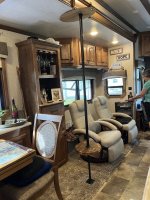
I had the same problem on my 2016 Heartland 365 living room slide. Determined that the slide being so long14’ the roof was bowed in the middle and water would run off the slide toppers which were to short. Water would run to the middle of the slide and run to the inside where seals are located then drip to inside. Fixed with a steel clothes pole and a jack screw and round cutting board as a end table, jacked up the center 1/2” and problem solved.The kitchen slide has 2 supports floor to ceiling and not as deep. I feel that’s why one side leaks and one doesn’t. Good luck
 

RoadJunkie

Well-known member
Prace: Your concept is sound, however it is not necessary to permanently attach the pole. Behind the facia is a header and the ceiling needs to be reset along with the header. If one removes the facia and the screws that attach the header, a lift mechanism, similar to your pole, can move the header up. Once this is done you can re attach the header, using the screws you removed, I had to do this on my coach, also a 2017. Again, this process basically resets the header to a higher position. If anyone is interested they can search my posts, I believe I added pictures. Oh, this was the process recommended by H.
 

Routemaster

Well-known member
Prace: Your concept is sound, however it is not necessary to permanently attach the pole. Behind the facia is a header and the ceiling needs to be reset along with the header. If one removes the facia and the screws that attach the header, a lift mechanism, similar to your pole, can move the header up. Once this is done you can re attach the header, using the screws you removed, I had to do this on my coach, also a 2017. Again, this process basically resets the header to a higher position. If anyone is interested they can search my posts, I believe I added pictures. Oh, this was the process recommended by H.
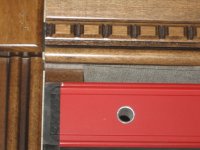
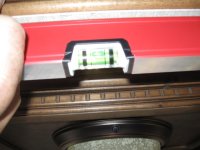
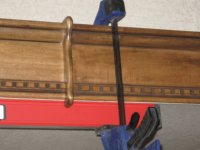
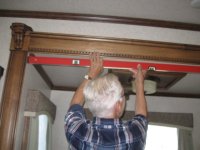
RoadJunkie What is the preloaded amount to move the ceiling up above the parallel plain? I have mine as well drooping a .700". Do you think I may when I tackle this the header may need to be turned over because of the bow in the header?
 

Attachments

  • .7 gap at door.JPG
    .7 gap at door.JPG
    186.8 KB · Views: 31
  • Bubble in the center.JPG
    Bubble in the center.JPG
    155.9 KB · Views: 28
  • Center of slide.JPG
    Center of slide.JPG
    151.2 KB · Views: 26
  • Level.JPG
    Level.JPG
    148.8 KB · Views: 43

RoadJunkie

Well-known member
In my case, I didn't worry about removing the "V" dip out of the facia, I only wanted to raise the ceiling to avoid the dip. My 2017 looked a lot like yours as far as the facia. By the way, I know of several people that have had to perform this process. I would consider flipping the header to assure the crown is oriented in the up position. The header will come off easily, once you get started from the end. When jacking up the ceiling, you will need to go a bit beyond what you think is adequate as there will be some residual sagging as you relieve the upward expansion.

HERE is the link to pics of my lifting process. You will have to scroll down to find my post.

This is an email I received from H regarding the process:


Cody Hockenberry <Cody.Hockenberry@heartlandrvs.com>

You
Good Morning,

I have just herd back from our engineering depart on a repair solution for your sagging roof. I will copy and paste their response in yellow. I hope this information helps aid you in your repair.

Remove top facia and backer board, place a “T” stick in the middle of the room pushing ceiling up to where it is past level. Leave “T” stand in and replace backer board screwing board every 8”-10”. This should lock roof in.


Thank you,

Cody Hockenberry

Heartland RV
P: 844.915.7950
F: 574.206.0910
 
Last edited:

RoadJunkie

Well-known member
Cody Hockenberry <Cody.Hockenberry@heartlandrvs.com>

You
Good Morning,

I have just herd back from our engineering depart on a repair solution for your sagging roof. I will copy and paste their response in yellow. I hope this information helps aid you in your repair.

Remove top facia and backer board, place a “T” stick in the middle of the room pushing ceiling up to where it is past level. Leave “T” stand in and replace backer board screwing board every 8”-10”. This should lock roof in.


Thank you,

Cody Hockenberry

Heartland RV
P: 844.915.7950
F: 574.206.0910
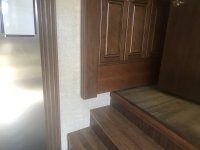
In my case, I didn't worry about removing the "V" dip out of the facia, I only wanted to raise the ceiling to avoid the dip. My 2017 looked a lot like yours as far as the facia. By the way, I know of several people that have had to perform this process. I would consider flipping the header to assure the crown is oriented in the up position. The header will come off easily, once you get started from the end. When jacking up the ceiling, you will need to go a bit beyond what you think is adequate as there will be some residual sagging as you relieve the upward expansion.

HERE is the link to pics of my lifting process. You will have to scroll down to find my post.

This is an email I received from H regarding the process:


Cody Hockenberry <Cody.Hockenberry@heartlandrvs.com>

You
Good Morning,

I have just herd back from our engineering depart on a repair solution for your sagging roof. I will copy and paste their response in yellow. I hope this information helps aid you in your repair.

Remove top facia and backer board, place a “T” stick in the middle of the room pushing ceiling up to where it is past level. Leave “T” stand in and replace backer board screwing board every 8”-10”. This should lock roof in.


Thank you,

Cody Hockenberry

Heartland RV
P: 844.915.7950
F: 574.206.0910
Just tried this email and it bounced!!
The email is at least 5 years old.
 

jenell

Member
I had a similar leak in the corner of my bedroom slide (Schwintek). Turned out to be a small plastic drain cup at the bottom corner of the slide that wasn't sealed properly. I re-caulked the cup. No more leak. Not saying this is your problem, but it is something you can check.
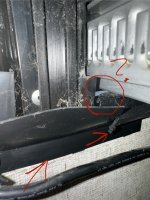
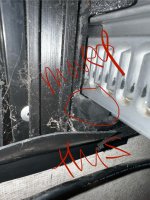
Hello! I am experiencing a leak from what I believe is the same plastic cup you are referring. Can you confirm if this is the same thing? Should I seal around it? I looked outside as well and it really all looked in good shape, so I am really unsure of what to do.

The first image has the arrows at which points water was leaking from the cup, as well as wondering if I should be able to see outside? The third shows that I flipped a small part of the seal to cover the hole leading outside.
 

Attachments

  • IMG_0620.jpeg
    IMG_0620.jpeg
    1.3 MB · Views: 35
  • IMG_0621.jpeg
    IMG_0621.jpeg
    1.5 MB · Views: 39

Bogie

Well-known member
Hello! I am experiencing a leak from what I believe is the same plastic cup you are referring. Can you confirm if this is the same thing? Should I seal around it? I looked outside as well and it really all looked in good shape, so I am really unsure of what to do.

The first image has the arrows at which points water was leaking from the cup, as well as wondering if I should be able to see outside? The third shows that I flipped a small part of the seal to cover the hole leading outside.
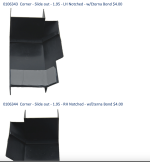
Hard to tell from your picture. But I went back to an old email from Heartland when I was having the problem. This picture shows what they look like and has part numbers for left and right hand side. I can't say you would have the same part numbers. You will have to check with Heartland to be sure.
Drain Cups.png
 

Roller4tan

Well-known member
On the slideout's outside side panels. there may be a strip of caulked metal the full depth of the slide. Water runs down the side and hits that and creeps back into the trailer. I added a bead of caulk angled up where that metal passes through the rubber gasket, stopping the water from coming in. Also check your window caulking.
 

pfedso

Member
Be careful what sealant you use as it can corrode the rubber. Best to use a non-corrosive sealant like diver's silicone which won't harm any rubber seal.
 

oldelmer1

Well-known member
On the slideout's outside side panels. there may be a strip of caulked metal the full depth of the slide. Water runs down the side and hits that and creeps back into the trailer. I added a bead of caulk angled up where that metal passes through the rubber gasket, stopping the water from coming in. Also check your window caulking.
This is where mine leaked, down at the bottom of the slide. Water was running in, I removed all the screws, which were rusted, and out new butyl caulk on and new screws and then caulked the entire metal strip. No more leak. Also check the caulk around the face of the slide, it's like the outer trim peice, there if no caulk behind that peice, so you need to make sure it's caulked good.
I actually took all 4 metal strip off and recalled them all.
 
Top