Black Tank Flush Problem

wrgrs50s

Well-known member
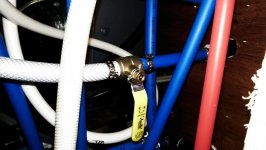
Today I was flushing my black tank and heard a pop, then noticed very little water was making it into the tank. I assumed the vacuum breaker had broken and started looking for water leaking but found none. Some water is making it into the tank as I can hear it behind the shower enclosure and see it coming through the sewer hose.

My question is it most likely the vacuum breaker or the flush valve. I have experienced the flush valve stopping up with crud in a previous rig but it didn't do it suddenly while flushing. Just wondering what could go wrong in the vacuum breaker that would restrict the flow.
 

agpopp

Active Member
I had mine apart and in my hands today and there is nothing to the device that would make it suddenly stop working unless a piece of the valve cartridge broke. Might as well take it out and inspect it.
 

Gary521

Well-known member
I would bypass the vacuum breaker and put a check valve at the black tank flush fill. Check the entire line to the black tank, mine had a flex line going into the tank and it was kinked off.
 

wrgrs50s

Well-known member
Thanks for the replies agpopp and Gary521. I took the shower faucet off and located the vacuum breaker. I took the vacuum breaker off and blew through it with my mouth and it seemed plugged, but I hooked it to my hose outside and water flowed through it just fine.

I took your advise Gary521 and bypassed it so I wont have to worry about it leaking in the future. I checked the line to the black tank and it was pex so no kink there. Put it all back together and tested and all seems to be working fine with no leaks.

I can only guess that the vacuum breaker malfunctioned and blocked the flow. I didn't use a pressure regulator so maybe the excess pressure was part of the problem. However, while looking up the specs on the vacuum breaker it stated minimum 8psi and max 125psi so still puzzled but glad to have it bypassed anyway.
 

agpopp

Active Member
Thanks for the replies agpopp and Gary521. I took the shower faucet off and located the vacuum breaker. I took the vacuum breaker off and blew through it with my mouth and it seemed plugged, but I hooked it to my hose outside and water flowed through it just fine.

I took your advise Gary521 and bypassed it so I wont have to worry about it leaking in the future. I checked the line to the black tank and it was pex so no kink there. Put it all back together and tested and all seems to be working fine with no leaks.

I can only guess that the vacuum breaker malfunctioned and blocked the flow. I didn't use a pressure regulator so maybe the excess pressure was part of the problem. However, while looking up the specs on the vacuum breaker it stated minimum 8psi and max 125psi so still puzzled but glad to have it bypassed anyway.

Thanks for the props. I left mine in only because I put pencil marks on the wall and will put in an access panel if it gives me trouble in the future. The fact is the vacuum breaker should be installed in a wet location or with a funnel and drain under it because if the tendency of them to leak. In fact the plastic valve and thin rubber gasket is all thats standing between a good day and a potential water disaster. Even worse is the fact mine is buried in a wall.
Glad you got it fixed.
 

sengli

Well-known member
I did the same thing a long time ago. That vacumm breaker in my big horn, was installed in the wall behind the shower, and it failed twice. So I bypassed all of that, and now run the flush line from the back of the UDC, thru a brass ball valve (accessed thru a door in basement wall) for full manual control over that water flow. Works perfect, no muss nor fuss.
 

Attachments

  • blacktank.jpg
    blacktank.jpg
    62.5 KB · Views: 78
Just purchased 2016 BC 3950 FB. Neither of the 2 black tanks will flush. Located the anti- siphon valves behind the shower through the small access port, look to be installed correctly. Unit was delivered 12/31. Neighbor saw my unit and liked it so well he bought one just like it. One of his tanks flush, second does not. Both seem like blockages in the flush lines. I will be contacting Heartland next week for a solution. Can't get my hands in that little area to r&r the valves, if that is the problem.
 

Bob&Patty

Founders of SoCal Chapter
Is the Anderson valve set to the proper position? The tank flush only works on the black....do you have 2 black tanks?
 

danemayer

Well-known member
The Anderson 4-way Valve is the 4-way selector shown in these pictures. But when flushing the black tanks, it doesn't matter what position it's in because you hook the water hose to the black tank flush inlets to flush the black tanks.

If no water is getting through, I'd suspect that the pex lines are reversed at the anti-siphon valve.
 

Attachments

  • UDC Water annotated 2.jpg
    UDC Water annotated 2.jpg
    80.1 KB · Views: 50
  • UDC Water annotated 1.jpg
    UDC Water annotated 1.jpg
    71.2 KB · Views: 46
I suspect you are correct. The problem is I don't think the line length will allow me the change it IF I could get to it through the the small port in the shower.
 

JohnDar

Prolifically Gabby Member
If you can access it and have room to work, you might try cutting the lines, reversing it and using PEX straight union fittings to reassemble it. Could even splice in a little more line to make it easier.


Sent from my iPhone using Tapatalk
 
If you can access it and have room to work, you might try cutting the lines, reversing it and using PEX straight union fittings to reassemble it. Could even splice in a little more line to make it easier.


Sent from my iPhone using Tapatalk[/QUOTE

might give this a try. Do they sell the fittings at the big box stores?
 

danemayer

Well-known member
You can get Sharkbite (or equivalent) fittings at big box stores. After cutting the PEX line, you just push the PEX into the fitting and it holds. I just installed some cutoff valves in the kitchen. They had the Sharkbite type of connection. No tools required. I think I had to shorten the PEX by about 1/2" after making the cut, in order to make room for the fitting.

Make sure to get the fitting removal horseshoe tool (it may come with the fitting) in case you have to take the fitting off for any reason. Also make sure you make a clean, straight cut. I use a PVC cutting tool.
 

JohnDar

Prolifically Gabby Member
If you can access it and have room to work, you might try cutting the lines, reversing it and using PEX straight union fittings to reassemble it. Could even splice in a little more line to make it easier.


Sent from my iPhone using Tapatalk[/QUOTE

might give this a try. Do they sell the fittings at the big box stores?

Yes, they sell all of the parts and tools for working with PEX at Home Depot and Lowe's. As Dan mentions, there are the SharkBite fittings, as well, that are easier to install, but not inexpensive. Tight quarters, I'd go with the SharkBite's myself, but I started out with a full complement of the crimp and clamp type fittings, along with the needed tools. Tool junkie.
 
Think I will remove the valve and install an elbow to verify the anti-siphon valve is the issue before I start cutting. That will have to wait until Friday. The second valve is behind this one but to short to pull out.
 

Attachments

  • image.jpg
    image.jpg
    53.4 KB · Views: 52

danemayer

Well-known member
Page 4 of the Black Tank Flusher doc located here shows the correct water flow. You can trace the red and blue lines behind the UDC to determine whether it's right.
 
So being a little curious here. Since the two "Atmospheric Vacuum Breaker/Check Valves are located in a wall between my Bedroom and the Shower, and the purpose of the devices to to provide protection from backflow into the potable water system when flushing the tanks, and, from what I have read, these things are prone to failure - assuming my issues are either defective valves or valves installed backwards, why wouldn't it be a better installation to remove the valves altogether from inside the wall, install 90 deg bends and use a "GOOD QUALITY" brass vacuum breaker/CV at the hose connection on the "water fill inlet"? I would assume the answer is "elevation". Opinions.
 

JohnD

Moved on to the next thing...
So being a little curious here. Since the two "Atmospheric Vacuum Breaker/Check Valves are located in a wall between my Bedroom and the Shower, and the purpose of the devices to to provide protection from backflow into the potable water system when flushing the tanks, and, from what I have read, these things are prone to failure - assuming my issues are either defective valves or valves installed backwards, why wouldn't it be a better installation to remove the valves altogether from inside the wall, install 90 deg bends and use a "GOOD QUALITY" brass vacuum breaker/CV at the hose connection on the "water fill inlet"? I would assume the answer is "elevation". Opinions.

Because it would ad .50 cents to the manufacturing cost . . .
 

JohnDar

Prolifically Gabby Member
So being a little curious here. Since the two "Atmospheric Vacuum Breaker/Check Valves are located in a wall between my Bedroom and the Shower, and the purpose of the devices to to provide protection from backflow into the potable water system when flushing the tanks, and, from what I have read, these things are prone to failure - assuming my issues are either defective valves or valves installed backwards, why wouldn't it be a better installation to remove the valves altogether from inside the wall, install 90 deg bends and use a "GOOD QUALITY" brass vacuum breaker/CV at the hose connection on the "water fill inlet"? I would assume the answer is "elevation". Opinions.

They're afraid the cooties will learn how to pole vault past it. I already have a brass check valve at the UDC inlet. After the OEM piece of plastic broke, I replaced it with a brass city water inlet, complete with check valve. This past fall, the anti-siphon PoC in the wall behind the toilet decided to let loose on me. And no access port for it. This spring, when I take the rig out of storage, I'm disconnecting the anti-siphon altogether and installing a SharkBite check valve above the black tank in the basement. I'm smart enough not to fill the black tank so far that it would back up into the toilet. That's the only reason they stick that defective piece of junk above the rim of the toilet.

This little episode of the leak justifies my relocating the converter and surge suppressor off the floor extension over the black tank in the basement. The water would have ended up right on top of the converter and flooded it.

So, if the cooties want to get past both check valves, they better be competitors for the Summer Olympics.
 
Top