LBR
Well-known member
Welp.... we've had the same thing happen as a few others here....the 'ole cracked toliet flange syndrome. It has been such for about 3 months and I was hesitant to "dive-in" until we quit our boondocking/travelling South-for-the-Winter trekking, and docked at friends place...just in case the toliet was removed and....well....
After pulling it off the 1st of 3 times to find what had broken, I was disheartened to see the entire flange and pipe were cemented together as a unit, as I suspected. I told the DW that I'm NOT cutting the pipe and deal with possibly having to build a complete new angled down-pipe to cement back together near the tank.
Thankfully with the mega support of this site, I had learned about the infamous repair flange...hope it works for us, soooo....remounted the toliet and went shopping. Enter the Stainless Steel Repair Flange and Rubber Seal.
As mentioned in a previous thread, the repair flange mounts on top of the original OK, but the outer rim of the toliet was raised up from the floor. Yuppers....after installing the 2 pieces, the entire outer perimeter was airbound by 1/4". This made for a VERY wobbly toliet and will NOT work permanently, let alone temporarily! OK. So I had 4 small plastic wedges and shimmed the front, back, and both sides with....then bolted it down for the 2nd time. "Well, CARP(sp) I said" and went into Macgyver mode.
I wandered into my buddy's storage container and went shopping....AHA!! He happened to have a 12" square piece of 3/8" UHMW....perfect, so performed the old grab and run!
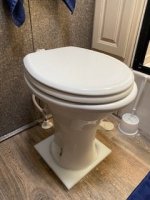
Off came the toliet for the 3rd and last time. Set it on top of the UHMW after measuring a few times striving for excellence, and traced the toliet base with a pencil. After figuring where to cut the repair flange hole, I used the entire 12" front to back for what you see as the end result for the thin walled toliet base plastic. Measuring the outer area, scribbed the base shape out about 1" all around my pencilling, drilled hole and jig sawed the inner hole and outer perimeter.
It now has a SOLID piece of UHMW supporting that thin-wall (1/16" thick wall at best) base that dug into the flooring and resulting in an always flimsy feeling toliet. I was able to tighten the nuts down much tighter than I would have been able to without that 3/8" base!!
**EDIT** photo sequence correction


Last edited:

