Partsbob
Member
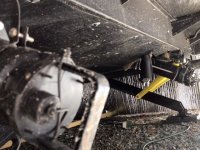
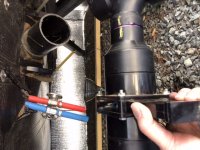
One of the few items of our North Trail that I disliked was the dual sewer connections, especially when the 2nd grey-water tank outlet was under the large slide and just behind the wheels, plus the pull handle was at an odd angle! So I decided to do something about it after 18 months of multiple drain hoses, “Y” connectors and other campers waiting in line behind me at dump stations. What it took was careful measurements, PVC connectors & pipe at my local Lowes and a little plumping experience. After completion and a 2,000 mile round trip from NC to FL, I am very happy with the results (and time-savings at the campsite)!
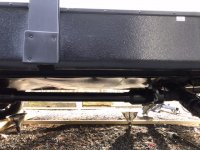
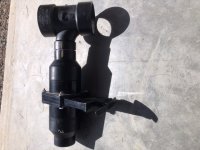
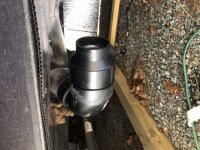
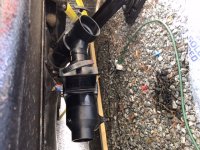
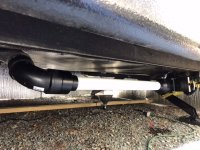
I will post pix below of the items used and before & after shots, but as long as you measure & re-measure, since these are permanently glued connections, I’m surprised the Heartland factory hasn’t already done this for us when the outlets are within 6 feet of each other. The only downside I’ve found is that the rear low-point drains end up behind the dump-valve of the front tank and are a little difficult to work, but since that’s only done typically when you winterize, it’s not a big deal. Sorry some of the pix are turned sideways, but things to remember are to be careful of your angles with glued connections and that you want at least 1” of “drop” from the front tank to the rear outlet and that you don’t extend your rear dump connector so low that you hit the ground at campsites or driveways. The existing piping is 3” on mine, though I chose to use reducers to 2” pipe between the front tank and rear valves just for clearance, plus between the finished photo and the trip, I split the 2” pipe and added a rubber connector in case I ever need to replace the dump valve from the front tank. BTW, I reused the gate valve from the existing front tank, further reducing the cost to make this mod. One other huge benefit to this mod is that, with a twist-on dump valve at the hose connector, I can “join” both grey tanks together to double my grey-water capacity when boondocking!
I will post pix below of the items used and before & after shots, but as long as you measure & re-measure, since these are permanently glued connections, I’m surprised the Heartland factory hasn’t already done this for us when the outlets are within 6 feet of each other. The only downside I’ve found is that the rear low-point drains end up behind the dump-valve of the front tank and are a little difficult to work, but since that’s only done typically when you winterize, it’s not a big deal. Sorry some of the pix are turned sideways, but things to remember are to be careful of your angles with glued connections and that you want at least 1” of “drop” from the front tank to the rear outlet and that you don’t extend your rear dump connector so low that you hit the ground at campsites or driveways. The existing piping is 3” on mine, though I chose to use reducers to 2” pipe between the front tank and rear valves just for clearance, plus between the finished photo and the trip, I split the 2” pipe and added a rubber connector in case I ever need to replace the dump valve from the front tank. BTW, I reused the gate valve from the existing front tank, further reducing the cost to make this mod. One other huge benefit to this mod is that, with a twist-on dump valve at the hose connector, I can “join” both grey tanks together to double my grey-water capacity when boondocking!
Attachments
-
 AACAA795-BFA2-406D-AF43-A18E1E219F7F.jpeg125.5 KB · Views: 78
 -
 6944BEBB-A93D-423B-AD7B-D606FB8E4858.jpeg125.3 KB · Views: 69
 -
 29E906F0-2FA5-4D41-BFAD-4285E881450D.jpeg92.8 KB · Views: 62
 -
 EFBB3FDD-168C-49B8-AF07-C5F9727215E7.jpeg146.4 KB · Views: 63
 -
 CCD37ADA-296F-4D40-A020-DCF96E98E9A9.jpeg124.6 KB · Views: 64
 -
 5A87E49D-632F-4C0A-9D6D-BF15FEDFEF0D.jpeg149.1 KB · Views: 65
 -
 9D2D442C-27D7-46DC-8B32-BA17B9E93A1A.jpeg129.1 KB · Views: 71