We have a 2011 Bighorn 3055 RL and have a leak coming out of the wood covered box that you bump your head on when you get into the side storage compartment. Thought it would be something that would stop when we emptied the gray water(thanks trailer gods for not making it black water), but it has just kept on leaking, slowly but steadily. Found a vent stack on top that might have gotten some water in it, but haven't had rain for a couple of days, and it appears to have just started. Is that a metal beam put there for reinforcing? Have looked at all the plumbing fixtures and they are dry, but maybe the lines to the toilet are compromised? It seems to have plenty of pressure to flush. This beam seems to be along the wall of the toilet area, but no telling if that's where the water is getting in. Any ideas?
You are using an out of date browser. It may not display this or other websites correctly.
You should upgrade or use an alternative browser.
You should upgrade or use an alternative browser.
Got a strange leak
- Thread starter herefishy
- Start date
The wood covered box you bump your head into may be the plumbing chase for the washer hookup. It is on my BH3670, but it has a black fabric covering. And I've gotten several astronomy lessons from it. Mine is on the curbside.
Remove it and see what's in it.
Yes, I was able to reach around the side and there is a 2" pipe and some water size hoses. They curl around across the basement, and I bet that is where the leak is, because there is a bit of water in other areas of the basement. I was able to move the wall with the vac in it a little bit, would I be able to take off the vac and then move the wall? Should I move the other section of the wall on the streetside first? The 2" pipe is probably the drain, right?
danemayer
Well-known member
Yes, the washer drain pipe would go through that same raceway. You'll likely have to take down the frame around the raceway before you can remove the rear wall on the door side. There may be trim that has to come off. There's a mounting ring around the vacuum that's held by 4 screws. If you have a TV mount, that may have to come off. And you'll probably have to take the cover plates off outlet and coax and release the outlet.Yes, I was able to reach around the side and there is a 2" pipe and some water size hoses. They curl around across the basement, and I bet that is where the leak is, because there is a bit of water in other areas of the basement. I was able to move the wall with the vac in it a little bit, would I be able to take off the vac and then move the wall? Should I move the other section of the wall on the streetside first? The 2" pipe is probably the drain, right?
If you have a washing machine, first thing to check would be the drain pipe.
If you do not have a washer you might consider doing what others have done, and that is to cap off the washer supply lines.
To remove that basement wall you will most likely have to remove the street side half first.
There should be three or four screws located in the UDC as well as a couple located where the two halves of the wall meet.
You may also have to remove that head knocking plumbing/wire chase before removing the second half of the wall.
Good luck and let us know how you make out.
Peace
Dave
JohnDar
Prolifically Gabby Member
Let's pause for a moment. If you don't have a washing machine in the rig, look at where it would go. Normally, below the water and drain fittings there is a small piece of paneling screwed to the wall. Remove it and see if there is any evidence of water on the pipes or the floor. Unless the supply lines got damaged, it's possible the connections to the water valves are leaking and the water is running back down along them. Or the elbow at the floor is leaking. Unless a PEX line burst due to freezing, the fitting connections are where most leaks happen.
Other than the stupid anti-siphon valve for the tank flusher, my only leak occurred at a PEX joint. Caught it early while dewinterizing so no damage.
Sent from my iPhone using Tapatalk
Other than the stupid anti-siphon valve for the tank flusher, my only leak occurred at a PEX joint. Caught it early while dewinterizing so no damage.
Sent from my iPhone using Tapatalk
danemayer
Well-known member
If I do remove the head knocker, can I just hang the lines with wire ties or some such when I get it fixed? Or do I have to rebuild the head knocker?
On our coach, it would be pretty unattractive to leave the cover off permanently. And if you hit your head on the wood, there's a pretty good chance you'll hit it on the pipes and other stuff.
If the drain pipe needs support, it might be better to support it to the rear where it turns toward the water connections.
I'm assuming that the water lines I'm seeing are going to the washer, and I can't feel any dampness on them, as though there was a connection leak at the washer and it is following back down to where the water is coming out. Can't exactly trace the lines, seems as though the water lines are going to the washer and the drain is coming away from the washer, and they just happen to be bundled together. I can see them all at the left side of the "header", but can't see anything at the right side, so think the next step is to rip out that header, but if it has to be re-built, I'll be a little more cautious about it. Checked the inspection panel by the washer and everything is dry there. And looking behind the wall in the basement, it looks dry there. So I think we've narrowed it down to a line in the header.
danemayer
Well-known member
You don't have to tear it apart. There are probably 2 screws holding it in from outside and another 2 from inside. There are likely a few other pieces of trim or other stuff on the left that have to be removed first to drop it down.
If you don't have a #2 Square Bit, you should find one as most of the screws in the trailer use this type. A #2 Phillips almost fits, but will strip the head of a screw that's tight.
If you don't have a #2 Square Bit, you should find one as most of the screws in the trailer use this type. A #2 Phillips almost fits, but will strip the head of a screw that's tight.
Thanks for the tip - #2 is the one all our squre screws need, so had it handy. and found the leak right at the hot water joint. Will cap both off and just forget about it. Is there any special way to cap it, or will the hardware store know what to sell me?You don't have to tear it apart. There are probably 2 screws holding it in from outside and another 2 from inside. There are likely a few other pieces of trim or other stuff on the left that have to be removed first to drop it down.
If you don't have a #2 Square Bit, you should find one as most of the screws in the trailer use this type. A #2 Phillips almost fits, but will strip the head of a screw that's tight.
The main reason we got a Heartland was because of all the helpful folks, and here's a great example of that. Saturday nite/Sunday morning is kind of a bad time to try to get something fixed, but not with you guys around. A bazillion thanks.
- - - Updated - - -
I pulled out that cover years ago, cut the lines under the dresser and behind the wall took out the hot,cold and drain lines. I clamped up all the remaining electric lines and now have lots of room and no head banger.
I might just pull that box off and figure a way to tie the electric and water lines up. Great way to save some headaches.
JohnDar
Prolifically Gabby Member
I'm assuming that the water lines I'm seeing are going to the washer, and I can't feel any dampness on them, as though there was a connection leak at the washer and it is following back down to where the water is coming out. Can't exactly trace the lines, seems as though the water lines are going to the washer and the drain is coming away from the washer, and they just happen to be bundled together. I can see them all at the left side of the "header", but can't see anything at the right side, so think the next step is to rip out that header, but if it has to be re-built, I'll be a little more cautious about it. Checked the inspection panel by the washer and everything is dry there. And looking behind the wall in the basement, it looks dry there. So I think we've narrowed it down to a line in the header.
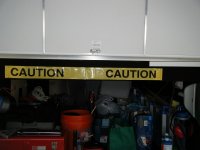
That entire "box" is removable. If it has a fabric covering, just feel around or use a magnet to find the screws. They are on both sides of it. No need to destroy it. Just remember which side was which to reinstall it so the holes line up.
That is assuming it's the same construction as mine. And the CAUTION tape didn't help. I still got to explore the galaxy.
Attachments
danemayer
Well-known member
If you don't have a washing machine, capping off the line is one answer. Another would be to put in a cutoff valve. Lowes or Home Depot will probably both have parts for either solution.Will cap both off and just forget about it. Is there any special way to cap it, or will the hardware store know what to sell me?
I'd suggest you preserve the value of the washer prep by fixing the Pex if that's what's leaking. You can get Sharkbite (or equivalent) press-on fittings; a 90 degree fitting for example. You can also install Sharkbite press-on cutoff valves. That way you can shut off the water but a future owner could turn it back on if they add a washing machine.
90 Degree press-on Coupling. Cutoff Valve. Sharkbite press-on End Cap.
The only tool required to use the press-on fittings is something to make a clean cut in the Pex line.
danemayer
Well-known member
I've cut the crimps with a good pair of diagonal cutting pliers.I can't see an orderly way to remove the "smash on" clamp to get the elbow off. If I could do that, I could preserve the ends of the hose to add a new coupling.
Similar threads
- Replies
- 6
- Views
- 217
- Replies
- 10
- Views
- 982