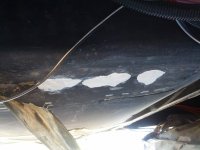
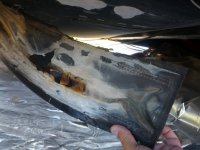
Gray Tank #1 leaking

danemayer

Well-known member
Could the water have gotten into your underbelly from travelling in a heavy rain/wet roads? Happened to me.


Yes, I'm pretty sure that's also happened. But after sitting for 3 days, if I run the washer, water leaks from the underbelly.

Went back this morning to look for leaks.
  1. The drain hose is in the drain pipe.
  2. There is no water leaking from hoses or fittings behind the washer.
  3. Checked the drain trap and pipes behind the access panel that's behind the washer. All is dry.
  4. No water in the drain pan or the carpet around the washer.
  5. Removed the faux steps between washer and dresser. All dry.
  6. Looked under the dresser. Pipes and everything are dry.
  7. Opened the raceway that the leveling control panel is mounted on in the basement. Also dry.
  8. Basement floor is dry.
  9. Drain pipe going into the gray #1 tank looks good and is dry.
  10. Can't find any leaks in the gray #1 tank.

I think I'm going to stop looking. For the moment, my working theory is that a bunch of water got into the front underbelly last December while driving through a very heavy rainstorm. The insulation got soaked and has stayed soppy wet in sections. When the washing machine goes into spin cycle, maybe the vibration shakes some of the water loose from the insulation and starts leaking through the drain hose opening in the coroplast.

We'll see what happens in June as we head out to Gillette.
 

danemayer

Well-known member
Dropped the underbelly to get another look. FOUND THE LEAK.

As the tank started to fill, water was leaking a bit from the tank heating pad (see post 1). I peeled the pad back and found 3 pretty big leaks. 2 holes at least 1/8" diameter, and a third that looked more like a crack. With the pad removed, water pours out.

Patched it with Water Weld. It's an epoxy-like putty that you force into the holes/cracks and onto the surrounding area. It cures in about 25 minutes, even when wet and is completely hard in an hours.

Patched Tank.jpgTank Heating Pad.jpg
 

brianharrison

Well-known member
Wow - thanks for sharing Dan. The pics show a burn mark (?) on the pad - is there possibility the heater pad is shorted in the area where the leaks are on the tank? - ie burnt a hole through the tank, or weakend the plastic to the point of failure with the internal weight of water? Hmmm.

Brian
 

danemayer

Well-known member
is there possibility the heater pad is shorted in the area where the leaks are on the tank? - ie burnt a hole through the tank

I turned on the tank heaters to see if the pad would warm up. Got a light shock from feeling it. I'm also wondering if the pad burns the tank if it sits empty for a while after it's drained. I don't remember seeing a warning about that, but I have seen it on some pipe heating tape and valve heaters.

Cut the wires off, capped them with wire nuts and taped them and then taped the loose wire to the side of the tank. Putting on a replacement pad in a different location shouldn't be too hard. I'll be under there again before the ski trip to replace insulation and install new coroplast.

Not knowing whether there might be other weak spots, I also put 4 coats of spray-on rubber sealant over the entire area where the pad had been.

While under there, I noticed on the doorside, a 2" gap between the bottom of the tank and the rear cross-bar that supports the tank. The crossbar is screwed to the frame and the 2 mounting screws on the doorside had sheared off. So the tank was free to bounce around in the rear doorside corner. Fixed that while the underbelly was open.
 

TravelTiger

Founding Texas-West Chapter Leaders-Retired
When we installed ours, the Ultra-heat instructions warn of not using them unless there is liquid in the tank/pipes.
 

danemayer

Well-known member
When we installed ours, the Ultra-heat instructions warn of not using them unless there is liquid in the tank/pipes.

Hmm - I think this means no leaving the gray tank valves open. I definitely will have to put heat tape on the valves for this winter. And after dumping the gray tanks, I'll have to add a few gallons of water.

I guess I'll need to take a look at the gray #2 heating pad when I get in there in November. It may also have caused damage.
 

2psnapod2

Texas-South Chapter Leaders-Retired
The only tank that I leave open is the one for our Shower/ Washer. Do you really need a heat pad on a tank that's empty?
 

danemayer

Well-known member
The only tank that I leave open is the one for our Shower/ Washer. Do you really need a heat pad on a tank that's empty?

There's only a single switch, so they're either all on or all off. Even with the grays empty, I have to have the tank heaters on to keep the black tank from freezing. I suppose if I always left gray #1 open while on our ski trip, I might be ok without replacing that pad.
 

TravelTiger

Founding Texas-West Chapter Leaders-Retired
d121720e-27bc-38f9.jpg
Dan, since you are in the underbelly anyway, it would not be too hard to run another switch. Ultraheat has a switch plate and lighted switches you could use to isolate the different runs.

Now that I think about it, you may want to check to see if the amp draw is appropriate for all of those pads to be on one switch.... Especially if you are considering adding to them.
 

danemayer

Well-known member
Oooh, look at that sweet control panel. It might be worth a look to see where the existing wires for the 3 pads come together. Maybe I could break them out without too much trouble.

I don't have any space left in the breaker panel, so the heat tape I add will probably have to get power from the pedestal. Haven't worked it all out yet. The replacement tank pad will just connect to the original wiring.
 

JohnDar

Prolifically Gabby Member
Oooh, look at that sweet control panel. It might be worth a look to see where the existing wires for the 3 pads come together. Maybe I could break them out without too much trouble.

I don't have any space left in the breaker panel, so the heat tape I add will probably have to get power from the pedestal. Haven't worked it all out yet. The replacement tank pad will just connect to the original wiring.

Here's a thought. Run a subpanel off the main panel and gain some additional circuits. Granted, you would need to be mindful of how much current you're using at any particular time, but at least it would all be under "one roof."
 

TravelTiger

Founding Texas-West Chapter Leaders-Retired
You can get heat pads that are DC powered, too, if you have room in the fuse box. Ours are DC. The switch plate has room for 5 switches. It comes with two blanks, if you don't use them all.
 

danemayer

Well-known member
I have an idea ;). I'll order pads and heat tape and new insulation and new coroplast and bring it all to Canton in October. I'm sure there'll be enough brainpower, experience, tools and muscles to get everything done in no time at all.
 

boatto5er

Founding VA Chap Ldr (Ret)
I have an idea ;). I'll order pads and heat tape and new insulation and new coroplast and bring it all to Canton in October. I'm sure there'll be enough brainpower, experience, tools and muscles to get everything done in no time at all.

Now you're using the old noggin!
 
Top