how do you stop the leak in the shower?

bgscott

Active Member
I have an 09 2998rb and I have really struggled with the shower leaking into the underbelly. It only happens when the shower is hitting the right hand corner of the shower stall (if you are facing the shower head). I tried to redo the caulking job from the factory without much luck. So i took it back to my dealer and let them try, it seemed to be better but after being in winter storage (my trailer has been inside a heated building that did not see temps below 35 degreess) it is pouring water into the basement. I really don't want to haul it back to the dealer just for this. can you guys tell me exactly where we should be putting the caulk to stop this? can you send pictures please?

thanks

Brad Scott
 

Peteandsharon

Well-known member
Brad,

Not sure if your shower is the same but my Bighorn had a leak into the basement from the shower and it was the access panel in the shower. The BH shower has a round access panel that screws into place. No matter how I took it off and put it back in place, it kept leaking. I finally caulked all around the edge of that panel and screwed it back into place. That solved the problem at least until the end of my first season. We'll see how it survived the winter.
 

red4re

Member
First - you have to find out exactly where the leak is coming from. I fed a water hose inside to put water in exact places in the shower to find mine. Hold the water hose in the corner and let water spray in one location. Use a nozzle with a little pressure. Have someone else looking in the basement to watch for drippage. Hold it there for a while. Sometimes it takes a few minutes for water to find its way out. If no leaks, move the hose to a different location and repeat.

Mine went back to the dealer three times for water leaks. All they did was caulk it and send me on my way. They never tested anything. I finally gave up and did it myself. I removed as much of the old caulk as I could. Then I recaulked it myslef. I let it dry for a couple days and then used the water hose to test for leaks. I think more caulk over old caulk is not the best way.

Hope this helps.

red
 
We fought a shower leak for several months, finaly found that it was the shower control unit. Water was leaking into the area around the part that sticks up to connect the flex shower hose. Put a hole new unit with brass insides and turned it pointing down so that water can't flow in. Then put thread tape on the access threads. No leak since.
 
D

Dave Willis

Guest
I am going to forward this to our service dept. Im sure that they will be able to help you.

Thanks,
 

SmokeyBare

Well-known member
When you suspect a water line is leaking... but are not sure... make several wraps of toilet paper around each pipe in question... if it leaks... the TP gets wet... :)
 

tmcran

Well-known member
I just got my new 2998RB about 2 weeks ago. I got it set up today and checked the shower. Guess what it leaks. It leaks in the side and bottom near the outside wall and between the shower and the lavatory. Where the glass panels join the pan. It is also leaking around the bottom of the trim on the floor.The hose leaks at the connection to the faucets. The caulking looks as if it was just thrown on between the glass panels and pan.
Also have leak in the basement. The floor is wet next to the access panel where the water pump is located. The floor is also wet in the area where the water pump and hoses are located. I can't find anything that is leaking and the water pump has been on for over 8 hrs and only comes on when turning on the water. So I assume there is no connection leak. The only thing I have done is put water in the holding tank through the gravity fill. No wetness on or around the filler connections. Any ideas.

Needless to say I'm not impressed with the QC and have had several other small items that need repair. Hate to gripe but when you spend as much as we do I think basic things should work. I would not last long in my business with this type of QC. It is back to dealer today.
 

jmgratz

Original Owners Club Member
Congratulations on your purchase. Sorry you are having the problems. I am sure the dealer will get your issues worked out, but if you are having your problems addressed don't hesitate to contatct Heartland Customer Service.
 

slmayor

Founding California Northern Chapter Leader
If yours is like the BH, check the back of the outside shower fitting for your under side leak. It's a tricky one to find. Our shower leak was also at the top of the faucet. When water ran down the shower wall above the faucet, it came out on the floor. We thought it was the glass panels and pan, but never could find it. I was cleaning some spilled shampoo off the shower faucet and happened to notice it coming out. Tightened everything up and it's not leaked again.
Just as an FYI, we didn't have any leaks until we'd put several thousand miles on it. They do need to be checked as vibration from dragging these rigs over the highways can cause some fittings to loosen.
 

tmcran

Well-known member
If yours is like the BH, check the back of the outside shower fitting for your under side leak. It's a tricky one to find. Our shower leak was also at the top of the faucet. When water ran down the shower wall above the faucet, it came out on the floor. We thought it was the glass panels and pan, but never could find it. I was cleaning some spilled shampoo off the shower faucet and happened to notice it coming out. Tightened everything up and it's not leaked again.
Just as an FYI, we didn't have any leaks until we'd put several thousand miles on it. They do need to be checked as vibration from dragging these rigs over the highways can cause some fittings to loosen.

Humm.thanks for the feedback.I looked at the outside shower and didn't notice anything. Not sure if I know where to look for the outside shower connections. I can see part of it from inside looking to the back of the bedroom lavatory.

I tested the shower by spraying some water from the sparyer on all the caulked areas on the bottom where the glass panes meet the pan and from about four feet up the sides.. It seemed to me that the leak was at the area where the panels meet the pan. I didn't unscrew the hose from the faucet to see it it had any sealer on it. Very close to dealer and just let them give it a try.
 

Rmcgrath53

Well-known member
Tmcran . My leaks, were the hot water tank conection, and the outside shower . That fitting is under the lav sink. You can put your head in there with a flashlite. Look at the hose fitting were it conects to the shower manifold. Two showers leaked at that fitting. The access panel in the basement can be taken out and flashlite at the hotwater tank would show the leak there. It may not evan be the shower stall inside.
 

bgscott

Active Member
thanks for the reply's. it looks like my leak is in the bottom corner of the shower closest to the outside wall just above the pan. there is a ton of sealant there so I am not sure how water is getting in but thats certainly where the leak is. I am going to haul it back to the dealer on thursday and let those guys have another shot at fixing the leak.
 

tmcran

Well-known member
thanks for the reply's. it looks like my leak is in the bottom corner of the shower closest to the outside wall just above the pan. there is a ton of sealant there so I am not sure how water is getting in but thats certainly where the leak is. I am going to haul it back to the dealer on thursday and let those guys have another shot at fixing the leak.


That is where mine is leaking same place.Closest to the outside wall and between the shower and lavatory. I'm also checking all the other ideas as well. I think the outside shower connections may be the cause of the wetness on the floor in the basement as it is very near being below the outside shower placement. Thanks for all the input. At the dealers today.
 

tmcran

Well-known member
Follow up on shower. The techs at the dealers have worked hard and long. Even took the shower stall off and recaulked. Helped but still leaks some. So after almost 2 weeks of not being able to use our new RV I said ok. I'll fix it. Took a shower curtain and velcroed it to the frame so i can remove it to get in and put up when need to shower. No leaks! IMO there is a design flaw in the shower as I'm awear of others having the same problem.
Took RV home on Thursday and was checking for leaks on slides and found big leak in bedroom around the lower part of the slide.. Back to dealer yesterday afternoon.:(
 

Ray LeTourneau

Senior Member - Past Moderator
Follow up on shower. The techs at the dealers have worked hard and long. Even took the shower stall off and recaulked. Helped but still leaks some. So after almost 2 weeks of not being able to use our new RV I said ok. I'll fix it. Took a shower curtain and velcroed it to the frame so i can remove it to get in and put up when need to shower. No leaks! IMO there is a design flaw in the shower as I'm awear of others having the same problem.
Took RV home on Thursday and was checking for leaks on slides and found big leak in bedroom around the lower part of the slide.. Back to dealer yesterday afternoon.:(
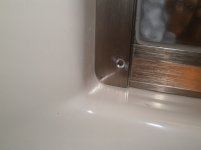
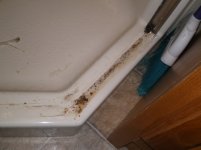
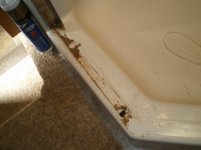
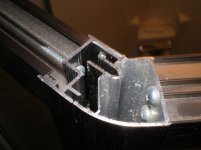
tmcran, we had the same issue. After several tries at resealing and a final round of completely disassembling the surround, I tested by using air pressure directed at the area the water was coming from. I sprayed a soap solution on the inside of the shower like you would use to find a propane leak. Air bubbles were coming from the thin rubber seal/gasket that is used to hold the glass in the frame. I greatly reduced the leak by siliconing the lower corners of this seal. I also found when taking apart the surround, the lower corners of the aluminum channels that get screwed to the wall of the shower were squared off instead of being round to match the contour of the fiberglass. That left a pretty big gap to seal so I fixed the corners to fit better.
 

Attachments

  • newly radiused corner.JPG
    newly radiused corner.JPG
    39.3 KB · Views: 86
  • Right side base.JPG
    Right side base.JPG
    58 KB · Views: 88
  • Left side base.JPG
    Left side base.JPG
    64.2 KB · Views: 86
  • corner fitment.JPG
    corner fitment.JPG
    69.9 KB · Views: 84

tmcran

Well-known member
Ray,
Thanks for the info and pics. I'm like you when I get time (or ever get the RV away from the dealer doing warranty work long enough) I'm going to take it apart and redo everything. For now tho the curtain is working fine.
 

talley

Well-known member
tmcran, we had the same issue. After several tries at resealing and a final round of completely disassembling the surround, I tested by using air pressure directed at the area the water was coming from. I sprayed a soap solution on the inside of the shower like you would use to find a propane leak. Air bubbles were coming from the thin rubber seal/gasket that is used to hold the glass in the frame. I greatly reduced the leak by siliconing the lower corners of this seal. I also found when taking apart the surround, the lower corners of the aluminum channels that get screwed to the wall of the shower were squared off instead of being round to match the contour of the fiberglass. That left a pretty big gap to seal so I fixed the corners to fit better.


Ray....Good job on the corner of the shower. I took mine apart and found the same squared off frame. I wish I had been smart enough at the time to have formed the aluminum channel as you have done. Mine still leaks. I will follow your lead and check using the soap solution and air pressure. If I have to disassemble again will modify the channel ... great idea.

BTW - did your repair work (hope so).
 

flyfishing48

Active Member
My shower has leaked from day 1. I have been fixing 1 leak at a time. I expect I will find more when I start using it again.
I want to pull every thing apart and start out fresh. How did you guys get this all apart?
 

talley

Well-known member
Tom, use Ray's technique above. I used compressed air (no soap solution) with a helper on the outside to feel where air was coming thru the frame and caulked areas. Used the compressed air from inside and directed air onto suspected areas.

I had (on an earlier attempt to fix leak) disassembled the shower panels, but caulked only from inside. Recently re-visited the project and used the compressed air to identify leakage. Had to place additional caulk from outside into the corner at bottom of wall. Also, along the bottom at the thin gasket between frame and glass.

I would clean off any excess and loose caulk and try the above first. Taking the panels apart is easy, but a PITA to assemble and adjust... can be done though.

Panels are held to shower pan only by silicone caulk. Side channels are held by about 4 screws. Top frame is one piece and ties the three sections together. Doors and panels fit together in verticle groove which allows for adjustment of angle of the two panels. Must also adjust so that door is square in frame and does not drag.

Good luck
 

Jimmyt5

Well-known member
All my shower leaks were from the inside. I used clear chalk all along the bottom of the glass where it meets the rubber.
 
Top