I finally found it....frame sag at the front overhang

newbie

Northern Virginia
The area being discussed is the horizontal area around the kingpin back to the vertical area in the area behind the kingpin.

I know that makes perfect sense to you but I still can't picture what you all are talking about either. I really need a picture too.
 

ihsolutions

Well-known member
It's amazing what a difference pictures make. My old coaches, all Sunlines, have a great owners group too, and several of the owners post pictures in every single post from multiple angles, taken during steps of repairs. It's quite a great learning tool. Every now and then I see people post pics here on heartlandowners, but nothing like the Sunline group.
 

Bob&Patty

Founders of SoCal Chapter
OK OK, I will post some pix. Doing these repairs when it's 103* outside. The last thing on my mind was pix.

Newbie, look at your avitar of your coach on your posts. Look at the pinbox and then look back to where your B/R closet and bed would be. Now look at front where the front storage door compartment is. This is the area we are talking about. There is an aluminum frame that the vertical short wall is that holds the storage door. Open the front stoage compartment door and look inslde. You can also see the both the side wall and front compartment walls from the LP doors. That wall is NOT secured properly to the side wall frames.

Just a side note on stainless steel screws, nuts and bolts. They are not as strong as normal steel fasteners. I used the cadium plated screws @ 40 cts each X 6. I do believe that 3..1/4" X 4 1/2" long sheet metal screws on each side will do the trick. I don't think rust would be an issue...but if you were to sink your HL that deep in water...you will have bigger problems than a few rusty bolts. The water line would be above your LP tanks. Something like.."open the doors and windows to let the water out". JMHO

Like I said in my previous post on this thread...Send me a PM....with your PH#....and I will call you...with your cell in your hand and walk you through an inspection. Guys it's not rocket science.
 

newbie

Northern Virginia
Okay Bob, that was a good description. I think I get it now.

I understand about the picture taking when you are in the middle of a repair. I always think to myself after I do a mod that it would have been nice to take a few pictures but I get so wrapped up with what I am doing and can't ever remember where the camera is...well, you get the idea.

If you get the chance, I still wouldn't mind seeing a few:)

Good luck,
John
 

jmgratz

Original Owners Club Member
Here is the area that is being talked about. This was ours prior to it being repaired.
 

Attachments

  • DSC03538.JPG
    DSC03538.JPG
    94.9 KB · Views: 158
  • DSC03539.JPG
    DSC03539.JPG
    91.4 KB · Views: 149
  • DSC03541.JPG
    DSC03541.JPG
    94.5 KB · Views: 151
  • DSC03542.JPG
    DSC03542.JPG
    93.4 KB · Views: 146

ihsolutions

Well-known member
OK OK, I will post some pix. Doing these repairs when it's 103* outside. The last thing on my mind was pix.

Bob, I just went back and read the thread and realized I sounded a little rude repeatedly asking for pics. I apologize. I have been trained by another owners group to always have the camera handy and snap away pictures during a repair. It is not an easy habit to get into, especially I imagine if the working conditions are as unfavorable as yours.

Having said that, I still didn't "get it" until jmgratz posted the pictures. That made it all very clear to me. A "duh" moment, for sure.

The pictures, when taken before, after, and especially during a repair, can serve as a tremendous educational resource for guys like me who invariably experience all the "common problems" and don't have ingenuity to devise a solution, but do have the mechanical skills to copy the solution someone else came up with (and documented).

Good luck in your efforts to repair!
 

Bob&Patty

Founders of SoCal Chapter
Just so everyone knows...I did not take any pix and I don't think anyone was rude. If it is cooler tomorrow I will take some pix. The problem being that the Horn is all back together. That being said...there was not anyway to know if it fixed the problem until I put it all back together and hooked the TV to it. I sure wish I knew how to put arrows on pix to point out things.

My whole day was devoted to getting our new puppy home. Its been a challenge trying to get the pup out when needed and having a 3 year old child interfering. Someone is going to die or get hurt over this. But I can tell you it wont be me. "OUT WITH THE DUCT TAPE". LOL
 

TXBobcat

Fulltime
I had a similar problem. I think this is what was indicated above. This photo is on the driver side of the front of the trailer at the corner where the bedroom slide is located.

Trailer Front Seperation.jpg

The gap opened up every time I connected to the TV. Close up when removed from the TV. However I could not keep the gap calked and the bulkhead on the under side rotted.
Heartland helped me get it fixed on 08/27/2010. As of this date I have no longer had any problem. I am happy with the people they had make the repairs.
BC
 

Bob&Patty

Founders of SoCal Chapter
Bobcat, YEP THAT WAS PART OF IT. The cardboard/fiberglass was/is separating. A lot of moisture got into that area at some time, BUT it only separated on the ODS, it didnt travel to the DS. The molding separation or SAG was on the door side on my Horn. There was not any molding SAG on the ODS. WEIRD??!!

I'm glad this thread is being read. Maybe Jim Fenner will read it, then go to the assembly floor and take a look at how this is being addressed now. I'm really not trying to bash HL...you say you build a quality coach...then has this issue been addressed yet??
 

KENNY COCHRAN

MCNEESE STATE COWBOYS #1
I'M NOT AN ENGINEER, SO IF WE HAVE SOME OUT THERE, PLEASE HELP. SEEMS TO ME WHEN YOU SCREW 2 DIFFERENT METALS TOGETHER, YOU SOMETIMES HAVE PROBLEMS FROM CHEMICAL/ELECTRICAL??? REACTIONS. SEE: http://en.wikipedia.org/wiki/Galvanic_corrosion
NOT SURE IF THIS WOULD HAPPEN WHEN YOU USE THE STEEL SCREWS GOING INTO ALUM. FRAMING. IS THIS WHY THEY CORRODED AND CAME APART. SURELY SOMEBODY AT HEARTLAND WOULD KNOW THIS, IF I'M CORRECT.
 

Bob&Patty

Founders of SoCal Chapter
Kenny, the type of metal is not the issue here. It's the lack of or want of ... bigger screws...more screws...or something. Maybe welding the 3 walls together at the front. 4 #10 sheet metal screws wont cut it in this area, TOOOO much stress. A #10 sheet metal screw wont hold anything. Go to Lowes or HD and look at one. They are the size of a pencil lead.
 
Last edited:

Willym

Well-known member
This can be an issue in damp or wet environments, i.e. you need an electrolyte. In this case the aluminum would preferentially corrode, but given that it is a large frame, the actual loss would be minimal. However as Bob says, this was not the issue here, and hopefully the factory is using all of this customer experience (and trouble) to make a better product.

I'M NOT AN ENGINEER, SO IF WE HAVE SOME OUT THERE, PLEASE HELP. SEEMS TO ME WHEN YOU SCREW 2 DIFFERENT METALS TOGETHER, YOU SOMETIMES HAVE PROBLEMS FROM CHEMICAL/ELECTRICAL??? REACTIONS. SEE: http://en.wikipedia.org/wiki/Galvanic_corrosion
NOT SURE IF THIS WOULD HAPPEN WHEN YOU USE THE STEEL SCREWS GOING INTO ALUM. FRAMING. IS THIS WHY THEY CORRODED AND CAME APART. SURELY SOMEBODY AT HEARTLAND WOULD KNOW THIS, IF I'M CORRECT.
 

JohnDar

Prolifically Gabby Member
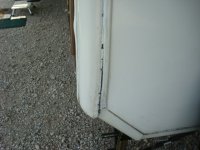
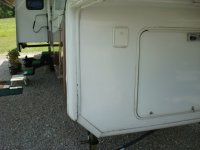
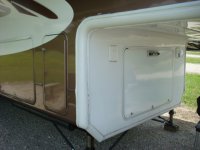
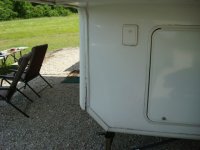
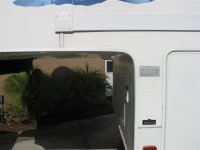
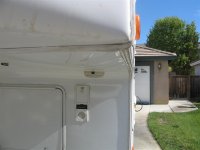
Glad we got the pix in there. I know in my "garage" area, there is a wide gap between the framing and the front wall in front of the jacks, making it an open door for rodents. But I haven't seen any structural damage or flexing. It's a long shot, but in re-reading the service report from my dealer when the fixed the squeak in the bedroom floor, it sounds like some of the problem may have been resolved. Hard to tell since I haven't hauled our BH all over the place...yet.

Not to hijack this thread, but for anyone who thinks a squeak in the bedroom floor is just an annoyance, here is the report:

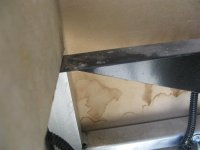
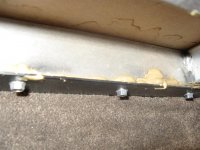
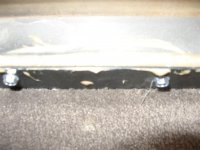
Complaint: Customer states that there is a squeak in the bedroom floor.
Service Rep: Found bump in floor
Repair: Loosened front cap, removed hitch neck wrap, removed front cap mldgs, removed front wrap, removed comp latch, light, front jack box, battery vents, front comp, removed bed and frame, removed electrical, removed mech doors and track, removed carpet, removed warped decking, welded 1x1 angle for support, installed new decking and screwed down, filled gaps with filler and reinstalled all above parts, caulked edges of front cap, vents, door, and jack box. Closet floor removed washer and dryer, removed carpet and pad, fixed warped decking in closet with new and reinstalled all carpet and trim and checked for water leaks.

Fortunately, this was all before the warranty expired last Fall. I post this because the bedroom is directly above the section in question. With all of the clothing, bedding, W/D, and you and the significant other romping in the bed [;)], there is a lot of weight over that area.
 
Last edited:

Bob&Patty

Founders of SoCal Chapter
OK you lucky people. Here's the pix I took today. I don't know why...but they would not upload by numbers 1-18.

From left to right....top row...#1 and #4.....bottom row #2 are of the ODS LP tank area. You are looking forward at the aluminum vertical frame for the front compartment wall. You can see on the lefts side of the pix the wood shims I made for the front and side walls to pull together.

From left to right... top row....#3 and #5 is the bottom front of the storage compartment. This is where the steel frame and the front vertical wall come together. You can see the construction adhesive and the sheet metal screws that I used to pull it back together.

From left to right... bottom row..# 1 is the DS side. This where the front "V" molding was pulling away from the side wall horizontal molding. The gap between the 2 was 3/4".

From left to right...top row... # 2 is the ODS overhang. As you can see it never seperated from the side wall. Bottom row #5...if you look at the bottom of the cover you can see the waves in the fiberglass where water was getting in and delaminated the material.

Bottom row # 4 are the screws and washers I used to pull it back in place.

Sorry guys, the pix in the preview post where in the right place........now there all wrong...I GIVE UP.
 

Attachments

  • wall repair on the Horn 003 (Large).jpg
    wall repair on the Horn 003 (Large).jpg
    57.9 KB · Views: 168
  • wall repair on the Horn 011 (Large).jpg
    wall repair on the Horn 011 (Large).jpg
    66.3 KB · Views: 183
  • wall repair on the Horn 018 (Large).jpg
    wall repair on the Horn 018 (Large).jpg
    98.6 KB · Views: 149
  • wall repair on the Horn 004 (Large).jpg
    wall repair on the Horn 004 (Large).jpg
    74.8 KB · Views: 158
  • wall repair on the Horn 013 (Large).jpg
    wall repair on the Horn 013 (Large).jpg
    103.3 KB · Views: 170
  • wall repair on the Horn 008 (Large).jpg
    wall repair on the Horn 008 (Large).jpg
    38.5 KB · Views: 155
  • wall repair on the Horn 002 (Large).jpg
    wall repair on the Horn 002 (Large).jpg
    52.4 KB · Views: 159
  • wall repair on the Horn 012 (Large).jpg
    wall repair on the Horn 012 (Large).jpg
    68.9 KB · Views: 156
  • wall repair on the Horn 007 (Large).jpg
    wall repair on the Horn 007 (Large).jpg
    37.5 KB · Views: 148
  • wall repair on the Horn 001 (Large).jpg
    wall repair on the Horn 001 (Large).jpg
    54.4 KB · Views: 154
Last edited:

newbie

Northern Virginia
Bob, thanks for taking the time to take and post the pics. I certainly get what you were explaining now. Looks like you did a fine job with the repairs and got it all back together tight.

Did your new little furry helper give you a hand?
John
 

Moose

Well-known member
I am not sure if this is related or not, but should I be able to see daylight between the front and sides of the front lower storage compartment as indicated in these photos?

These photos were taken before my first trip. The dealer said he would inquire at Heartland.

As previously suggested, if big enough, they can be an entry point for rodents. There are rust stains shown in one picture.
 

Attachments

  • Front Compartment_DS (Small).jpg
    Front Compartment_DS (Small).jpg
    31.5 KB · Views: 152
  • Front Compartment_ODS (Small).jpg
    Front Compartment_ODS (Small).jpg
    30.9 KB · Views: 138

Bob&Patty

Founders of SoCal Chapter
Moose, my answer would be NO. IMHO, I would get the BH to your dealer and have them remove the overhang cover and look at what is holding that front wall to the coach. More #10 sheet metal screws????

JOHN (NEWBIE) ...no Callie was not much help. She spent most of the day sleeping under a tree in the backyard.
 
Last edited:

JohnDar

Prolifically Gabby Member
[Black tank contents]!! That's what the front of my "garage" looks like. Has since Day 1. Is that the result of wall separation or just the way they build them all? Mine feels sturdy when I try to force movement.
 
Top