Installed Never Fail Bushings.....have questions.

Garypowell

Well-known member
The big day was supposed to be yesterday but between a late start and then realizing I did not have enough wood for the jacks to work properly the installation was today.

In general the installation went fairly easy. It took me and my nephew about 5 hours to do the installation. But I also checked the brakes and greased the bearings as they have easy lube (yes I put the grease in very slowly…and they seemed to work fine). I have a couple of question as some of it did not go as I thought.

1. No matter what we tried we could not get most of the bolts to seat all the way flush into their holes. We tried several techniques:
a. Drawing them in as we used a double wrench.
b. Beating on them with a hammer.
c. We devised a board with a hole in it (so the other end of the bolt was protected) and then used a C clamp on the heads.

But no matter what we did we could not get them fully engaged…..like the ones we took out were. In my opinion they are all about ½ engaged….and they did not rotate when I tightened them. I also used a torque wrench to put the 50 Pounds on them….and they did not rotate.
Had the most success with the new brackets supplied.

You can see the pictures below (Gap 1, 2, 3)

So the question is…..do I have something to worry about here or is this fairly normal?

2. Secondly, it was my understanding that you replaced the bushings on the Dexter E-Z Flex too. I did not. First the top bushing was a lot bigger than the never fail size….even the bolt was bigger. So no go there. I did notice there was no lubrication in sight….took care of that today and grease went in easily.

The other two had brass bushings in them….they looked fine and tight….so I left them as they were.

That’s the second question….I thought I have heard from others they have replaced these bushing…..how did you get around the bigger bolt issue?

I am going to call Mobile Outfitters early next week to see what gives with my two questions. But obviously would like to hear the opinions of the EXPERTS!

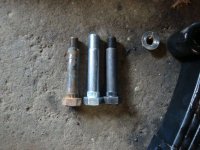
To help protect myself I put paint on the bolts so I can see if they start to spin….we’ll see how that works. Put in a picture to show.

I am very glad I did the upgrade and will be happier once I am comfortable that the new bolts supplied don’t usually go all the way in. The main reason I am glad is that one of my bushings had already failed. I have about 2,500 miles on the Rig since purchase last November.

I look forward to hearing what you all have to say.

Gap 1.JPGGap 2.JPGGap 3.JPGPaint Dots.JPG
 

cookie

Administrator
Staff member
One thing you will want to do is remove a nut on the bolts in question and check to be sure that the shoulder of the bolt is in the shackle hole and not up against the inside of the shackle.
That will cause the problem you are describing.

Peace
Dave

Sent from my DROID RAZR using Tapatalk 2
 

porthole

Retired
And if not what Dave says I would take them off and find a hydraulic press to finish seating them.
Or, socket and hammer.
 

brianharrison

Well-known member
Hi Gary,

You do need to ensure the bolts are fully seated to engage all of the knurled portion. Dave and Duane have mentioned the first easy check. As well check the length of the bolt and make sure the shank portion is the correct length to use with the supplied shackles. Maybe the bolt is too long to properly seat? The nut may be bottoming out on the shoulder before it can suck in the knurled end.

The shank portion (non threaded part) needs to the correct length - the length is matched for use with the specific shackle thickness. It looks like you have new shackles as well as new bolts; were they provided as a kit with the neverfail bushings? Use the nut on the end of threads to protect them if you need to use a hammer to disengage the knurled portion that is engaged.

50ftlbs is not a lot of clamping force, and your C-Clamp on wood backer may not have added much more; If you can find a press that's the best, but next to that I would use a large bench vise, or a larger wrench on the nut end, holding the bolt end to make sure it does not turn. Without seeing your bolts, if they are 1/2 thread I would add about 100 ftlbs with no concern. Yes, I know the purists will jump all over the last procedure, but it is better than leaving the bolt knurls half engaged......

You are correct on the EX Flex the main hanger bolt, its is larger and requires some grease (they are shipped dry). No neverfail bushing there. I did punch out the brass bushings in the EX Flex shackle ends and added the neverfails last year.

Good luck,
Brian
 

Garypowell

Well-known member
Thanks all. I guess I have something to worry about. I almost stopped half way through....but figured if the boots needed more work at least they would already be installed.

I left all the stuff at the trailer and since Sunday won't go back today.

But here is more info in response to the comments so far:

1. This was a whole kit, bushings, bolts, nuts, and new metal pieces with holes in each end....not sure what they are called.

2. My memory say there were no shoulders on the bolts. It went from shaft right into threads. I think if I had seen a shoulder I would have been more concerned.

3. I thought I read online that 50 ft pounds was the right force.....but I respect Brian's opinion. I know they are fairly stout bolts.

4. I did get a "pop" on a couple of bolts that seated 100%. Just have to go back and get the rest of them to do the same thing.

5. I might first try my breaker bar to get more force on the nut. I was simply using a 12" ratchet wrench which only gives so much force.
6. I'll search around on line and see if there is a hydraulic press that fits this application.

Keep the comments coming.
 

brianharrison

Well-known member
Hi again Gary,

The shoulder is the transition area between "shaft" and threads. Sometimes it is chamfered (rounded, like a shoulder) or sometimes it is square. If it is square, it can get hung up on the shackle (metal pieces with holes in each end) on one side preventing the non-threaded shaft to fully slide into the shackle hole. Or if the bolt is too long, the nut will bottom out (ie no threads left) on the shoulder.

Here is a pic of three knurled bolts used for suspensions. The length and diameter of the shaft, or shank as it is sometimes called, is critical for the application to be installed. Too long, or short and it will not seat correctly. Not the right diameter and the clearance between shank and bushing will be incorrect, possibly creating excessive movement, or not enough movement leading to premature failure.

Hope this helps.

Brian
 

Attachments

  • Knurled hardware.jpg
    Knurled hardware.jpg
    82.9 KB · Views: 64

57chevyconvt

Well-known member
Gary, Brian has covered the subject very well. What is the thickness of the metal straps (shackles)? The wet bolt kit should have shackles that are made from 3/8" thick material rather than the 1/4" thickness as originally supplied by Lippert. When I replaced the original shackles and bolts with the wet bolt kit, I proceeded to follow the detailed procedure that Brian put forth prior to assembly. I used my air impact wrench to draw the knurled portion of the bolt into the new shackle. Be sure to put a wrench on the bolt head when tightening the nut to suck the knurled portion of the bolt into the shackle with your brake over bar. This to avoid bolt from turning in shackle and negating the locking effect of the knurled section and thus allowing the bolt to become loose in the shackle causing premature failure. Another method to seat the bolt in the shackle is to use a short piece of say 3/4" pipe, longer than the bolt and drive the bolt into the shackle and pipe. Note, this is to be done prior to placing the bolt and shackle in the spring and spring hanger. Take care to use another piece of steel such as your old shackle to use as a cushion on the bolt head to prevent damage to the tapped hole that is used for the grease fitting.
 

Garypowell

Well-known member
I am not sure if the idiot of the week award has been decided yet but if not i would like to enter my name. I decided to go to the trailer to see my bolts. Guess what....I have shoulders!

i often describe myself as someone who knows enough to be dangerous....well.......

so then I crawled under the trailer and pulled off a nut.....sure enough the shoulder was still on the other side of the hanger.

at least I now know what the problem is....me!

As I first reported I banged and squeezed the bolts so my hope now is that I have not damaged the shoulder or the hole such that the bolt will not go through the hole. Obviously I have to jack the unit back up and take the tension off the springs and from the inside see if I can guide the shoulder through.

I like 57chev's idea above but the bolts are "started" so I think I will see what I can do to simply complete their travel.

the schackles should not be that hard.

If anyone has any heartburn with the idea of using these bolts or my prceedure please let me know. I have been known to make mistakes!

Thanks all....I'll survive this!
 

57chevyconvt

Well-known member
Gary, Don't be to hard on yourself. I have a MS degree from the "School of Hard Knots." I have scars and extra parts in the shop that are no long viable to provide proof of my degrees. You are not by your lonesome in this process of working on an RV and making a few mistakes along the way, Joint the Crowd.
 

jimtoo

Moderator
Hi Gary,

Thanks for the update. We all learn from others mistakes, especially when they come back and tell us what happened or what they did wrong. That's part of learning and rv'ing.

Thanks again for coming back.

Jim M
 

GOTTOYS

Well-known member
The easiest way to press these bolts in is with a ball joint press. It's nothing more than a heavy-duty C Clamp that can develop enough pressure to force the splined sholder of the bolt all the way into the hole. You can buy a kit from Harbor Freight for around 60bucks or rent one from an auto parts store or rental shop. This will easily press the bolts in with no danger of stripping the threads from trying to pull them into place with a impact wrench..Don
 

mobilcastle

Well-known member
I am sure this is not the right way to mount these bolts, but I did not have a press handy. I took the shackles to the vice and layed the shackle across the open vice and slipped the bolt into the hole and hammered them into the shackle until they were flush. I used this technique on my last 5ver and everything went well and all bolts seated flush.(this system was told to me from the people who owned Equaflex before they sold out to Lippert). Make sure you hold the head of the bolt when you install them so they don't turn as stated above. On any I could not do this way I tightened them carefully to draw the bolt flush to the shackle. Good luck.
 

Garypowell

Well-known member
Well...finally got my problem straightened out. Through the help from many above ( with a special thanks to Brian Harrison). I realized fairly early that I had not properly gotten the shoulder of the supplied bolts through the other side of the spring hanger. This kept the fluted part of the bolt head from seating all the way.

I was concerned that I had messed up some of the bolts so I found a trailer (hauling kind) parts store in town and purchased some new 9/16 bolts that did not have a shoulder. My supplied bolts were 9/16 shaft but 7/16 thread. Since the threaded portion was bigger on the new bolts they had a higher torque...which I liked too.

So jacked the unit up today and simply pulled out the old bolts and inserted the new ones. It was still a lot of work to draw down the bolts then pound on the head with a hammer then draw them down some more. It seemed each bolt took about 5 iterations but they are finally all seated 100%. I tried a C clamp but just could not get them to move.

So my learning curve is over.....maybe I'll stick closer to inside mods. I am converting two kitchen hanging lights to LED (going from wedge to GU 20 base for more light) and am putting longer drawers in the closet so I'll write about that latter.

Thanks again everyone!
 
Top