More valve problems

gotlieb

Active Member
I think worst case you might have cut a little bit of the sheath so more of the center cable sticks out and is available to the plunger.

Yep, that's what I had to do. Used some pure silicon and lubed it up. Can open and close it with one finger now. Will try the same on the other two valves and hopefully that's it. That is if my back holds out long enough to fix the other two.
 

gasman

Camp Socializer
Re: More vavle problems

You might try using Tri Flo lubricant. It is designed for cables. Just squirt it in the end if the housing and work the cable while squirting.
 

gotlieb

Active Member
Re: More vavle problems

Alright, I gave up for the day. The valve is operating smoothly and closes completely.

Now I'm struggling with getting the valve back into the pipe fittings. The actuated valves have a different end by the cable that has to go on the outside of the pipe fittings. Any tips for getting this together?

The fittings have to be pushed together to go inside the valve end, but by pushing them, it doesn't allow the inner part of the valve to slide into place. Struggled with this all night. I can get the front side in and not the back, or the back side and not the front. Tempted to just break one side off and call it good.
 

Gary521

Well-known member
Re: More vavle problems

This is exactly why I had to cut some pipes. I realize that cutting anything is not a desired option but it may be your only option. My system had the 3" line joined by the 1-1/2 lines. I just cut the smaller lines and used slip fittings to ressemble them. I did this so that if I ever had to do this again, disassembly would be a lot easier. Got the fittings at Home Depot. Once I cut the lines, it was very easy to get the valve situated without having to worry if the seals were in place or not.
 

gotlieb

Active Member
Re: More vavle problems

Cutting isn't an option for me at this point. I would have to cut into my 3" pipe and replace the entire dump station.

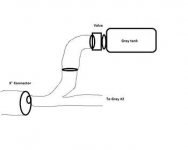
Valves.jpg
My crude drawing of the grey #1 setup. The grey pipe is less than a foot total before entering the 3" pipe assembly that connects to the dump station.

Unless there is a way to easily splice the curved pipe, but there isn't much room.

Vasoline on the seals helps keep them in place, for what it's worth.
 

Gary521

Well-known member
Re: More vavle problems

This kinda looks similiar to mine - maybe a bit different. I had to replace part of the 1-1/2" pipe when I was doing this process. The part I replaced was cemented to the back half of the gate valve. Camping World sells the individual parts of the valve so if you need to replace the curved pipe that is cemented to the valve, you can and all will be OK. They have both a male and female pipe fittings where the seal sits on and glues to the incoming or exit pipe.
 

gotlieb

Active Member
Re: More vavle problems

Not sure how I would replace the curved pipe. It is cemented in all the way to the 3" connector (2 pieces of curved pipe). The back of the valve assemble is pretty much glued right to the tank, so there is no room to cut there.
 

Gary521

Well-known member
Re: More vavle problems

This is the valve part I was referring to: http://www.inyopools.com/Products/00101352051839.htm?gclid=CNvf74mMjMACFQQSMwodeD8Aug

You would have to replace the valve part on the upper gate valve and the two curved sections of pipe. Looks like the lower section is part of a "Y" adapter. I cannot tell how that "Y" is conected to the 3" line. If the 3" line goes right into another "Y", this can be replaced too. Valterra makes a fitting for 1-1/2" into 3" for the upper part of the "Y". You would need to replace a few fittings to make it happen. This is all a worst case scenario but doable.
 

gotlieb

Active Member
Re: More vavle problems

Yep, this would require replacing almost my entire 3" line as well. The Y adapter is glued to the 3" connector, which is then glued to more curved sections of the 3" pipe. Basically, from this grey tank, all the way to the black tank is nothing but small pieces of curved pipe.

Got to hand it to the Heartland engineers on this one. It is very compact.
 

Gary521

Well-known member
Re: More vavle problems

Try this. Remove the bolts on the upper grey tank valve. Cut the lower grey tank line. I am assuming that the 3" line is part of a "y" that connects to the outfeed side of the 3" black tank dump valve. You already have that valve apart. This entire assembly should come off. If this is case, we are home free. Use a 1-1/2" compression fitting on the place where the line was cut. Cut the line where you have room the put the compression fitting on. You can also use a glue slip coupling to put the cut line back together.
 

Gary521

Well-known member
Re: More vavle problems

I like to use the compression coupling as I don't have to worry about getting the glue thing back together in a couple seconds and can take it apart later if I need to.
 

gotlieb

Active Member
Re: More vavle problems

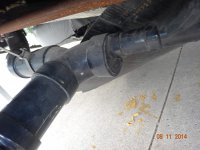
DSC01990.jpg

Not sure if you can make that out, but the right side of the pic is where the grey comes down and is glued to the 3" Y connector. The left side of the pic shows the 3" pipe going up to the black tank.

Any cut would have to be further to the right side of this picture, where there is straight 1-1/2" pipe to connect to grey #2. It would require full replacement of the 3" pipe up to the black tank valve. Could possibly cut the 3" pipe just to the left of the Y, but the picture is deceiving, the pipe is not very long and would still require replacing a lot more pipe than I would like.
 

gotlieb

Active Member
Re: More vavle problems

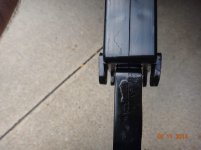
At this point, I think it might be simplest to just cut one side of the clips off the valve assembly. Any thoughts if this would weaken the valve too much? The older valves don't have the clips, so I wouldn't think it would be big problem. The one side already has a bend to it, so probably won't take much more before it snaps off anyway.

DSC01991.jpg
 

gotlieb

Active Member
Re: More vavle problems

Alright, I'm going to start out by apologizing to all. This was a simple fix. This is why I am an actuary and not a mechanic!

If nothing else, I post this to help the next mechanically challenged individual.

It is easier to put the valve back in between the fittings if you disassemble the valve and put it back in between the fittings in pieces. It almost takes 3 hands, but it is much easier than trying to force the fully assemble valve back between the fittings. Think smarter, not harder. Only took a couple of minutes to put the whole thing back in there this way, after trying for hours over the last couple of days. Now, the other two valves should go much faster.

Thanks for all the input.
 
Top