new solar install - question for those who installed panels on roof

esscobra

Well-known member
here what I will be installing:renogy as they have been really great with questions before purchase, had 20% sale , and scored one of there 170ah lithium batteries new for next to nothing-

2 total 170/ah lion batteries
renogy 60 new rover mppt controller
Victron battery monitor
PD9180ALV lithum converter/charger
6 100w panels - 2 sets of 3 in series - then paralleld to charge controller

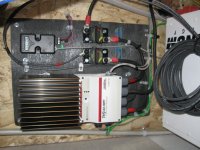
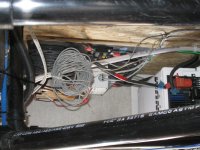
for now planning on mounting controller in large space that behind basement wall - which I removed some to make more useable storage area-so have easy access and visual access as well- relatively centered and right where I plan on bringing down cables from panels - and future plans to batteries ( 1- more )and inverter -for now I will be just replacing the factory batteries in front compartment - as I have not made decision on which brand inverter/charger system I want to go with- and going to continue to use factory inverter for fridge - goals for now are just to learn system and have more power and longer run times for resi fridge during travel and day time so to cut down on generator running time

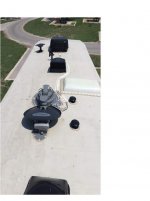
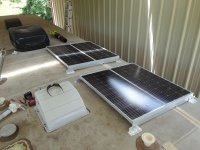
so plans are to mount panels as follows- ( ref roof pic ) 3 towards front - 2 on door side in front of bath skylight and 1 on other side paralleled and 3 all together side by side nearer to middle behind center max air vent ( at bottom of pic ) will run wires down by two vents before skylight in pic - in series then paralled down to controller- techs recommended that this ay the front 3 which in parks will usually have more direct sun will still produce higher output than the three in middle which in rv parks are likely to sometimes be in shade-

my main question is what points and how many mounts are you using per panel ? what type - length screws? and any issues with panels lifting or buffering when traveling at highway speeds?


thanks for help in advance
 

Attachments

  • 8693.jpg
    8693.jpg
    23.6 KB · Views: 174

Routemaster

Well-known member
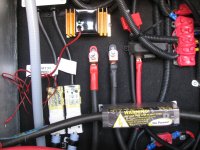
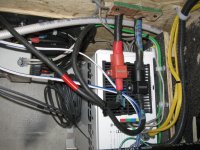
This what I have done so far as well. I put the Tri Star and Mag behind that front wall, so as to keep the cable to the batteries as short as possible. I have four six volts wet deep cycle batteries in the front hold.
Next I have to drop the wires down from the roof when weather gets better.
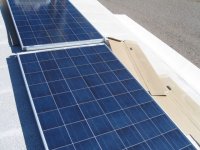
I wanted to know whether there is a weight limit for installing panels on the roof, (the panels in the picture are what I had on the last 5er.) because bouncing down the road could they move the roof down. Should they be mounted on the rafters for better support?
Cheers.
Den.
 

Attachments

  • 2 Canadian Solar 220w Watt 24.JPG
    2 Canadian Solar 220w Watt 24.JPG
    127.4 KB · Views: 185
  • IMG_0275.JPG
    IMG_0275.JPG
    580.1 KB · Views: 169
  • IMG_0294.JPG
    IMG_0294.JPG
    623.3 KB · Views: 160
  • IMG_0295.JPG
    IMG_0295.JPG
    535.3 KB · Views: 156
  • IMG_0247.JPG
    IMG_0247.JPG
    526.1 KB · Views: 148

jbeletti

Well-known member
...my main question is what points and how many mounts are you using per panel ? what type - length screws? and any issues with panels lifting or buffering when traveling at highway speeds?

My panels came with 4 aluminum brackets on them. Your panel mfr may offer mounting brackets. Otherwise, checkout AM Solar.

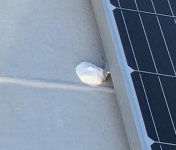
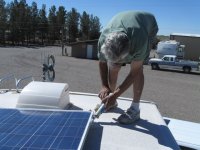
I put a section of Butyl tape on the bottom of the bracket, then I used 3/4" or 1" (I forget which) - stainless steel lag bolts with hex heads. I used a small impact wrench to install the lags through the hole in the brackets, then used Dicor lap sealant to seal the lag head and all around and on top of the bracket.
2019053007260774-IMG_2856.jpg

I made no attempt to mount at roof truss locations. This would likely require a custom panel frame.

More of my install pics
 

travelin2

Pennsylvania Chapter Leaders-retired
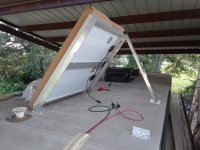
As I mentioned in another post, my panels included 4 pairs of right angle brackets. I chose the mounting location of the brackets to the panel. I attached the panels to the roof with 1” #12 pan head screws then covered same with self leveling dicor. Just by luck I hit a truss on the rear most panel brackets. Additionally I can tilt my panels from either side to capture more sun if have some shade overhead
I mounted the controller, cutoff style marine breakers and inverter on the wall just above the batteries

2aad425edb863e034ed8456eb130c315.jpg


Sent from my iPhone using Tapatalk
 

Semi-Hex

Grand Poobah!
I moved my batteries to behind the basement walls as well. My controller is about two feet from the batteries.
I ran a larger wire to the front compartment to run all the stuff there.

It is supposed to run more efficiently.
 

Routemaster

Well-known member
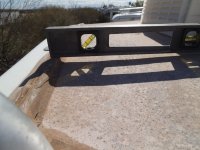
See in the picture when I screwed down the panels in 2013 on my old Keystone the distance was maybe 1/4''at the back end of the top cap. Now 6 years later when I removed them notice the increase drop in the roof line? What do you guys think?
Den.
 

Attachments

  • IMG_1520.JPG
    IMG_1520.JPG
    119.5 KB · Views: 158
  • Roof drop.JPG
    Roof drop.JPG
    654.8 KB · Views: 166

jbeletti

Well-known member
See in the picture when I screwed down the panels in 2013 on my old Keystone the distance was maybe 1/4''at the back end of the top cap. Now 6 years later when I removed them notice the increase drop in the roof line? What do you guys think?
Den.

Den - does your Keystone have wooden roof trusses?

I see a seal void in that pic too (water is the enemy).
 

CarterKraft

Well-known member
View attachment 63490
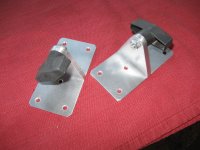
The only suggestion not already covered is whether or not you want your panel fasteners hidden under the panel. I cringed at that idea because any issue with the panel would require some creative wrenching to get the fastners out of the back of the panel or require the feet to be removed from the roof. I built aluminum angle mounts to avoid that and put two panels in a tiltable frame but it's a far more complicated system and it doesn't have to be just by two piece brackets that will allow the panel to be removed and the roof brackets left intact.
These "smart feet" mounts accomplish what I am describing.
These pictures are of my install, it was easier for me than trying to source brackets compatible with my setup and still allow tilting.
20190706_143316.jpg20190705_182114.jpg

I used 3/4" long 5/16" lag bolts to attach the brackets to the roof. I predrilled the holes and applied dicor around the holes under the bracket then after tightening down I covered the brack perimeter and screw with more dicor.
I tried to hit the trusses or get close as there seems to be a decent amount of "spring" in the panel between trusses and I didn't want that force to be multiplied while bouncing down the road.
 

travelin2

Pennsylvania Chapter Leaders-retired
[h=3]Will my solar panels generate electricity during cloudy, rainy, or snowy days? What about at night?[/h]

Cloudy & rainy-minimal, maybe none
Snow covered-zippo
Nighttime-zero
Include heavy shade under a tree canopy-not so much


Sent from my iPhone using Tapatalk
 

Silverado23

Iowa Chapter Leaders
Cloudy & rainy-minimal, maybe none
Snow covered-zippo
Nighttime-zero
Include heavy shade under a tree canopy-not so much


Sent from my iPhone using Tapatalk

It really depends on the type of solar panel that you have also.
My panels generate pretty good power in cloudy conditions and more reduced power in rainy and shaded conditions including covered with some snow..
How much power depends on panel type, configuration and weather conditions, etc..
 

Routemaster

Well-known member
I have a question about using "Unistrut" for mounting solar panels on our LM's there was a camper her and he dad installed two lengths of Unistrut's on his 5er to mount the panels he had.
Now being when I had the Everest I found mounting mine panels in the middle at the back end of the coach I believe the roof had dropped doors on the overheads in the coach had misaligned one of the tell tails.
My thoughts are that the feet's on the panels did not have enough of a foot print to take the weight.. thoughts.
I made some "L" brackets out of 2'' alloy with a larger foot print should I try to place these over or close to trusses and closer to the out side walls than over the middle of the coach I do have concerns.
Den.
 

Attachments

  • Panel mount.JPG
    Panel mount.JPG
    835.2 KB · Views: 79
Last edited:

diddlyv

Member
My plan for mounting panels on my 2016 Elkridge E-292 Extreme Lite is to use 2 10 foot strut channels on either side of the RV behind the crest line and attach 2 58 x 28 inch 210 or 215 watt panels hooked in series down either side of the trailer and probably drop the wires either down the sink vent or put some kind of a drill a hole close to vent and use some kind of roof gland to drop the 2 pairs of wires down inside and connect to the SCCs. I am having difficulty finding out what my roof trusses are made of. If they are aluminum I need one kind of bolt, if they are wood another kind of bolt. Figuring Over Kill is a good thing will also use the 2 sided butyl tape on the strut channel before mounting and dicor in pilot holes and over the fasteners when attaching the strut channel. I want to be sure of 2 things the roof will not leak and the solar panels do not magically become kites. Only decision left really is what strut channel to buy. Gold galvinized or Painted strut channel.to decrease the likely hood of rust stains. Do any of you know how the roof of the E-292 Extreme Lite is constructed
 
Last edited:

Routemaster

Well-known member
I just made up angle alloy brackets back to back and held them down in the wood with #8x1" long S/S screws as above.
 

sjandbj

Well-known member
Several years ago I mounted 6 panels using aluminum angle brackets that I made. Using 10 struts will add a bunch of unwanted weight. Keeping the weight down as well as keeping the panels as close to the roof as possible is important. If you use small lag bolts and then cover the brackets with Dicor lap sealant the panels should stay put. Mine have been on over 6 thousand miles of highway speeds with no trouble.
 

taskswap

Well-known member
This is my personal opinion, do what you will. But I agree with sjandbj. Rails make sense on a house because it makes installation faster and it's easier to align 20 panels in a neat grid. Asphalt roofs are hard to waterproof properly, so by preinstalling the rail you can get that out of the way and then attach your panels. Also over 20-30 years of home solar system ownership with 1-2 dozen panels you're going to get a failure or two, and rails makes them easy to replace quickly.

On an RV it's just dead weight. Bear in mind even a non-walkable roof is designed to handle a snow load and that's much more (perhaps 10x more) than your panels are going to place. And rails are just a temptation to mount multiple panels to one set of feet, potentially increasing the effective weight on the feet you do have. Now if you do get snow, all that snow load will be sitting on your panels instead of your roof, and they'll bear it down to the rails which will bear it to the mounting feet you use. Which sure, are now on studs (assuming you hit studs everywhere) but are greatly increasing that load to a small set of pressure points, instead of dividing it more evenly as when all the panels have their own feet (and four feet bear only a single panel's weight). If you want to go the extra mile, every panel I've seen has 8-12 mounting holes and they're easily drilled to add more. You could either just drill them to put the feet where your studs are, or add more feet. I think it's overkill but...

Again, not a professional but another thing, I'm not a huge fan of putting butyl rubber under the mounting feet. Butyl flows, and it can flow for months after you install it, especially if you get hotter days. You do NOT want any flex or bounce in your panels because if that happens, the vibration will start weakening the joint as you drive. As it does, it snowballs and gets worse and worse until the panels are actually bouncing and now they're damaging the roof. IMO butyl tape can trigger this by flowing "out" from under the joint, and providing space under it for the vibration to begin.

I like to put a small bead of Dicor (the non-sag kind is convenient for this step) under each foot then lay the panel down and let it settle for a few minutes. Then screw it down and all the excess will flow out immediately. The only purpose here is to fill those micro voids that a textured roof always has so the "foot" has a totally level bed to sit on. Then I flood the top liberally with more Dicor (the self leveling variant now), exactly as you see done with other vents/antennae/roof penetrations from factory installs.
 

diddlyv

Member
Living in AZ snow load is not a factor approximately 99.9995% of the time. Spent way to much time in the Infantry wet cold tired and hungry without having a choice to willingly subject myself to those conditions at my age. Your advice about the butyl rubber appears to be sound. The solar panels are 34 lbs each. I received a call from Heartland explaining the roof was essentially constructed with 4ft x roof width aluminum frames filled with styrofoam and apparently no cross ribs. He did not state there was any plywood decking at all. Looking at the roof it appears that there are approximately 2 inch wide frame elements every 4 feet. This will allow a total of 5 or 6 lags per 10 ft strut channel. I will use my stud finder to verify no cross ribs between the visible frame elements. (the roof looks considerably whiter where I presume the ribs are) Not sure I understand the Mounting feet for the strut channel. My plan was mount the strut channel directly on the roof, with or without the butyl tape and every where I put a lag use dicor. If there are indeed no cross members between the 48 inch spaced frame members that would mean mounting a panel between 2 frame elements then having a large gap and mounting the next panel to the frame element 48 inches away. I certainly don't want to anchor anything into styrofoam nor do I want to place mounting squares on the inside of the trailer to solidly anchor the panels thru the whole roof.
 
Top