Preparing For Incoming Cold Weather

1BRAVO9

Member
As you can see I am a novice and very new to this so forgive my ignorance.

I just returned from a trip with my trailer and before leaving I drained everything and got out as much water out of the lines as possible.

I open all of the faucets, flushed the toilet, and of course drained the grey and black water tanks. I also drained as much as I could from the water heater by opening the pressure release valve.

Its going to get in the high 20s where I lived for a day or so and I'm wondering if I need to winterize it if I plan on using the trailer again in a few weeks?

I don't have the means to blow out lines but if absolutely necessary I guess I could find a way.

What are your thoughts?

Thanks in advance.
 

jerryjay11

Well-known member
Draining alone isn't enough to protect from freezing. There is always residual water in system.

If you don't have a compressor to blow out lines at least go out and purchase some RV antifreeze. Add it to the freshwater tank and run it through all faucets and flush toilet until you see antifreeze coming out. Alternate method is use the pump siphon hose to draw antifreeze from the bottles and flush all faucets and toilet. Don't forget the shower. Add antifreeze to each drain and both waste tanks to ensure nothing freezes there. I normally purchase 4 bottles antifreeze to make sure I have enough. Before doing this first close the inlet and outlet valves to the hot water tank and open the bypass valve. This is so you won't add antifreeze to the hot water tank.

If you go to the Resources link above, you will find a more comprehensive set of instructions, though it may be a bit confusing for beginners. At least it was way too much reading for a straightforward procedure which I've done many times. But if you have a big rig then I would advise you to download those instructions. My instructions are for my 30-foot camper.
 

david-steph2018

Well-known member
As you can see I am a novice and very new to this so forgive my ignorance.

I just returned from a trip with my trailer and before leaving I drained everything and got out as much water out of the lines as possible.

I open all of the faucets, flushed the toilet, and of course drained the grey and black water tanks. I also drained as much as I could from the water heater by opening the pressure release valve.

Its going to get in the high 20s where I lived for a day or so and I'm wondering if I need to winterize it if I plan on using the trailer again in a few weeks?

I don't have the means to blow out lines but if absolutely necessary I guess I could find a way.

What are your thoughts?

Thanks in advance.
I also drained as much as I could from the water heater by opening the pressure release valve.
By doing this, you didn't drain water from the water heater. You need to remove the plug or anode rod to drain the water heater. You also forgot the outdoor shower to winterize. The cost of winterizing it, is less than the cost of repairing items that broke.
 

taskswap

Well-known member
^^^ what they said, and I didn't see anyone mention your low-point drain. Nearly every modern camper has one. They're often confused with the drain for your fresh water tank but are separate. Ours are a ways back near the front axle which makes them easy to miss if you don't know to look for them.

Also, as a personal fan of the "air compressor" approach, if you do that, don't forget to remove the small plastic filter bowl on your water pump.
 

jerryjay11

Well-known member
By doing this, you didn't drain water from the water heater. You need to remove the plug or anode rod to drain the water heater. You also forgot the outdoor shower to winterize. The cost of winterizing it, is less than the cost of repairing items that broke.
Correct, I forgot to mention those! And it was the first thing I noticed from original post. Good catch!
 

cookie

Administrator
Staff member
If your looking at a day of temps in the twenty's just leave the heat and water heater on for a day.
Just another thought.

Peace
Dave
 

1BRAVO9

Member
Thanks everyone for the feedback, you don't know how much I truly appreciate it.

I think I have a blow out valve and a compressor now so I should be able to blow it out before the cold temperatures hit.

As far as the water heater, you are right the pressure valve will not drain the tank, I will remove anode and drain it thoroughly.

Taskswap, that's why I'm a novice 😁, I didn't even know the low-point drain existed. I had to look it up. I will definitely drain it as well now that I know.

As far as the fresh water tank, I haven't used it and I know it hasn't been used since the last time it was drained and blown out, and so the pump hasn't been used. If I'm comfortable with knowing it hasn't been used is there really a needed to touch it?

Also, I don't have an outdoor shower.

If your looking at a day of temps in the twenty's just leave the heat and water heater on for a day.
Just another thought.

Peace
Dave

That is definitely a good back up plan. I have a state park less than 5 miles from my house. They have winter rates for $25 a night. I was thinking of taking it there and setting it up where I can heat the entire camper.

Am I missing anything?
 

taskswap

Well-known member
If you're going to use compressed air for this, I have a few suggestions. I am NOT an expert but just sharing the process that works for me.

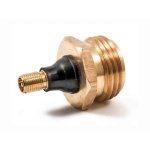
First, you want the valve that has a schrader-style (bicycle/car tire) valve on one side and 3/4 GHT (garden hose thread) on the other. There are a million of these on Amazon and they're all the same. This is what mine looks like:


Next, you want an air compressor with a long enough hose to reach the valve when it's installed on your city water inlet port. If you have an adjustable one and can set it to 35-40 psi that's ideal but not necessary. A "tire inflator" like the kind you find cheaply at Walmart or in car emergency kits WILL NOT work. You're looking for volume, not pressure, so ideally something with a tank, no matter how small.

Given the above here's my process:
1. Adjust bypass valves behind HWH. Usually there are three - you close a pair of valves on the HWH inlet and outlet, and open a valve usually on a short bypass between the inlet/outlet, bypassing the HWH.
2. Remove anode and drain HWH. Inspect anode, order new one if <50% left. They can go until they're just a wire left, but they're cheap. Why risk it.
3. Reinsert anode into HWH hole loosely, to keep bugs out (and to keep it clean).
4. Remove shower heads and let their hoses dangle (shower heads are really hard to blow out completely and their hoses trap water).
5. Connect and turn on air compressor. Set to 35-40psi. If this is not doable, open one faucet somewhere before turning it on.
6. Open each faucet cold then hot one at a time. After the water is nearly all out, turn it off and count to 10 then open it again. Repeat until only air comes out.
7. Do this for each faucet. Don't forget your outdoor shower and outdoor kitchen if you have one. And don't forget the toilets!
8. Go back around one last time.
9. Shut off air compressor.
10. Open all low point drains, and turn on one faucet in the camper. Let gravity do its thing.
11. Remove and empty the filter bowl on the water pump. While it's off, tilt the pump a bit to get out any remaining water.
12. Dump black and grey tanks.
13. Pour pink antifreeze into each sink, enough to fill each trap.
14. Pour half of whatever's left over into each toilet, and flush. This gets antifreeze down to the gate valve under the tank, helping protect it.
15. Close low point drains (bugs).

In spring I run a quarter bottle of RV water system sanitizer through the fresh tank with the first fillup. I've never had a problem, but maybe it's because I never skip this step.

It sounds like a long list but I can winterize my camper in <10 min. I make no promises for your own use, but I've never had a line or faucet develop a leak using this method. There are plenty of fans of "pink stuff everywhere" and that's probably the safest answer in the long run, but IMO this is actually faster, uses less antifreeze to winterize, and wastes less water later when you have to flush out your lines in spring. YMMV.

Bear in mind: it's not necessary to get every droplet of water out of the system. What damages water systems when they freeze isn't just the presence of water, it's that water having nowhere to expand into. Try this. Take two plastic water bottles. Fill one COMPLETELY to the top and close its cap tightly. Fill the other one to 90% - just an inch or so of air space. Now freeze both. The completely full bottle (simulating a full water system) will burst (or at least expand and make it very obvious this was a bad idea). The one filled to 90% will not.

Water expands about 9% when it freezes. If there is air space for it to do that, it won't break anything. That's why it's so crucial to get it out of tight spaces (full water lines, the HWH, faucets/shower heads) because those don't normally have extra space for it to expand into. But if there is a small amount left in your lines, let's say because there's some low point, that won't hurt anything. It will be able to expand left/right along the water line. You just need to get the majority of it out.
 

1BRAVO9

Member
If you're going to use compressed air for this, I have a few suggestions. I am NOT an expert but just sharing the process that works for me.

First, you want the valve that has a schrader-style (bicycle/car tire) valve on one side and 3/4 GHT (garden hose thread) on the other. There are a million of these on Amazon and they're all the same. This is what mine looks like:


Next, you want an air compressor with a long enough hose to reach the valve when it's installed on your city water inlet port. If you have an adjustable one and can set it to 35-40 psi that's ideal but not necessary. A "tire inflator" like the kind you find cheaply at Walmart or in car emergency kits WILL NOT work. You're looking for volume, not pressure, so ideally something with a tank, no matter how small.

Given the above here's my process:
1. Adjust bypass valves behind HWH. Usually there are three - you close a pair of valves on the HWH inlet and outlet, and open a valve usually on a short bypass between the inlet/outlet, bypassing the HWH.
2. Remove anode and drain HWH. Inspect anode, order new one if <50% left. They can go until they're just a wire left, but they're cheap. Why risk it.
3. Reinsert anode into HWH hole loosely, to keep bugs out (and to keep it clean).
4. Remove shower heads and let their hoses dangle (shower heads are really hard to blow out completely and their hoses trap water).
5. Connect and turn on air compressor. Set to 35-40psi. If this is not doable, open one faucet somewhere before turning it on.
6. Open each faucet cold then hot one at a time. After the water is nearly all out, turn it off and count to 10 then open it again. Repeat until only air comes out.
7. Do this for each faucet. Don't forget your outdoor shower and outdoor kitchen if you have one. And don't forget the toilets!
8. Go back around one last time.
9. Shut off air compressor.
10. Open all low point drains, and turn on one faucet in the camper. Let gravity do its thing.
11. Remove and empty the filter bowl on the water pump. While it's off, tilt the pump a bit to get out any remaining water.
12. Dump black and grey tanks.
13. Pour pink antifreeze into each sink, enough to fill each trap.
14. Pour half of whatever's left over into each toilet, and flush. This gets antifreeze down to the gate valve under the tank, helping protect it.
15. Close low point drains (bugs).

In spring I run a quarter bottle of RV water system sanitizer through the fresh tank with the first fillup. I've never had a problem, but maybe it's because I never skip this step.

It sounds like a long list but I can winterize my camper in <10 min. I make no promises for your own use, but I've never had a line or faucet develop a leak using this method. There are plenty of fans of "pink stuff everywhere" and that's probably the safest answer in the long run, but IMO this is actually faster, uses less antifreeze to winterize, and wastes less water later when you have to flush out your lines in spring. YMMV.

Bear in mind: it's not necessary to get every droplet of water out of the system. What damages water systems when they freeze isn't just the presence of water, it's that water having nowhere to expand into. Try this. Take two plastic water bottles. Fill one COMPLETELY to the top and close its cap tightly. Fill the other one to 90% - just an inch or so of air space. Now freeze both. The completely full bottle (simulating a full water system) will burst (or at least expand and make it very obvious this was a bad idea). The one filled to 90% will not.

Water expands about 9% when it freezes. If there is air space for it to do that, it won't break anything. That's why it's so crucial to get it out of tight spaces (full water lines, the HWH, faucets/shower heads) because those don't normally have extra space for it to expand into. But if there is a small amount left in your lines, let's say because there's some low point, that won't hurt anything. It will be able to expand left/right along the water line. You just need to get the majority of it out.
Talk about coincidence....

I looked online and really all I saw where these.

cam36143-2.jpg

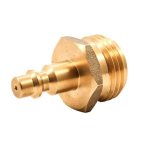
So I went to the local RV supply shop to get one but all they had was this.

rv-36153_2.jpg

Initially I was very disappointed but then I saw your suggestion and then felt a little better about it.

After using it I think you were right, the one with the valve stem on it was much more convenient.

So I did everything you said, except that I forgot to disconnect the shower head/hose, and I'll do that today.

Thanks for the suggestions!
 

taskswap

Well-known member
Funny you should mention it, I actually have both. I've always used the schrader-valve style but I've had winter trips where I've winterized/de-winterized multiple times on one trip (on a road trip to Yellowstone we'd camp somewhere temperate at a campground with water and want to shower and do dishes, but then winterize for safety while driving through the mountains, and back and forth once or twice more). That got really annoying so I picked up the quick-connect style just to play with it. It didn't go well. The other "side" of the quick-connect is a fairly beefy brass connector and they don't bother to make them lightweight because they're mostly used for contractors connecting air tools, where durability matters. I could see the air hose connection putting stress on the plastic city-water connection and didn't feel comfortable continuing to use it. YMMV.
 

fluffywhitedogs

Active Member
As far as the fresh water tank, I haven't used it and I know it hasn't been used since the last time it was drained and blown out, and so the pump hasn't been used. If I'm comfortable with knowing it hasn't been used is there really a needed to touch it?
The check valve that prevents water from flowing into the freshwater tank while on the city water connection is a *very* common failure point, and I would assume replacing a cracked one would be an expensive fix, so I would never assume the tank is empty without checking. It doesn't sound like it'll get cold enough for that, but just in case...
 

1BRAVO9

Member
The check valve that prevents water from flowing into the freshwater tank while on the city water connection is a *very* common failure point, and I would assume replacing a cracked one would be an expensive fix, so I would never assume the tank is empty without checking. It doesn't sound like it'll get cold enough for that, but just in case...

Thankfully I took your advice.
 
Top