SueJean
Active Member
Greetings & Blessings from Alaska!
After 2 1/2 years of looking at the interior of our "Nest", I've finally worked up the courage to make it my OWN space.
Part of my motivation is in my efforts to do all that I can to keep us as warm as possible during the winter and the other part comes from that deep seated desire to make my interior a reflection of "me".
I've started with the windows in the main living area. First step: ripping out all those boring, ugly (in my opinion) window valances (?). They took up too much room and the color was blah and they had to go. This was also motivated by the fact that I had more than 50% of my day/night shades with broken strings and the task of restringing them was too much for me. I would have had to take the valances off to do that job anyway. I've looked at the directions several times and figured that this was a job for someone with a lot more "string" talent than I have.
(I actually gave up "Girl Scouts" when we started working on some stupid macrame project. Way beyond me! )
)
After the valances came off and "flew into the trash", I took off all the day/night shades. (This was a bit intimidating to me also as I had a hard time with some of the screws and is also part of the reason I've been putting the job off. I figured I was going to be damaging the valances in taking them off and at first, I was thinking I would put them back on. Once I got past that idea, taking them off didn't matter so much to me.) Some of the screws were almost impossible to get out and I had to enlist help more than once. It was clear pretty quickly that if I did want to put them back I was going to have to drill new holes for some of them.
YAY! I loved the openness and the clean lines of the windows! We have some beautiful views in our current location of the mountains, glaciers and the Bay. If it wasn't for the cold and the privacy issue, I'd love to be able to leave the windows bare.
However, DH gets a little nervous with the "privacy issue" and the cold is a serious consideration. Gotta save that propane! Especially as it's a little more pricey up here than down in the lower '48!
Next step: I bought some foam rubber insulation that comes in thin strips on a roll to put around the windows. There's a nice channel/groove around the outside edge of our windows that it fits into perfectly. This gives me a surface to work with that's not metal and it lifts the plastic shrink film away from the window a bit giving me a better seal.
After the foam was in place, I put the shrink wrap plastic over the windows to keep the interior moisture away from the windows and the outside cold away from us. I had some problems with this as the tape that came with the shrink wrap window kits didn't want to stick to the wallpaper or the window frame and I had to use extra tape. My main connection for the shrink wrap was to the top surface of the foam insulation. I added pieces of clear packing tape where needed.
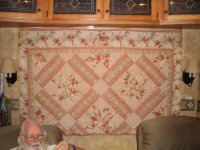
Finally, I went to the Salvation Army store and bought a large quilted bedspread with two pillow shams. This part is still in process so you'll have to wait for the pictures. Then I went to a hardware store and bought a box of velcro strips (a large box! ) and then I went to a quilt shop and bought this insulating fabric with a foil layer in it that I could sew into my "window quilts".
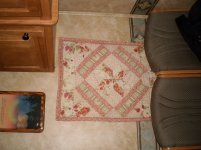
The two pillow shams made one window covering each for the windows at each end of my large slider and the bedspread makes two coverings - one for my large back window and another for the window over my couch.
When I want to "open" the larger windows, I just peel them from the velcro at the top and sides and let them lie down on the floor below. I have an idea about how to roll them up on a piece of wood used for trim, but I'm in a hurry so I'll add that later. The smaller windows, I just pull their little quilt covers off and lay them on the back edge of the couch. This opens up my view for the daytime.
We already have a graphic on our back window for our ministry that is similar to the ads you see on buses and such that keeps people from seeing inside during the daytime so we still have our privacy with the quilt off.
Anyway, this is currently a "work in progress' so I've only got a sample here of what's going on.
I can say that this "little" project and perusing this thread has opened up my imagination to a lot more little changes that I will be making as time and money allows. As many of you have already said, "this is my home and it's time to make it a little more "homey"!" :angel:
BLessings!
SueJean
P.S. Just ignore the cute "cowboy" there in the corner of my pic. He didn't know what I was doing or he would have made a "dive" to get out of the way. Sorry about the 90 degrees off on the pic on the right. I did "tip" it in my computer before I uploaded it, but apparently, it didn't "stick"..


After 2 1/2 years of looking at the interior of our "Nest", I've finally worked up the courage to make it my OWN space.
Part of my motivation is in my efforts to do all that I can to keep us as warm as possible during the winter and the other part comes from that deep seated desire to make my interior a reflection of "me".
I've started with the windows in the main living area. First step: ripping out all those boring, ugly (in my opinion) window valances (?). They took up too much room and the color was blah and they had to go. This was also motivated by the fact that I had more than 50% of my day/night shades with broken strings and the task of restringing them was too much for me. I would have had to take the valances off to do that job anyway. I've looked at the directions several times and figured that this was a job for someone with a lot more "string" talent than I have.
(I actually gave up "Girl Scouts" when we started working on some stupid macrame project. Way beyond me!
After the valances came off and "flew into the trash", I took off all the day/night shades.
YAY! I loved the openness and the clean lines of the windows! We have some beautiful views in our current location of the mountains, glaciers and the Bay. If it wasn't for the cold and the privacy issue, I'd love to be able to leave the windows bare.
However, DH gets a little nervous with the "privacy issue" and the cold is a serious consideration. Gotta save that propane!
Next step: I bought some foam rubber insulation that comes in thin strips on a roll to put around the windows. There's a nice channel/groove around the outside edge of our windows that it fits into perfectly. This gives me a surface to work with that's not metal and it lifts the plastic shrink film away from the window a bit giving me a better seal.
After the foam was in place, I put the shrink wrap plastic over the windows to keep the interior moisture away from the windows and the outside cold away from us. I had some problems with this as the tape that came with the shrink wrap window kits didn't want to stick to the wallpaper or the window frame and I had to use extra tape. My main connection for the shrink wrap was to the top surface of the foam insulation. I added pieces of clear packing tape where needed.
Finally, I went to the Salvation Army store and bought a large quilted bedspread with two pillow shams. This part is still in process so you'll have to wait for the pictures. Then I went to a hardware store and bought a box of velcro strips (a large box!
The two pillow shams made one window covering each for the windows at each end of my large slider and the bedspread makes two coverings - one for my large back window and another for the window over my couch.
When I want to "open" the larger windows, I just peel them from the velcro at the top and sides and let them lie down on the floor below. I have an idea about how to roll them up on a piece of wood used for trim, but I'm in a hurry so I'll add that later. The smaller windows, I just pull their little quilt covers off and lay them on the back edge of the couch. This opens up my view for the daytime.
We already have a graphic on our back window for our ministry that is similar to the ads you see on buses and such that keeps people from seeing inside during the daytime so we still have our privacy with the quilt off.
Anyway, this is currently a "work in progress' so I've only got a sample here of what's going on.
I can say that this "little" project and perusing this thread has opened up my imagination to a lot more little changes that I will be making as time and money allows. As many of you have already said, "this is my home and it's time to make it a little more "homey"!" :angel:
BLessings!
SueJean
P.S. Just ignore the cute "cowboy" there in the corner of my pic. He didn't know what I was doing or he would have made a "dive" to get out of the way.


Last edited:
