The Perverbial Rotted Floor due to Water

Robo

Member
I spent a few hours scouring this forum for information that would assist me in replacing two significant floor areas in my 2011 MPG 181. Like I've read so many of the buyers did here, I bought a travel trailer that had issues that I should have been able to diagnose and consider in my purchase. However, to my embarrassment and chagrin, I missed them. I haven't started tearing into the floor yet as I want to sniff out and snuff out the leaks first to mitigate further water damage. Not much sense in replacing a floor that will just get wet again in the next rain or trip through a rainstorm.

I did get some great information herein respective to what may be leaking and how to test for and repair the leaks. I was hoping to gain some insight into the specifics of the ripout and replacement of the floor itself like: Is it from the bottom to top membrane, OSV board, styrofoam, OSV board and vinyl floor covering? Can you remove and replace certain floor areas without dismanteling and reinstalling the bathroom floor by simply cutting around it? (it doesn't seem to be leaking there) but I am prepared to see that the rot has migrated beyond the "soft" areas in the floor which are primarily under the dinette in the rear and the bed area at the front.

Anyway, any help or guidance would be greatly appreciated. I do plan on taking pictures and posting them during this project to share with those who may be in the same boat, or in this case, trailer.

thanx,
robo
 
Last edited:

danemayer

Well-known member
Hi Robo,

Welcome to the Heartland Owners Forum.

Sorry to hear that you have problems with the flooring. Hopefully another MPG owner has some experience with the repairs you're undertaking and can give you some guidance.
 

Garypowell

Well-known member
Robo,

I did not have your model but let a leak go too long on a previous Big Horn. Let me try and remember the process as we had that “sandwiched” 6” thick floor.

1. Any way I could I removed the flooring. Had both carpet and tile. Made the area larger than the soft spot. It was about 2 foot by 3 foot section.

2. Removed the easy part of the wood until I got close to the edge. Then had to use a circular saw or chisel to remove all the way back to good wood. There was one structural “floor Joyce” and once I found it I tried not to cut into it.

3. Around the edges, in several places, I used short pieces of 2 by 2 that I forced back under the good floor left and screwed them in place (counter sinking the holes) such that several inches of it extended out into the opening.

4. Once that was done cut the odd shaped piece to put in new. This was probably the hardest part since it was an odd shape.

5. Slathered glue everywhere I could and put the new piece in and counter sunk screws in to hold it in place.

6. Replaced the foam pad and just laid the carpet and tile back down.....unless they take it apart the new owners will never know there was a problem.

The whole thing is more time consuming than difficult. I was traveling full time when this happened so it was a pain.....but got it done in about 5 - 6 hours.
 

Robo

Member
Hi Robo,

Welcome to the Heartland Owners Forum.

Sorry to hear that you have problems with the flooring. Hopefully another MPG owner has some experience with the repairs you're undertaking and can give you some guidance.

Thanx, I hope so too. It's obvious by the amount of traffic regarding this issue that there is a good chance that, sooner or later, there is a chance that TT owners may have to deal with this.
 

Robo

Member
Robo,

I did not have your model but let a leak go too long on a previous Big Horn. Let me try and remember the process as we had that “sandwiched” 6” thick floor.

1. Any way I could I removed the flooring. Had both carpet and tile. Made the area larger than the soft spot. It was about 2 foot by 3 foot section.

2. Removed the easy part of the wood until I got close to the edge. Then had to use a circular saw or chisel to remove all the way back to good wood. There was one structural “floor Joyce” and once I found it I tried not to cut into it.

3. Around the edges, in several places, I used short pieces of 2 by 2 that I forced back under the good floor left and screwed them in place (counter sinking the holes) such that several inches of it extended out into the opening.

4. Once that was done cut the odd shaped piece to put in new. This was probably the hardest part since it was an odd shape.

5. Slathered glue everywhere I could and put the new piece in and counter sunk screws in to hold it in place.

6. Replaced the foam pad and just laid the carpet and tile back down.....unless they take it apart the new owners will never know there was a problem.

The whole thing is more time consuming than difficult. I was traveling full time when this happened so it was a pain.....but got it done in about 5 - 6 hours.

Thanx Gary. That helped. Made the work seem not as intimidating as I thought it to be.
 

cookie

Administrator
Staff member
While I haven't worked on a MPG I have repaired a Jayco floor and more.
This afternoon I will upload a couple videos to YouTube and link them here. Might be of some help.
All I can say from my experience is be prepared. You really don't know the extent of damage till you tear up the floor covering.

Peace
Dave
 

JohnDar

Prolifically Gabby Member
Reading the fixes, let me add that you should seal any edges of plywood that are along the outside perimeter. Heavy paint, Gorilla tape, whatever. Do not leave raw edges.

Pay particular attention to areas covered by wheel skirting. It’s probably wide open behind the ragged sheet metal behind it.


Sent from my iPhone using Tapatalk
 

cookie

Administrator
Staff member
Thanx, I hope so too. It's obvious by the amount of traffic regarding this issue that there is a good chance that, sooner or later, there is a chance that TT owners may have to deal with this.
Here are a couple videos of a rotted floor and more repair.
Although it was not an MPG the basics should be similar.
Keep in mind that this project was extreme and hopefully yours will not be as bad.

Vid 1

Vid 2

Vid 3

Vid 4

Vid 5

Vid 6

Hope this gives you a little confidence going forward.
Good luck.

Peace
Dave
 

Robo

Member
Reading the fixes, let me add that you should seal any edges of plywood that are along the outside perimeter. Heavy paint, Gorilla tape, whatever. Do not leave raw edges.

Pay particular attention to areas covered by wheel skirting. It’s probably wide open behind the ragged sheet metal behind it.


Sent from my iPhone using Tapatalk

Thanx for the tip John.

- - - Updated - - -

Here are a couple videos of a rotted floor and more repair.
Although it was not an MPG the basics should be similar.
Keep in mind that this project was extreme and hopefully yours will not be as bad.

Vid 1

Vid 2

Vid 3

Vid 4

Vid 5

Vid 6

Hope this gives you a little confidence going forward.
Good luck.

Peace
Dave

Wow, what a mess! Thanx for the reference material.
 

Robo

Member
37F9B82B-0846-4F65-A05B-0130EDB9CD86.jpg
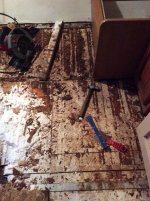
Started the floor ripout. I’ve got a question that I am hoping someone may be able to help me with. The picture attached shows the exposed alum angle that the 1/2” rotted Particle board was attached to. They run from one side of the trailer to the other but they are 50.5” apart! That seems like a large gap for frame spacing. There must be some intermittent support but I can’t tell from looking under the trailer as I am trying to keep the rubber vapor barrier intact. I am also trying to keep from removing the styrofoam for fear of damaging the barrier from the topside. Is there someone on this forum that might have some drawings or photos that might help give me some insight into the floor?

Also, if someone tells you that a soft spot in the floor of an RV that you are considering to purchase RUN, RUN like the wind.
 

cookie

Administrator
Staff member
That OSB was most likely one sheet running front to rear and laminated so that would explain the spacing.
You might consider running a piece or two of angle iron between those supports.

Peace
Dave
 

JohnDar

Prolifically Gabby Member
Have you tried using a stud finder (one that can also detect metal studs) to see if there is anything under that span? 50” seems way to much for just a sheet of 1/2” particle board flooring.

If there is a floor heat register, pull it out and see just how thick the floor actually is. That particle board may just be the top of a thicker laminated floor structure supported between the aluminum I-beams


Sent from my iPhone using Tapatalk
 

Robo

Member
That OSB was most likely one sheet running front to rear and laminated so that would explain the spacing.
You might consider running a piece or two of angle iron between those supports.

Peace
Dave

Thanx Dave. That's a great Idea.
 

Robo

Member
Have you tried using a stud finder (one that can also detect metal studs) to see if there is anything under that span? 50” seems way to much for just a sheet of 1/2” particle board flooring.

If there is a floor heat register, pull it out and see just how thick the floor actually is. That particle board may just be the top of a thicker laminated floor structure supported between the aluminum I-beams


Sent from my iPhone using Tapatalk

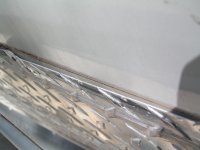
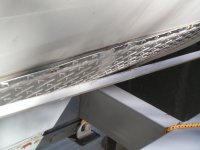
It's a small trailer (19' - 2011 MPG 181) without any floor ducting. I was just hoping that someone had similar experience with a comparable model. I believe I have found the source of the water intrusion. It's primarily coming in at the seam on the front of the trailer where the diamond plate rock guard meets the front and rear trailer wall. The diamond plate OVERLAPS the composite wall material from the bottom up and a piece of molding covers that seam. This allows the water to essentially flow underneath the diamond pate if it can get past the molding. The manufacturer didn't even run a bead of sealant where the two meet. In my case at least one of the previous owners or the manufacturer, had run a bead of silicone on the bottom ledge of the trim which essentially created "trough" in which to catch the rainwater (go figure).

Additionally, I am sure I am getting water around the slideout. The rubber gasket is broken on the top and I am probably getting water at the bottom as well.

If someone could give me an email address that I might be able to contact Heartland (if they even mess around with questions concerning a 9 year old product that has been discontinued) I would be appreciative. Thank you to anyone reading my diatribes. robo

PICT0411.JPGPICT0412.JPG
 
Last edited:

danemayer

Well-known member
If someone could give me an email address that I might be able to contact Heartland (if they even mess around with questions concerning a 9 year old product that has been discontinued) I would be appreciative. Thank you to anyone reading my diatribes. robo

I think you'll do better to call Heartland Customer Service at 877-262-8032 / 574-262-8030. Have your VIN # ready.

On a 9 year old product, you're probably right, help, if any, would be pretty limited. I'd be surprised if any of the current Customer Service or Engineering staff has any familiarity with your MPG. But you never know. And phone calls don't cost much.
 

Robo

Member
I think you'll do better to call Heartland Customer Service at 877-262-8032 / 574-262-8030. Have your VIN # ready.

On a 9 year old product, you're probably right, help, if any, would be pretty limited. I'd be surprised if any of the current Customer Service or Engineering staff has any familiarity with your MPG. But you never know. And phone calls don't cost much.

Thanx for the info.
 

wdk450

Well-known member
Thanx Bill.

Just as a follow up: My personal number one choice for sealing out water intrusion is Eternabond tape. Since i have always used it on the white rubber roof, appearance aesthetics haven't come into question for this. There are various widths and lengths available on E-Bay, Amazon, and other suppliers. In my opinion this thick, rubberized, highly adhesive tape is a modern era replacement for caulk, that the RV industry has so little faith in that they require you to inspect the caulk seams every 90 days to maintain your warranty. Eternabond is warrantied for something like 11 years. I don't know if you can paint it, though.
 
Top