Warranty Repairs

Uncle Rog

Well-known member
tdh, That was a typo "hot" in the sun was intended, Although the Crow Bar in Shoshone....never mind. You do not need 4 vents, it is "code", code for what I have no idea. I am in for my last trip as a family member, soon to be orphaned, and I have instructed the shop to shim the tank on the DS 1", fully support and plug the ODS vents and re direct the others. I copied your stereo idea, where did you finf the the key storage? Gotta go Suzi is bringing in limes so I hafta go to work....Guacomole and Margarita's...Fix that tank.........UR
 

svd

Well-known member
TDH,
I wondered the same thing about the tank, and figured that because it covers such a large area and is so shallow, that the slightest deflection when filling it could cause air pockets in the corners and reduce water capacity.
 

tdharley

Well-known member
I knew if I slept on it I would come up with some ideas.

I am going connect one vent to the outlet on the fill, after I find out what is piped there now. I am then going to install an adjustable pressure releif valve on one outlet (just in case)& plug the last.

Also I am going to remove the screws on one side of the angle iron that is supporting the tank and set it up higher for pitch instead of chocking it. I am also going to lay in 2 more peices of angle iron next to the exsisting strap under the OSB.

Also since I have the bottom open I will run my inveter wires in the underbelly.

**** Im good:D
 
C

Chulinw

Guest
tdharley,
Dam you are good. You want to come down to Fl and park in my drive way I have 50amp service and I ask you to help me some and then we can go out to the sugar white sand beach and look at all the girls on college vacation and get the eyes all charge up.
 

Uncle Rog

Well-known member
Tank Fix Pictures

Here's a couple of pictures of the tank shimming fix, the first one shows the tank jacked up, prior to shimming to see how the water draws, the second one shows the blocking on the DS frame, note the angle iron is being adjusted so that the entire tank is fully supported and is not tweeked.......UR
 

Attachments

  • DSC02386.JPG
    DSC02386.JPG
    446.5 KB · Views: 67
  • DSC02387.JPG
    DSC02387.JPG
    484.5 KB · Views: 70

tdharley

Well-known member
Got home a little early from work today so I did some water tank work.

I installed a manual drain valve, pressure releif valve & plugged 2 out of the remaining 4 vents (there were 5 in total). While I was under there I replaced all the feedlines with 1/2" PEX tubing and installed a siphon system. I got the idea for the siphon system from another thread about carrying a small amount of water and using the winterizing suction line for a feed.

Tommorow I am going to repipe the 2 remaining outlet with PEX tubing and run them back to the fill for a vent.

Also after taking a close look at my tank I realized it is installed at a pitch toward the outlet. I am just going to reinforce the angle iron with some thicker stock.

It also seems like my tank is installed differently then yours Rog. My tank is supported on the bottom edges with angle iron & then strapped together. I also do not have any room to shim it up due to a support beam above the top of the tank.

The pictures are here if you want to see them:

http://community.webshots.com/album/558170964jsfDrD
 

Uncle Rog

Well-known member
Very clean install tdh, in the northern climes that drain will be real handy for winterizing or just keeping the tank clean, at some point, when I have to open her up myself, I will add the same, I am saving your pictures for reference. How does the siphon valve work, what lines did you connect? Once again nice clean work....UR
 

tdharley

Well-known member
Hey Rog

I subscribe to KISS- Keep It Simple Stupid..........

When the valve is open and the brass cap is on the pump is acessing the water tank. Conversly, when the valve is off and cap is off (a hose hooked up to antifreeze or water) it accesses through there.
 

jpmorgan37

Well-known member
tdharley;
I really like the new Avatar. Super job on the redo and thanks for posting the pictures. You add a lot to the forum with your updates.
John
 

Uncle Rog

Well-known member
tdh, I see now, my valves are situated a little different but the alteration is do-able, good job.
The Horn is home from the warranty trio....thimk I am going to be real happy this time! After I run a full systems check I will post a complete report.............UR
 
Last edited:

tdharley

Well-known member
Well its snowing here in New York so I went out for some more supplies for the mods.

I was at West Marine to purchase some #2 battery cable and found that I needed a mortgage for 20 feet....$120.00....Whew

So anyway low and behold theres a rectangle water holding tank on the shelf. Guess how many vents......... 1.

(1)1/2" vent, (1) 1/2" feed and one (1) 1-1/4" fills. So I ask the guy about our 5 vent system and the whole pressure story, he said he did not honestly know why there are 5. He then says (probably because there was no in the store but me & I just dropped $425.00)that he would call the manufactuer. The rep. of course did not want to commit to anything but said their tanks do not need that many vents.


Well if the weekend is not a washout I am gonna try to finish underneath & wire the Inverter. Anybody want to come over & help?????????? Beers on me.
 

Uncle Rog

Well-known member
tdh, heck, if it wasn't snow'n in New York, and 80 here, and if it wasn't 3500 miles away and if my BH was still in the shop and if my wife wasn't free, or at least reasonable,for the weekend, I'd race right over there for free beers and a lesson in inverter installation. With my help you would be the first one on your block to do a $400 job for $2600 in extra materials. Good luck with the weather.....UR
 

tdharley

Well-known member
Your just jeaolus because I get to use my big honkin shiny red snowblower.....LOL

You have to use all that suntanoil that clogs your pores and wear sunglasses that probably make you look like a gangster.
 
C

Chulinw

Guest
tdh like that bike you are on. Can I use it for a nice summer weekend with one of the hot chicks you got in the other picture. HE! You got man....
 

Uncle Rog

Well-known member
Warranty / Repair...Full Report

Howdy folks, the Horn is home and I am pretty darn pleased. Well I started this thread so here is what happened. The shop only took 10 days to get most things addressed. I will address my biggest concerns.
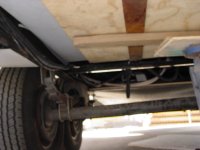
1) the water tank is shimmed up on the DS about 1" and two of the vents on the OD side were plugged and the two vents on the the top were combined and redirected to make access easier by the gravity drain. I ran two tests, one with a garden hose meter, the other with a five gallon pail, hold 5.5 gals. I now can drain 55-60 gals, that works for me. With the transfer pump I am good.
2)The ripped vinyl is on order, Joe wants to figure a fix before it is replaced so it does'nt happen again.
7)The furnace now works like a charm, a seal was not installed on the rear of the unit properly and a 5" floor penetration for plumbing was right in front of the return. With everything tightened / sealed up, it works great! I am finally just like Chopperbil, warm and toasty!
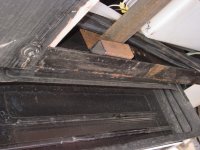
9)The delam on the storage door is waiting for parts also, not horrible but it will only get worse.
Joe at J&L in Fontana is OK with me, he has a contract to repair the front caps on 200 Mandalay diesel pushers but they still had time to get me going, kudos to Heartland for using a good shop! They even fixed mouldings that I did not see and fixed the shower door so that now I need to use the sea lock, and clipped body screws that were rubbing and not noticed.
I want to thank Heartland for taking care of me. When I go back to finish,final adjustments, and when parts have arrived, my only other concern is that the Lippert flex covers for the slide wires will fail. Other than that "I'm a happy camper".
 

Attachments

  • DSC02386.JPG
    DSC02386.JPG
    446.5 KB · Views: 34
  • DSC02387.JPG
    DSC02387.JPG
    484.5 KB · Views: 37
  • DSC02389.JPG
    DSC02389.JPG
    478.7 KB · Views: 34

tdharley

Well-known member
The repairs look good.

Did you get any noticable gurgling or backpressure when filling the tank?

When I was in the sprinkler business we would open a garden hose fully into a 5 gallon bucket and time it to see how long it took to fill and that was our gallon per minute. You can take that number and multiply by the minutes it takes to fill your tank to get the total gallons. Not exact but close.

I expect to put my tanks back together as soon as the snow melts.

My grandkids and I had soup and sandwiches and watched King Kong out there today, they are looking forward to the good weather.
 

Uncle Rog

Well-known member
Thanks tdh, I had some gurgling when I was power draining the tank somewhere around 40 gals, it seemed to be coming from the fresh water fill, no back pressure that I could detect. When the overflow started I shut it off and added 5 more gals and called it good. I have a couple of garden hose meters that i used as well as the 5 gal bucket. I filled the bucket with 5 loads from a one gal jug and then it took 1/2 gal more. When I drained with the bucket it showed higher capacity. I should / will post some pictures tonight. I got a little sunburned yesterday between messing with the BH and smoking up a bunch of ribs. Good luck with the snow...UR
 
Top