WTH: #2 Grey water valve never attached from factory

gslabbert5119

Well-known member
Not sarcasm. Occam's Razor. Looking for the simplest explanation. To me first owner mod or dealer repair is simplest.

Sent from my SM-G950U using Tapatalk

DaneMayer, I would typically agree with you, that the the simplest answer carries the most weight, and for me the simplest answer is that the factory just did not install it.

I do know the original owner personally, so after all of this discussion I figured that out of curiosity I should call him, so I did.

His answer was the following ...

1. He never modified any of the piping for any of the gray water tanks
2. The only plumbing issue he had was that the 3" black water valve kept getting stuck with debris, so he had a black water valve added to the end of the system (which I mentioned previously) for both ease of maintenance and for tank flushing.
3. He permanently left the original black water valve open
4. He never had any issues with gray water tanks leaking or overfilling.
5. He never knew that the valve for the #2 gray water tank was not fitted or he would have had it installed under the original warranty.

This supports my theory that the factory simply missed the installation.

FWIW, I am going to let this go, and install the valve myself, for it is a relatively simple task.

I will however write a less than stellar review on my site re: the issue that I have had with the quality of the Heartland Bighorn, for the construction & manufacture in my opinion is less than stellar, for I have had to fix any number of things, and the list continues as the rig ages.

Frankly these things take more ongoing maintenance and repair than my sailboat did and that is saying something.

BTW: I discovered that my pipe for the icemaker has split and is now leaking, I do however suspect that that is from age. i have turned that off under the sink.
I will open a new thread for this, however if you can provide me some insight as how to replace that pipe I would appreciate it, as it does not appear to be a simple task (thought it may be)

Thank you for your insights, & I value your opinions
Gavin
 

jbeletti

Well-known member
Gavin - when you start your new thread on icemaker line replacement, I'll add some of my experience to it. Stainless Steel Braided line will be your friend forever.

With regard to your gray tank valve never being hooked up, I'm taking this as meaning it was connected and worked but was never glued right. Is this correct?
 

pjones1969

Well-known member
if you can provide me some insight as how to replace that pipe I would appreciate it, as it does not appear to be a simple task (thought it may be)

Take the valve apart by removing the 4 bolts, cut a section out of the pipe, glue ends on pipe separately, slip valve body between and reinstall, you’ll want to use an ABS primer and glue
 

cookie

Administrator
Staff member
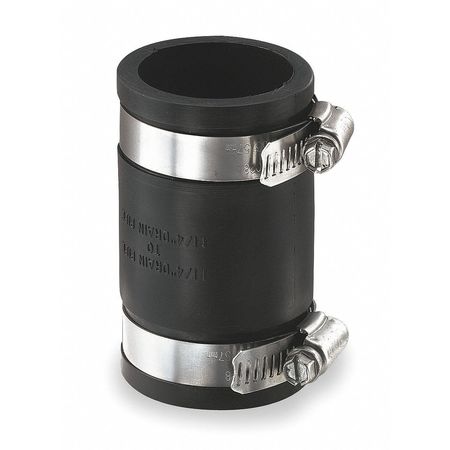
If you need to cut and splice a pipe back together they the easiest thing to use for that is a Fernco coupler.
They are rubber sleaves with hose clamps and can be bought at most big box building centers. They are available for all size plastic pipes.
Z1Browfo5oy.JPG

tAAAAA==


tAAAAA==

tAAAAA==

tAAAAA==


Peace
Dave
 

avvidclif

Well-known member
Not a plumber but I would probably cut the pipe and glue the valve next to the tank. Then run a stub out the other side of the pipe and use a rubber coupling (that Fernco deal) to tie it all together. Then you don't have to depend on moving the tank or pipe to get the spacing right on the valve.
 

mlpeloquin

Well-known member
Gavin - when you start your new thread on icemaker line replacement, I'll add some of my experience to it. Stainless Steel Braided line will be your friend forever.

With regard to your gray tank valve never being hooked up, I'm taking this as meaning it was connected and worked but was never glued right. Is this correct?

Jim if you look at post number 1 and his explanation, It was just laying in the belly on top of the insulation and coroplast. Another thing bothers me as well. He stated in a later post that the previous owner said that there was never a leak from the gray water tank. I wonder if this is an extra valve that was left in the belly at manufacturing and he has the working valve inline near the large drain pipe transition. He needs to pull the handle to see if it works that disconnected valve. or just see if he can pull out the other end.
 

gslabbert5119

Well-known member
He needs to pull the handle to see if it works that disconnected valve. or just see if he can pull out the other end.

mlpeloquin, I pulled the valve to make certain that it was not a spare unit simply lying in the under belly as that was my first thought as well :) , and it is definitely connected to the #2 Tank lever as it opens and closes the valve.

The cable & valve operated smoothly while loose, but as soon as i installed it it would open easily but but close all of the way. I suspect that the cable itself is flexing when it is being closed, and I bet that there is a trick to securing the cable in such a way as to prevent the flex and thus have the valve close all of the way. Nothing is stuck as i can open and close the valve very easily with my fingers.

Suggestions please on securing the cable would be most appreciated ...

Gavin
 

mlpeloquin

Well-known member
Now the first thing I suspect is that the inner seals popped out of place when you installed it. Don't have to ask me why I suspect it. Been there and done that. I use a small amount of petroleum jelly to help hold them in place. You cannot pop the valve in or they will pop out. The symptom of this is as you have described.

To shorten the cable. It can be done by disconnecting it at the valve end. You have to loosen hardware and then the set screws holding it. You may have to disassemble the frame holding the valve and that means removing it from the pipe. Pull it out and measure the length of the exposed center cable with the handle pushed all the way in. Stretch the cable and allow enough slack to form the bend back into the valve. Next measure just how much is needed to be cut. Pull the cable handle out so that you will not cut the center cable, cut the jacket. Push the handle back in and cut the center cable to the length measured previously. Reinstall the cable and jacket into the valve. Cutting the jacket and center cable is easy with a Dremel tool. Don't bend the cable jacket using wire cutters.

By the way, the valve is a standard valve with the handle removed and the round piece screwed on in its place. Then inserted into the outer frame. All RV's as far as I know use the Valterra valves. Purchasing the separate valve instead of the one with the cable assembly will save you a lot of money. To remove the "T" handle hold the shaft with vice grips and unscrew the handle. Do the same to the defective valve and then install the new valve into the frame. It is that simple. Just don't score the shaft because it can ruin the top shaft seal of the valve.
 

jbeletti

Well-known member
Gavin,

Marc has given you solid instruction for shortening the cable should you want to go that route. I've seen it done just as Marc explained. Thanks Marc.

Recently, I helped a friend change out all 3 of his valves. We reused all 3 cables but 2 of them were really long. Rather than shortening them, as we had his tanks exposed by removing the coroplast and insulation, we were able to route the cables in a large radius, then use heavy tie-wraps (think handcuff tie-wraps) to secure the cables to frame crossmembers and structure. This made for near zero cable jacket movement and smooth pull handle / internal wire movement.
 

gslabbert5119

Well-known member
Gavin,

. This made for near zero cable jacket movement and smooth pull handle / internal wire movement.

This what I suspect is going on, as i have shortened the cable by about 2ft, but it still has plenty of curvature in it.

Marc thanks for the great and detailed instructions, it is appreciated

Gavin


Sent from my iPhone using Tapatalk
 

gslabbert5119

Well-known member
This what I suspect is going on, as i have shortened the cable by about 2ft, but it still has plenty of curvature in it.

Marc thanks for the great and detailed instructions, it is appreciated

Gavin


Sent from my iPhone using Tapatalk

Ok, so here is how I solved the issues ... actually multiple ...

Issues as I discovered them

1. # 2 tank valve was not installed (Still believe that it was not install by the factory)
2. The Plywood board that the handles were attached to was rotten and the plies had separated causing flex and the Black water tank would not close either
3. The Black water valve was facing the wrong way and causing the cable to loop
4. All the cables were at least 6ft in length or possibly longer (I did not measure)
5. Non of the cables were secured
6. The 3" 90 degree turn where the 3" & the 1.5" joined had a small crack in it. (The crack was not leaking, however the additional Valterra 3" valve connection at the end of the system was glued on crooked and did not seal properly, so that had to be fixed as well)


1. Cut the black PVC and installed the #2 grey water valve (This was the easiest part of the job)
2. Purchased a 1/2" thick plastic bread board, & cut it to match the lower portion of the control box where the cables & handles were & installed this on the back side of the control panel. I used the valve cable bolts to secure it and then added a piece of channel aluminum with oversize washers to strengthen the back more. This support tightened up everything and I had to recaulk the box as the plastic inside of the control box was now flush with the ply board.
3. Removed the Black water valve and reinstalled it facing the direction of the cable
4. cut all cables to the correct lengths
5. Rerouted all the cables keeping them as close to level with the valve as was possible
6. secured all cables 6 inches in front of the valve and also 6" in front of the handle
7. Cut out the 3" to 1.5" connector and replaced it.


Tested all, and everything now works smoothly and with me being as anal as i am, is probably better than Factory new.

Thanks all for your ideas, suggestions & comments, they helped immensely.

Gavin
 

jbeletti

Well-known member
Wow Gavin - what a job. Sounds like you did all the right things to not only repair but improve your valve and pulls. Thanks for sharing what you found and how you remedied it.
 
Top