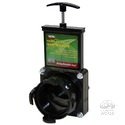
2016 Key West Grey Tank Drain Question

gandmrv

Member
We have a 2016 Key West we've been full timing in since June this year. We love it by the way! It's loaded with washer/dryer, dishwasher etc. Lately the #1 grey tank valve has become sticky and doesn't seem to close all the way. I think this is for the kitchen sink/washer/dishwasher, but I'm not positive. I've started adding Camco valve lubricant a couple months ago which hasn't helped. The sensors are not accurate, show tanks at least 2/3 full all time. We've started opening grey 1 and 2 when my wife does laundry because she ran the drain over 1 day, sensor showed 2/3 full. Anyway, when I opened grey 1 today for my wife to do laundry, nothing comes out, not a drop. It has been 2 or 3 days since it was drained, We've don dishes etc in that time so there should have been something in it. Also when we got to our current park and set up, when I removed cap to hook up sewer hose the pipe had a significant amount of grey water in it, which spilled onto the ground. This is why I think grey 1 valve is not closing completely and it would also explain there being nothing in the tank when I open valve after several days of use.

Now my question, Is there someplace to get a Plumbing Schematic for my specific unit so that I can know for sure what drains go where.

Is it possible that #1 and #2 are connected and #1 just acts as an overflow for #2

Any insights or experiences would be appreciated.

Greg W.
 

danemayer

Well-known member
Hi gandmrv,

Gray #1 is usually for the bathroom shower, sink and washer. Gray #2 is usually the galley, which would probably include the dishwasher. If you have a clear adapter on the sewer outlet (and you should), you can easily verify what's what by running the shower with Gray #1 open and Gray #2 closed because you'll see water draining while the shower is on. Same approach for verifying the washer. Reverse what's open to check on kitchen sink and dishwasher.

There's a good chance the Gray #1 valve can be accessed without too much difficulty. On the off-door-side, at the rear corner of the drop-frame, if you let down the coroplast, you'll probably find the Gray #1 valve within 12-16" of the corner. To remove the screws that hold the coroplast, use an impact wrench - it works much better than a ratchet and is unlikely to break the heads off the screws. Just remove enough screws to get to the valve assembly.

Spray some lubricant (not WD40) on the plunger assembly of the valve and work the handle a few times to see if the stickiness is resolved. That may also fix the leaking. Or you may have something stuck in the valve blade guides, which would require disassembling or replacing the valve to fix. But in any case, it's worth lubricating the plunger.

While you're in there, you'll probably also be able to find the Black tank valve, likely above the Gray #1 tank and slightly forward. Lubricate that plunger as well.

Gray #2's valve is probably located 10-12 inches to the rear of the drop frame. It's harder to get to and might require cutting the coroplast. If you do that, cut 3 sides of a rectangle, leaving the front edge intact. The 3 sides can be taped back into place with Gorilla Tape. The difficulty is knowing where to cut. If you take out a couple of screws holding the coroplast to the frame, you may be able to spot the valve and know exactly where to cut.

Of course all of these locations vary somewhat by model and floor plan. But it's worth grabbing a flashlight and taking a look.
 

gandmrv

Member
Thank for the info and quick reply Dan! I did the water on valve open test and you are correct, #1 is shower/bathroom and probably washer. And I left #1 closed with water on in bathroom and the valve is leaking, there is a trickle of water coming out even with valve closed. (I do have the clear adapter). Thanks also for the tips on the placement of the valves, that may be something I can do myself without having to deal with warranty, I'm hoping it's just needs some lube. The detergent from the waher is probably the culprit on making the valve sticky.

Is it better, in your opinion, to leave valve open while doing laundry, or closed. And what kind of lubricant should I use on the valve if I remove the duroplast to access it. The other 2 valves work smoothly, it's odd to me that the 1 is so sticky so soon. Our rig is only 5 months old. We had been living in our previous unit for 4 years before we started having sticky valve problems..
 

cookie

Administrator
Staff member
Is it better, in your opinion, to leave valve open while doing laundry, or closed.
I suggest leaving that tank valve open.
I don't have enough fingers to count the number of people I know that have overflowed their tanks while doing laundry.

Peace
Dave
 

JohnD

Moved on to the next thing...
What you need is one of these for the drains:

valterratwistoncover-.jpg

$25 at Camping World!

Fits on the end of the sewer drain and gives you extra security . . . and piece of mind knowing you won't get wet feet!
 

danemayer

Well-known member
Is it better, in your opinion, to leave valve open while doing laundry, or closed. And what kind of lubricant should I use on the valve if I remove the duroplast to access it. The other 2 valves work smoothly, it's odd to me that the 1 is so sticky so soon. Our rig is only 5 months old. We had been living in our previous unit for 4 years before we started having sticky valve problems..

For the plunger, I'd suggest a spray lubricant with silicon.

If that doesn't help, check the nuts holding the valve assembly together. If they're too tight, they'll create a bind. They should be snug - maybe finger tight + 1/4 turn. It's possible one valve is over-tightened which would explain why only that valve has a problem.

Some people have tried valve lubricating products like this one from Camco that get poured down the drain. I've also heard of using a little bath oil or water softener. In fact, a lot of people periodically clean their tanks using the GEO method, which includes Calgon Water Softener. The idea off those products is to lube the blade and track it slides in. The GEO Method is really intended to keep the tank clean, but the Calgon may help with the valve assembly as well. I've tried the lubricating products but they didn't help in my case. I do use the GEO method at least annually on Gray 1, 2 and Black tanks, mostly to keep them clean.

If you can run the laundry with the gate valve open, it'll be easier. I generally do that. Create a U-shaped trap in your flexible sewer hose to keep sewer vapors from backing up into the coach. When it gets below freezing, I have my tank heaters ON and have to keep the valves closed. With valves closed you have to pay close attention to how much laundry gets done and how many showers get taken. Don't count on the control panel sensor readings - the only time they're accurate is when you take delivery of a new rig.
 

gandmrv

Member
Thanks guys for the input! We'll be on the road in the morning, TN to central FL with an overnighter south of Atlanta..we'll be in FL about a month, so I'll have time to try to fix the sticky valve. The extra valve at the discharge is a good idea as well.. thanks again

Greg and Mary
 
Top