All the Prep Work is Done, Now I can buy the washer!

Dennyha

Well-known member
We just purchased a new Cyclone 3010, and decided to install a washer/dryer (Splendide 2100XL combo.) I decided to do the install myself, as it didn't seem too complicated, and I tend to think I'll pay more attention to details than a dealer's technician might. I took pictures to document what I did, and hopefully provide some help to the next person to take on this job.

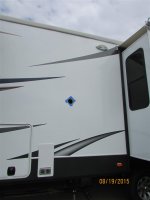
First, the 3010 is preplumbed to put the washer in the front ODS of the fifth-wheel. My unit did not have the infamous sticker showing where to put the exhaust. I called Heartland customer service, and after giving my VIN, they e-mailed me a print showing the proposed location. To me, it was useless. I had a stud finder that worked with metal studs, and I was able to mark the location of the vertical and horizontal framing, and picked my location accordingly. I drew a round circle with the exhaust tube included in the Splendide vent kit, and used my smallest drill bit to drill test holes around the circumference to confirm that I wouldn't hit any framing. If you look closely, you can see my circle and test holes in this picture.


(continued)
 

Dennyha

Well-known member
The center of this circle was in line with the bottom of the side window. I measured the distance from the front of the window to the center of the hole, and then used that measurement outside to estimate where the hole would exit the exterior. The location looked fine, so I proceeded with the hole. I used a 4" hole saw to start cutting from the inside. Then, I switched over to a 1/4" drill bit to drill through the center of the hole to pierce the exterior skin from the inside. I looked outside, and saw the drill exit was about where I had estimated it would. I then used the 4" hole saw, from the exterior, and in reverse, to score the fiberglass skin. Then, I ran the hole saw in forward and pushed through until the core popped out. So far, everything looks good.
 

JohnDar

Prolifically Gabby Member
Since you're putting it in the closet, which is where mine is, make sure to install a drain pan under it. Mine was dealer installed and they didn't put a pan under it. A broken plastic part inside leaked (my fault winterizing it) and I had water dripping off my king pin. I put in a drain pan after repairing the machine.
 

Dennyha

Well-known member
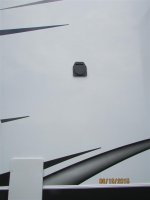
Next, I took the black plastic vent tube and flapper, and applied silicone caulk to the back of the face plate. I applied it all around the circumference of the tube. I gently pushed it into the hole (fit nice and snuggly), and used the self tapping screws to start holes in each of the four corners of the faceplate. After getting the holes started, I backed out the screws and added silicone caulk inside each of the four holes. Then I screwed the four screws in by hand to make sure I didn't over-tighten them, and each one sealed nicely in the caulk. This picture is crooked, not the installation as I used a level to set the position of the face plate before I drilled the holes. Then, after this picture was taken, I cleaned the excess caulking off around the outside of the faceplate. I left the excess caulk on each of the four screws. The only obstacle I hit was related to the aluminum stud just to the rear of the hole. When I tried to drive both of the rearmost screws, they bottomed out when they hit the stud. I had to take a small drill bit to get a hole started in the stud, and then I could finish driving these two screws.
 

Dennyha

Well-known member
To finish the vent, I just had to place the chrome (plastic) cover on the vent. It had two tabs that locked into the top of the black faceplate, and then two more self tapping screws to lock in the bottom. I just caulk in the screw holes here also, but was a little more careful about wiping up the excess. Here is the finished vent from the exterior.
 

Bohemian

Well-known member
Great job. Looks real good.

Are you putting the drip/catch pan under the W/D? with a drain?
 

Dennyha

Well-known member
Since you're putting it in the closet, which is where mine is, make sure to install a drain pan under it. Mine was dealer installed and they didn't put a pan under it. A broken plastic part inside leaked (my fault winterizing it) and I had water dripping off my king pin. I put in a drain pan after repairing the machine.
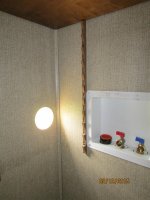
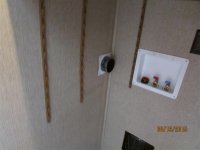
Thanks for the lead in. The other part of this install was to include a pan and drain line in case of a leak. I bought the Splendide drain pan (one side has to be added which looks like it could be a PITA). I used a good quality garden hose for the drain line, and drilled a 7/8" hole in the side of the enclosure where the water hookups are located. From there, I pushed the hose rearward, through the wall, to where I had to removed a little triangular carpeted panel that hid the pex water lines. In the second picture, you can see the removed piece sitting at the bottom of the picture. From there, I removed the four drawers from the dresser, and pushed the garden hose under and along the red and blue pex lines toward the rear drawer area. There,I drilled another 7/8" hole just toward the outside of where the pex lines exited the drawer area. After pushing the hose down through the hole (where it exits in the propane tank enclosure), I silicone caulked around the hose from the interior side, and from the propane enclosure side. After curing for a day or two, I foamed around the hose from the inside.
I cut the end of the garden hose even with the bottom of the camper, and covered the end with fiberglass screening and a hose clamp to keep critters out. I reinstalled all four drawers, and tested it by pouring a few cups of water down the hose, keeping it as close to the floor as possible. It drained nicely. Lastly, I cut two 2'x2' pieces of 3/4" plywood that I'm going to screw into the carpeted floor for a base. This will elevate the washer about 1.5" to help it drain if it does leak, and I'm going to place a nylon strap between the plywood and the carpeted floor, which will then be used to secure the washer to the floor to keep it from moving. The drain pan will be screwed down onto the plywood (all screws silicon caulked) providing a solid base for the washer. Next step is to buy the washer. Camping World, here we come.
 
Last edited:

JohnDar

Prolifically Gabby Member
Almost identical to how I did mine. Putting the front section on the drain pan is not a problem. Just maneuver the machine all the way to the rear of the pan and there's plenty of room to get it on. Helps to remove the lower front panel from the machine, too. It covers the lint trap access and just snaps on. When you run screws to anchor the pan to the floor, use some thin fender washers and a goodly dab of sealant around the hole to imbed it in. I found to move the machine around in the closet, it made it easier to put carpet sliders under the feet. Of course, when you go to slide the machine onto the pan, you'll have to remove them at the edge of it. But with a little leverage, you won't have to move it very far to get the front feet onto the pan before you put the front section of the pan in place. I couldn't figure out how to get the sliding mirror doors off the closet, so it was an exercise in confined space operations. Good thing I'm trained for it (CSR, that is).

If you winterize your rig, be sure to follow the FULL instructions for doing the machine. It requires running the machine while pumping antifreeze into it. I don't think you can just use air pressure to do it. For me that meant running the water pump on battery, drawing antifreeze from a bucket, while running the machine off my portable generator in the storage yard.
 

TravelTiger

Founding Texas-West Chapter Leaders-Retired
Looking good so far! Keep up the great documentation, we could produce an article for the Heartland Highlights newsletter!


Sent from my iPhone using Tapatalk
 

Dennyha

Well-known member
I'm also going to enter a topic under "Audio". I abandoned the Sony surround sound system that came with the camper, and installed a DISH receiver and a Blu-ray player in the same space (right side of glass door). Then I cut an access behind the 50" TV to run two HDMI cables down to the DISH receiver and Blu-ray player. Lastly, I added a Sony soundbar on the counter, just below the TV. Now, I have very good sound that works with everything, and no receivers are sitting out. I took pictures to document the process, and thought it might be helpful to someone else as well. These things are a little less scary if you can look at pictures of what someone else has done, and not regretted. Thanks for the comments.
 

Dennyha

Well-known member
Washer install is all finished. I combined two 2'x2' pieces of 3/4" plywood to build an elevated base to set the washer on. Here is the base with the drip pan. Underneath the plywood, I laid a nylon ratcheting strap to secure the washer during travel. Then, I screwed the plywood base to the carpeted floor. The drip pan was then screwed to the plywood base, with the screws silicone caulked. I then placed the washer into the drip pan and secured the ratchet strap. Here is a side view that shows all this.
lastly, here is the finished product.
 

campcrew

Member
Just planning this same install into a Bighorn 3010re, so your information and pictures are SO appreciated! One question - was there a reason you chose to go with the ratcheting strap vs. the Splendide installation brackets?
 

JohnDar

Prolifically Gabby Member
If you install the drain pan, you won't be able to use the floor brackets. But the machine seems to stay put without them once it's in the pan.


Sent from my iPhone using Tapatalk
 

sbhoward

Member
Nice installation. Ours is a dealer installed but looks just like yours.

How is your dryer performance? Our first try took 3 hours to dry a load. I'm suspecting a vent issue but am curious about how your is working out?

Steve
 

etcmss

Well-known member
I just did the vent install in a BH 3260EL (front pantry washer/dryer location). The location made this easy from the wall studs-there are none. The biggest hurdle was the cutting a hole in the wall of the trailer. After I got through that it was fine.
I have to install the drip pan yet. Probably go on elevated plywood piece to use the strap method to hold. The drain hose will easily go through the front wall and then straight down, get well sealed.
 

Attachments

  • IMG_7037 (Medium).JPG
    IMG_7037 (Medium).JPG
    55 KB · Views: 52
  • IMG_7038 (Medium) (2).jpg
    IMG_7038 (Medium) (2).jpg
    109.1 KB · Views: 51
  • IMG_7042 (Medium).JPG
    IMG_7042 (Medium).JPG
    78.1 KB · Views: 55
  • IMG_7040 (Medium).JPG
    IMG_7040 (Medium).JPG
    41.2 KB · Views: 46

Dennyha

Well-known member
Just planning this same install into a Bighorn 3010re, so your information and pictures are SO appreciated! One question - was there a reason you chose to go with the ratcheting strap vs. the Splendide installation brackets?

As JohnDar noted, I was concerned with trying to attach the brackets inside the envelope of the drip pan. It is already kind of tight. I also wanted to minimize the number of holes drilled through the drip pan. The ratchet strap has worked out well, and is actually pretty handy to hold a power strip in place on top of the washing machine, which we use to power our cell phones at night.

- - - Updated - - -

Nice installation. Ours is a dealer installed but looks just like yours.

How is your dryer performance? Our first try took 3 hours to dry a load. I'm suspecting a vent issue but am curious about how your is working out?

Steve
We've found that it typically takes 2-3 hours to dry, depending on the size of the load and the material. From what I've read elsewhere on this forum, that is pretty typical. The dryer does not work like a home dryer with a lot of heated air. The drying method it uses takes more time, but doesn't put as much heat and humidity into your camper (Heat and humidity is usually the last thing you need in your camper.)
 
Top