And so it begins

Rangles

Member
Thanks Bones , I will try messing with it a little, I wonder if I replace the fuse will it still be covered under the warranty

Replaced the fuse for about $10 , seems to be working fine , if I have the same problem again I may try the 80 amp option but for right now the 50 seems to be doing what it's supposed to .
 

Touchngo

Member
Finally finished my garage tie downs.
I prefer the ATB stuff, aluminum load track, beveled and non beveled.

The factory tie downs are two few and in the wrong places for me

I now have the aluminum track down both sides (not beveled) across the front and back and down the center.

View attachment 20822

The center track is offset because of the golf cart. The cart rides over the tie downs and the rear tire sits on the rear loop.

View attachment 20823

I switched the left side chock from a Bike Pro to a Condor. The Condor allows locking in without using a bolt. Very easy to move out of the way once the bike is out.

View attachment 20824

I also moved the bike over as far as I could to the left. There isn’t much room with an Electric Glide and a golf cart. And for your Harley guys, I am using Wild Ones 575’s, these are a bit wider then factory bars, they stick out past the fairing.


I use the 3 tab tie down rings. Same price as 2 tab. And I only use M&R straps, they are the best.

View attachment 20825

Looking to do this in a 2016 Torque 321 I just bought. With the L track all the way out on the edges, I don't have access underneath to bolt to anything. Middle is no problem accessing underneath. Wondering if your set up is the same and if you just used wood screws on the tracks, if you were able to get access at the edges somehow (mine is enclosed about 8" in on each side underneath). I was planning on using 1" SS wood screws, but just not sure that would be strong enough to hold a harley Ultra and a quad. Thanks in advance!
 

porthole

Retired
On the forward ends I was able to access the underside. On the left through the fuel station door and removing the rear inner filler plate (black plastic piece).

On the right access was above the opening for my steps.

At the rear I removed the beaver tail storage bin. On the earlier Cyclones that storage bin is about 5’ long with two doors.

For all the unaccessable areas, 1.5” screws.

Never had an issue. With a good wheel chock you really are not putting that much of a load on the tie downs. Mostly just keeping the bike upright.
 

NWILSON

Kentucky Chapter Leaders - retired
...... With a good wheel chock you really are not putting that much of a load on the tie downs. Mostly just keeping the bike upright.
I'm still using a Bike Pro Chock and have done much better at keeping the bike from moving around by placing a 6X6 block under the frame. This way I'm cinching against the block rather than trying to compress the shocks completely.
 

porthole

Retired
I'm still using a Bike Pro Chock and have done much better at keeping the bike from moving around by placing a 6X6 block under the frame. This way I'm cinching against the block rather than trying to compress the shocks completely.


I have two bike pros hanging in my garage.
Stopped using them, and I like the Condor's better. And the Condor's do not have to be bolted down. I keep one in the trailer and one in my garage, keep the bike parked in it all the time at home.

I never liked the idea of puling the bike down onto a block of wood. I know several people that do it in motorcycle trailers, but I also think smaller motorcycle trailers ride a bit different then our big 5th wheels. Even so, I also use my Condor's in the bike trailer as well now.

My preference is to let the bike ride on it's suspension while in the trailer. I pull the bike down maybe 1" on the springs. I figure if the bike can move a bit, it is less stress on the bike, straps, tie downs and the trailer.

I have from a first hand account (Deb) that the back of the trailer bounces around way more then we think.
 
Last edited:

Touchngo

Member
On the forward ends I was able to access the underside. On the left through the fuel station door and removing the rear inner filler plate (black plastic piece).

On the right access was above the opening for my steps.

At the rear I removed the beaver tail storage bin. On the earlier Cyclones that storage bin is about 5’ long with two doors.

For all the unaccessable areas, 1.5” screws.

Never had an issue. With a good wheel chock you really are not putting that much of a load on the tie downs. Mostly just keeping the bike upright.

I do have a wheel chock. Not one that bolts down, but just a free-standing one. It hold my Harley Ultra upright, and being portable, I just store it under the trailer when not in use. I ordered 1" SS wood screws because I wasn't sure if the screws should go all the way through the wood or not. I can get 1.5" screws if that is recommended. Not sure if the garage floor in a Torque is the same thickness as a Cyclone or not.
 

porthole

Retired
Re: And so it ........ ends

Today I took the last of one of many many changes off the Cyclone.

The Cyclone has served us well for 9+ seasons, but it was time for a change and it was traded in this week.

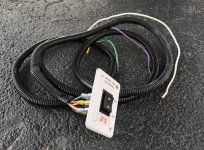
The last item to come off I really didn’t consider until using Lippert’s new LCD touch screen for the LevelUp.
I like the option of a front jack only switch.

And after using the LevelUp touch screen, I prefer the original control. Quicker to get the various functions, and no extra steps required.


So the independent switch and harness came off and I handed in the keys.

Front_jack_control_switch.jpg


It's been real
And it's been nice

And - it has been real nice ;)
 
Last edited:

jbeletti

Well-known member
We'll miss your mods here Duane. Wishing you all the best with your new coach and hope to get a tour of it at some NE chapter rally down the road. No need to be a stranger here though.
 

TravelTiger

Founding Texas-West Chapter Leaders-Retired
Did I miss a post about the new rig? What is it?


Sent from my iPhone using Tapatalk
 

OEFVET

Well-known member
Re: And so it ........ ends

Today I took the last of one of many many changes off the Cyclone.

The Cyclone has served us well for 9 seasons, but it was time for a change and it was traded in this week.

The last item to come off I really didn’t consider until using Lippert’s new LCD touch screen for the LevelUp.
I like the option of a front jack only switch.

And after using the LevelUp touch screen, I prefer the original control. Quicker to get the various functions, and no extra steps required.


So the independent switch and harness came off and I handed in the keys.

View attachment 57967


It's been real
And it's been nice

And - it has been real nice ;)

Duane,

Hope you have the same wonderful memories with your new rig! The Cyclone served you well!

See you down the road.
 

jayc

Legendary Member
Duane, it was nice to have been in the site next to you and Deb in Goshen. We'll miss you. Enjoy your new rig.
 

clubmgr

Heartland Owners Club Manager
Staff member
Re: And so it ........ ends

Duane and Debbie:

Enjoy your new coach and have fun with it.

Safe Travels and Wonderful Adventures!
 

porthole

Retired
At Goshen 2017 I finally broke down and picked up a water softener from one of the vendors.
https://heartlandowners.org/showthread.php/11365-And-so-it-begins?p=552397&viewfull=1#post552397

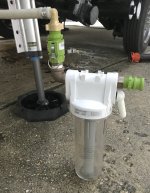
To recharge this softener you remove the sediment filter from the sump, insert a thin wall PVC pipe in place of the filter and fill it with the salt of your choice. The PVC pipe has a small hole drilled in the bottom so that water travels through the salt and then enters the softener tank, recharging the system. You run water through the filter with a stream at a flow that is similar to a pencil diameter on the out flow side.

This works, although you can't see the salt being dissolved so you have to start checking the outflow for drinkable water.

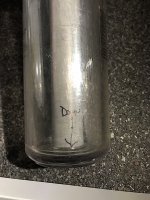
I had an extra filter assembly in the bin with a clear housing.
Electrical 1" PVC was the right size to make the dip pipe. I can now recharge my softener and see when the salt is gone.


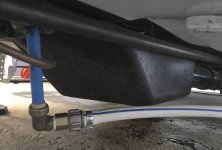
As a bonus (for me) I can use this same filter and put my H2O tank disinfectant in the filter housing and then fill the tank through this filter using a Sharkbite fitting attached to the fresh water tank drain pipe.
Doing it his way will bypass the filters in the basement, negating the requirement to remove the charcoal filters.
 

Attachments

  • H2O_inject_1.jpg
    H2O_inject_1.jpg
    283.6 KB · Views: 107
  • H2O_inject_b.jpg
    H2O_inject_b.jpg
    257.4 KB · Views: 100
  • H2O_inject_3.jpg
    H2O_inject_3.jpg
    72.7 KB · Views: 94

jbeletti

Well-known member
Nice. When I ran a softener, I too would use an extra, external filter housing to put the salt in and push water through it and into the softener. But I never used the PVC with the hole in it and my salt dissolved well. Does the PVC help in this manner?

And I gotta be honest, the thing I like best about your post... seeing the tiniest cam-lock fitting ever. Love it!
 

porthole

Retired
Nice. When I ran a softener, I too would use an extra, external filter housing to put the salt in and push water through it and into the softener. But I never used the PVC with the hole in it and my salt dissolved well. Does the PVC help in this manner?

And I gotta be honest, the thing I like best about your post... seeing the tiniest cam-lock fitting ever. Love it!


Cam-locks - you can thank Lyle Mercer for that tidbit.
They are on line, but I got mine at Tractor Supply. They are not with the hose and stuff, they are in the Agricultural section.

Heavy duty, and they do not leak.

They are also available with male and female hose threads on each piece. So don't just blindly grab a half dozen thinking you have what you need. And yes, so you don't have to ask, I did that :cool:

PVC pipe.

The water filter housing - water from the input goes in, 90's straight down in to the sump area.
The center of the housing is open and the water once the sump is filled will push right out through the top with little circulation.
The pipe forces the water to come in and at least travel to the bottom of the sump before going through that hole at the bottom and then back up.

I have run the salt without the pipe, it still dissolved but took a long time. The pipe makes for a good solution mixing.
 

travelin2

Pennsylvania Chapter Leaders-retired
And I gotta be honest, the thing I like best about your post... seeing the tiniest cam-lock fitting ever. Love it!

Cam-locks - you can thank Lyle Mercer for that tidbit.
They are on line, but I got mine at Tractor Supply. They are not with the hose and stuff, they are in the Agricultural section.

Heavy duty, and they do not leak.

They are also available with male and female hose threads on each piece. So don't just blindly grab a half dozen thinking you have what you need. And yes, so you don't have to ask, I did that

g.

My whole water system hooks together with those cam locks, from the male hose end through filter, softener, pressure gauge, to the UDC.


Sent from my iPhone using Tapatalk
 

jbeletti

Well-known member
PVC pipe.

The water filter housing - water from the input goes in, 90's straight down in to the sump area.
The center of the housing is open and the water once the sump is filled will push right out through the top with little circulation.
The pipe forces the water to come in and at least travel to the bottom of the sump before going through that hole at the bottom and then back up.

I have run the salt without the pipe, it still dissolved but took a long time. The pipe makes for a good solution mixing.

Better mix - got it. Thanks for sharing.

When I used to do mine, I often would do so with the salt canister upside down.
 
Top